There's something incredibly refreshing about indulging in a chilled sorbet on a hot summer day, isn't there? Picture a backyard barbecue, where the smell of grilled chicken dances in the air, kids are running around, and laughter fills the atmosphere.
At the end of that warm day, there's always room for dessert. That’s when a sorbet, bursting with vibrant fruit flavors and icy goodness, comes to the rescue. Easy to make and even easier to enjoy, it’s the perfect summer treat that I just can’t get enough of.
Let’s talk about blender sorbet. This delightful dessert brings fruit to life in a frozen masterpiece that’s simple to whip up. With just a few ingredients, your blender can work magic, transforming fresh or frozen fruits into smooth, creamy sorbet that’s a delight for any occasion.
Not only is sorbet a fantastic way to cool down, but it’s also a lighter option compared to heavier ice creams. It’s refreshing, sweet, and oh-so-satisfying without the guilt.
The flavor profile of blender sorbet really depends on the fruit you choose. For example, raspberry sorbet offers a tangy punch complemented by sweetness, while pineapple sorbet delivers a tropical burst that's pure sunshine in every bite. Peach sorbet brings in sweet and juicy notes, paired with a hint of tartness from lemon juice. This versatility allows you to curate your sorbet to match your mood. You’ll find a delightful play between sweet, tart, and refreshing sensations that create a wonderful experience.
What Makes This Recipe Different From Other Blender Sorbet Recipes?
What sets my blender sorbet recipe apart is its adaptability and the use of a homemade sugar syrup that you can tailor to your preferred sweetness level. Some recipes use store-bought ingredients or artificial flavors, but I focus on real fruit and natural sweeteners. Plus, my approach lets you swap out fruits and experiment with combinations, so your sorbet can vary with the season or your whims. And let’s not forget the addition of a few spices or herbs for an unexpected flavor twist!
The Ingredients You'll Need
Here’s what you're going to need to create these delicious sorbets:
Raspberry Sorbet
- 8 oz fresh or frozen raspberries
- 3 to 4 tbsp agave nectar or maple syrup for a refined sugar-free option
- A splash of lemon juice (optional)
Pineapple Sorbet
- 8 oz pineapple, cored and cut into ½ inch cubes (fresh or frozen)
- 3 to 4 tbsp maple syrup or agave nectar
- A squeeze of orange juice (optional)
Peach Sorbet
- 8 oz fresh or frozen peaches, peeled and diced into ½ inch cubes
- 3 to 4 tbsp agave nectar or maple syrup
- A splash of lemon juice
Honeydew Melon Sorbet
- 8 oz honeydew melon flesh, cubed
- 3 to 4 tbsp sugar syrup or maple syrup
- A squeeze of lemon juice
Sugar Syrup (For Any Sorbet)
- 1 cup granulated sugar
- 2 cups water
Optional Flavor Enhancers
- A pinch of cinnamon or a dash of vanilla extract can add a lovely depth to your sorbet.
Ingredients From : theflavorbender.com
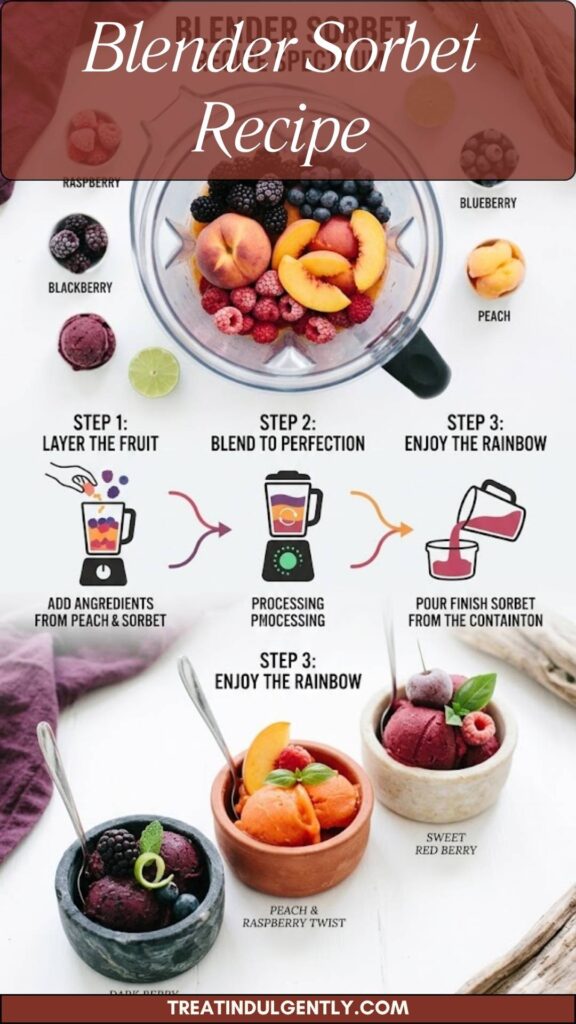
How to Make Blender Sorbet Recipe?
Making blender sorbet is straightforward, but there’s a little finesse involved. The entire process can be broken down into simple steps that guide you from start to finish. Here we go!
Step-by-Step Directions
Step 1: Prepare the Sugar Syrup
Start by adding the sugar to a saucepan along with the water. Heat the mixture over medium heat. Stir occasionally until the sugar completely dissolves. Let it simmer for about 15-20 minutes until it thickens slightly. Remove it from the heat and transfer it into a glass jar. For the best results, let it cool, then chill it in the refrigerator until you’re ready to use it.
Step 2: Prepare the Fruits
While the syrup is cooling, get your fruits ready. For raspberries, you can use them whole or thaw frozen ones. For the other fruits, take the time to peel and chop them into ½ inch cubes. Line a baking tray with parchment paper and spread the fruit cubes in a single layer, allowing them to freeze in a uniform way. If you use fresh fruit, make sure to freeze it completely, which usually takes about a couple of hours.
Step 3: Blend the Sorbet
Once the fruit has frozen, weigh out 8 oz of your choice of frozen fruit and place it into your blender. Begin pulsing the fruit to break it down into small pieces. After a few moments, start adding the sugar syrup, a tablespoon at a time. Pulse until everything combines into a smooth sorbet-like consistency. Don’t forget to mix in that splash of lemon juice or orange juice for added brightness.
Step 4: Serve or Store
Once you have a smooth blend, it’s time to serve! You can enjoy your homemade sorbet immediately, scooping it into bowls with a sprinkle of zest or some mint leaves on top. Alternatively, if you’d rather enjoy it later, transfer the sorbet into an airtight container and store it in the freezer. Let it set for at least an hour prior to serving for a firmer texture.
Tips On Making Blender Sorbet Recipe
- Use Frozen Fruit: This helps create a smooth texture without needing extra ice.
- Quality Ingredients: The quality of fruit and juices will impact the flavor significantly. Opt for ripe, in-season fruits when possible.
- Adjust Sweetness to Taste: Start with less sweetener, as you can always add more during blending for the perfect balance.
- Experiment: Try different fruit combinations or flavorings like mint or ginger for an extra twist.
- Garnish for Flair: Add fresh herbs, fruits, or edible flowers to elevate your sorbet presentation!
Storage Tips
To keep your sorbet fresh, store it in an airtight container in the freezer. Since it can harden as it freezes, allow it to sit at room temperature for a few minutes before serving for easier scooping. Enjoy your sorbet within a month for the best taste and texture!
Serving Suggestions
- Serve with Fresh Berries: A bowl of assorted berries pairs well with any fruit sorbet.
- Top with Crunch: A sprinkle of granola or crushed nuts adds texture and an added dimension of flavor.
- Garnish with Mint: Fresh mint leaves not only look good but enhance the fragrance of the sorbet.
- Scoop into Waffle Cones: Make it fun and serve your sorbet in crispy, flavorful waffle cones.
- Blend into Smoothies: Use leftover sorbet as a base for smoothies; it makes a delicious, creamy start to your morning!
If Some of the Items Are Not Available in Your Kitchen, What Are Some Substitute Options for the Ingredients?
- Raspberries: Swap with blackberries or strawberries for a similar texture and flavor.
- Pineapple: Use mango or kiwi for a tropical twist.
- Peaches: Nectarines can be an excellent substitution for peaches.
- Honeydew: Cantaloupe or watermelon can provide similar texture and sweetness.
- Agave Nectar: Honey or maple syrup will work in its place but adjust for sweetness.
FAQs
1. Can I use frozen fruits?
Absolutely! Frozen fruits are not only convenient but can also yield a smoother consistency in your sorbet.
2. How long will the sorbet last in the freezer?
Generally, it can last up to a month; however, for the best flavor and texture, try to consume it within two weeks.
3. Is this sorbet dairy-free?
Yes, this sorbet is naturally dairy-free, making it suitable for a variety of dietary preferences.
4. Can I add alcohol to the sorbet?
Yes, adding a splash of fruity liqueur can enhance the flavor and create a softer texture, but use it sparingly.
5. What’s the best way to defrost sorbet before serving?
Let it sit at room temperature for 5-10 minutes to soften before scooping it into bowls.
Conclusion
Blender sorbet is not only easy and delicious but also an incredibly refreshing way to enjoy fruits. With the flexibility to use whatever fruits are in season or simply to your liking, it can adapt to your culinary cravings.
Whether serving it at a summer barbecue or enjoying a quiet evening at home, this sorbet is bound to bring smiles and satisfaction. I encourage you to try it out and share your own flavor combinations! Happy blending!
Let’s talk about blender sorbet. This delightful dessert brings fruit to life in a frozen masterpiece that’s simple to whip up. With just a few ingredients, your blender can work magic, transforming fresh or frozen fruits into smooth, creamy sorbet that’s a delight for any occasion.
Ingredients
Here’s what you're going to need to create these delicious sorbets:
Raspberry Sorbet
8 - oz fresh or frozen raspberries
33 - to 4 tbsp agave nectar or maple syrup for a refined sugar-free option
- A splash of lemon juice (optional)
Pineapple Sorbet
8 - oz pineapple, cored and cut into ½ inch cubes (fresh or frozen)
33 - to 4 tbsp maple syrup or agave nectar
- A squeeze of orange juice (optional)
Peach Sorbet
8 - oz fresh or frozen peaches, peeled and diced into ½ inch cubes
33 - to 4 tbsp agave nectar or maple syrup
- A splash of lemon juice
Honeydew Melon Sorbet
8 - oz honeydew melon flesh, cubed
33 - to 4 tbsp sugar syrup or maple syrup
- A squeeze of lemon juice
Sugar Syrup (For Any Sorbet)
1 - cup granulated sugar
2 - cups water
Optional Flavor Enhancers
- A pinch of cinnamon or a dash of vanilla extract can add a lovely depth to your sorbet.
Instructions
Step 1: Prepare the Sugar Syrup
1
Start by adding the sugar to a saucepan along with the water. Heat the mixture over medium heat. Stir occasionally until the sugar completely dissolves. Let it simmer for about 15-20 minutes until it thickens slightly. Remove it from the heat and transfer it into a glass jar. For the best results, let it cool, then chill it in the refrigerator until you’re ready to use it.
Step 2: Prepare the Fruits
2
While the syrup is cooling, get your fruits ready. For raspberries, you can use them whole or thaw frozen ones. For the other fruits, take the time to peel and chop them into ½ inch cubes. Line a baking tray with parchment paper and spread the fruit cubes in a single layer, allowing them to freeze in a uniform way. If you use fresh fruit, make sure to freeze it completely, which usually takes about a couple of hours.
Step 3: Blend the Sorbet
3
Once the fruit has frozen, weigh out 8 oz of your choice of frozen fruit and place it into your blender. Begin pulsing the fruit to break it down into small pieces. After a few moments, start adding the sugar syrup, a tablespoon at a time. Pulse until everything combines into a smooth sorbet-like consistency. Don’t forget to mix in that splash of lemon juice or orange juice for added brightness.
Step 4: Serve or Store
4
Once you have a smooth blend, it’s time to serve! You can enjoy your homemade sorbet immediately, scooping it into bowls with a sprinkle of zest or some mint leaves on top. Alternatively, if you’d rather enjoy it later, transfer the sorbet into an airtight container and store it in the freezer. Let it set for at least an hour prior to serving for a firmer texture.
Nutrition Facts
Servings 4
Amount Per Serving
Calories150kcal
% Daily Value *
Sodium11mg1%
Potassium396mg12%
Total Carbohydrate37g13%
Dietary Fiber5g20%
Sugars30g
Protein1g2%
* Percent Daily Values are based on a 2,000 calorie diet. Your daily value may be higher or lower depending on your calorie needs.
Note
- Use Frozen Fruit: This helps create a smooth texture without needing extra ice.
- Quality Ingredients: The quality of fruit and juices will impact the flavor significantly. Opt for ripe, in-season fruits when possible.
- Adjust Sweetness to Taste: Start with less sweetener, as you can always add more during blending for the perfect balance.
- Experiment: Try different fruit combinations or flavorings like mint or ginger for an extra twist.
- Garnish for Flair: Add fresh herbs, fruits, or edible flowers to elevate your sorbet presentation!
Keywords:
Blender Sorbet Recipe
Rachel Ortiz
Registered dietitian, food enthusiast and food blogger
I'm Rachel Ortiz, a registered dietitian and the creator of Treat Indulgently. I combine my love for nutrition and indulgent, satisfying recipes to show you how to enjoy rich, flavorful meals while still making mindful choices. Join me as we celebrate the joy of cooking and treating yourself!