Ingredients
Method
Step 1: Prepare Your Aromatics and Protein
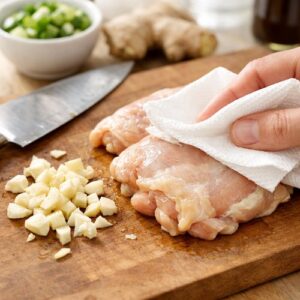
- Begin by patting your chicken thighs completely dry with paper towels—this allows proper browning rather than steaming. Roughly chop your garlic cloves (no need for precision here), slice your ginger into coins, and halve your fresh chilies lengthwise, leaving the seeds intact for now. These aromatics will become the flavor foundation of everything, so handle them with intention. Don't rush this preparatory work; it sets the stage for everything that follows.
Step 2: Sear Your Chicken for Depth
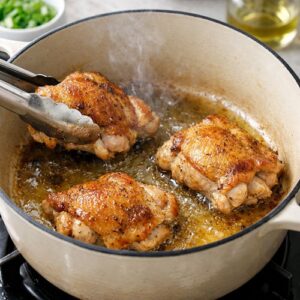
- Heat your heaviest pot over medium-high heat until it's genuinely hot—you want a shimmer across the entire surface. Add just enough neutral oil (I use grapeseed) to coat the bottom lightly. Place your chicken thighs skin-side down and let them sit undisturbed for 4-5 minutes. You're building fond—those beautiful browned bits that will carry tremendous flavor into your broth. Resist the urge to move them. Once they're golden, flip and sear the other side for 2-3 minutes. Remove to a clean plate.
Step 3: Build Your Aromatics Base
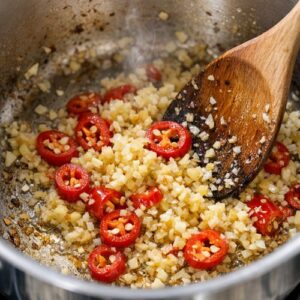
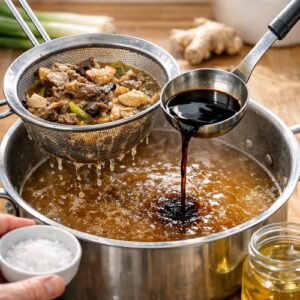
- In the same pot (don't clean it!), add your prepared garlic, ginger, and chilies. Stir constantly for 60-90 seconds until fragrant—you'll smell the kitchen transform. This is where the magic begins. Add your soy sauces and mirin here, stirring for another minute to incorporate everything. You're creating a caramelized paste that will be the soul of your broth. This step takes less than three minutes but contributes immeasurably.
Step 4: Return Chicken and Add Stock
- Place your seared chicken thighs back into the pot along with your high-quality stock. Add the brown sugar here as well. Bring everything to a gentle boil, then immediately reduce to a low simmer. You want small, lazy bubbles breaking the surface, not a rolling boil that will cloud your broth and toughen your chicken. This is a 90-minute commitment from this point forward—let it be gentle and patient.

Step 5: Simmer While Preparing Secondary Elements
- While your broth works its magic, prepare your soft-boiled eggs. Bring a separate pot of salted water to boil, gently lower room-temperature eggs into it, and cook for exactly 6.5 minutes for a jammy, set-white yolk. Immediately transfer to an ice bath. Once cooled, peel carefully (older eggs peel more easily) and place in a container with equal parts soy sauce and mirin—these will marinate and develop flavor throughout the week. During this same window, prepare your fresh shiitake mushrooms by removing stems and slicing caps into thirds. If using dried shiitake, rehydrate them in warm water for 20 minutes, then strain that soaking liquid into your broth for additional umami. Keep your fresh scallions, yu choy, and radishes separate and refrigerated.

Step 6: Final Broth Refinement and Straining
- After 90 minutes of simmering, taste your broth. Adjust seasoning with additional soy sauce, mirin, or salt as needed—remember, this will concentrate slightly as it cools and stores. Carefully remove the chicken thighs and place them on a cutting board to cool slightly. Using a fine-mesh strainer lined with cheesecloth, strain your broth into another pot, discarding the solids (the garlic, ginger, and chilies have given everything they have to offer). Once your chicken has cooled enough to handle, shred it into bite-sized pieces, removing any bones that might have separated. Keep this separate from your broth for maximum flexibility during the week.
Step 7: Add Fresh Mushrooms to Broth and Cool
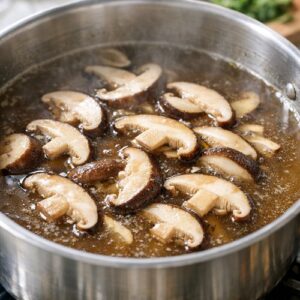
- Return your strained broth to the pot and add your fresh sliced shiitake mushrooms. Bring to a gentle simmer for 8-10 minutes until the mushrooms have softened and released their earthy flavors into the liquid. This is where the broth deepens even further. Remove from heat and let everything cool to room temperature—this takes about an hour. Never place hot broth directly into your refrigerator; let it cool first.
Step 8: Cook Your Noodles Ahead (Optional)
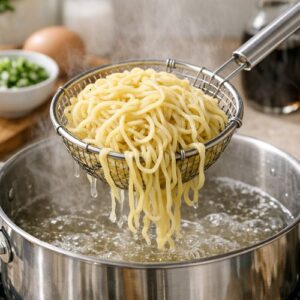
- You can cook your ramen noodles now and store them separately, or wait until serving day to cook them fresh. I prefer cooking them fresh for optimal texture, but if you're looking to minimize Sunday kitchen time, cook them now, toss with a small amount of sesame oil to prevent sticking, and store in sealed containers. They'll reheat beautifully with a quick warm-water rinse.
Notes
- Cooking the broth at too high a temperature: A rolling boil will cloud your broth, toughen your chicken, and extract flavors unevenly. Keep that heat low and patient. You want small bubbles, almost a whisper of cooking, not an aggressive boil. This is the most common mistake I see, and it's entirely avoidable with intention.
- Adding fresh toppings too far in advance: Scallions, radishes, bean sprouts, and garlic oil should be added mere minutes before consumption. Adding them hours ahead means they'll absorb broth, lose their textural integrity, and become soft rather than crisp. Keep these completely separate until the moment your bowl reaches your table.
- Neglecting to cool your broth before refrigeration: Placing hot broth directly into your refrigerator raises the internal temperature of your fridge, creating an environment where bacteria can proliferate. Cool everything to room temperature on the counter—this takes an hour—before transferring to cold storage.
- Sourcing low-quality chicken: This is where the biggest difference lives. Pale, thin-skinned, conventional chicken thighs will yield a thin, disappointing broth no matter how perfectly you execute every other step. Spend your resources here. Find a butcher. Develop a relationship. Ask about heritage breeds. Your body will thank you.