Ah, gummy candy. A staple of childhood joy, unbridled sweetness, and, let’s face it, a guilty pleasure we all occasionally indulge in.
But what if I told you that making these chewy delights at home is not just possible, but incredibly rewarding?
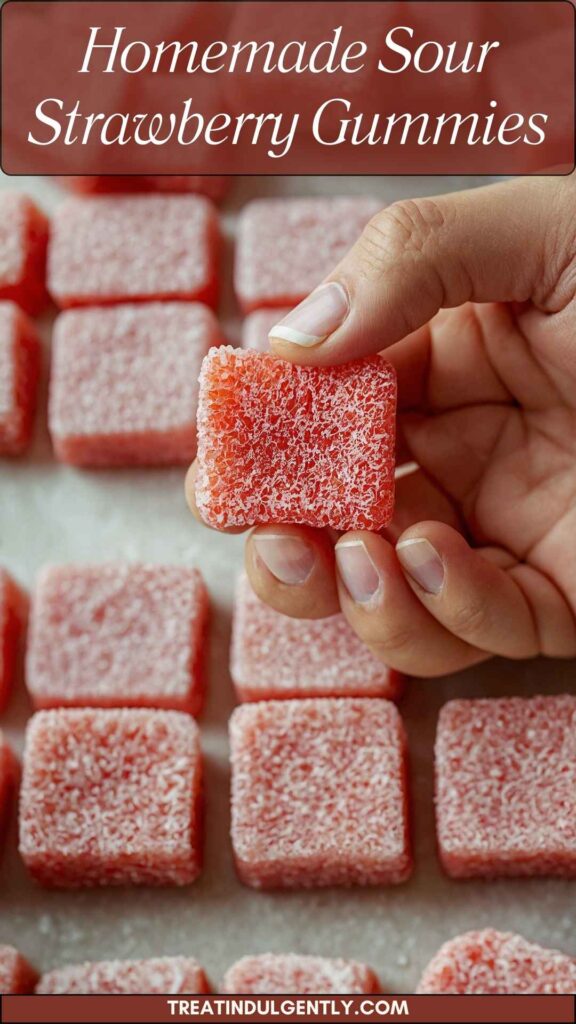
Today, I want to take you on a journey into the world of Homemade Sour Strawberry Gummies. Trust me, once you try these, you won’t want to go back to store-bought options!

What Is Homemade Sour Strawberry Gummies?
Simply put, Homemade Sour Strawberry Gummies are chewy, fruit-flavored candies infused with a delightful sour twist. Unlike their commercial counterparts, these goodies are made from wholesome ingredients, ensuring that every bite bursts with real strawberry flavor.
They’re often loved by both kids and adults alike. Making gummies at home is like bringing a piece of the creative candy shop into your kitchen.
Why You’ll Love This Homemade Sour Strawberry Gummies
Let’s chat about why you’ll absolutely adore making your own sour gummies. First, there’s the flavor. Nothing beats the fresh taste of strawberries blended into a puree and transformed into candies.
Plus, you get to control what’s in your food. That’s right—no artificial colors or preservatives here!
And then there’s the fun part: creativity. You can adjust the sourness or sweetness to your tastes, experiment with other flavors, and even involve the kiddos in the process.
The grins on their faces when they realize they can eat something they’ve made? Priceless. Now, let’s dive into the magic ingredients you’ll need.
The Ingredients
Before you start, gather these essentials:
1⅔ cups fine granulated sugar
12 ounces fresh or thawed frozen strawberries, blended into a puree
1 package regular fruit pectin powder
2 tablespoons light corn syrup
¼ teaspoon powdered lemon zest (substitute for powdered citric acid), dissolved in 1 tablespoon warm water
½ cup filtered spring water
1 teaspoon finely grated fresh ginger
½ teaspoon vanilla extract
For coating:
½ teaspoon powdered lemon zest
¼ cup fine granulated sugar
Each of these ingredients plays a crucial role in achieving that perfect gummy texture and flavor. Now let’s move on to the fun part—the steps to make them!

Step by Step Instructions
Step 1: Preparing the Strawberry Puree
First things first, let’s get that strawberry puree ready. If you’re using fresh strawberries, wash them thoroughly and remove the stems.
Thaw your frozen strawberries if you’re going that route. Place the strawberries in a blender and puree until smooth. Measure 12 ounces. Feel free to snack on a few strawberries during this process. You know you want to!
Step 2: Mixing the Ingredients
In a medium saucepan, combine 1⅔ cups of sugar and ½ cup of filtered spring water. Stir in the strawberry puree and bring the mixture to a boil over medium heat. Keep stirring—nobody likes burnt sugar!
Once boiling, reduce the heat to low and sprinkle in the pectin. Continue stirring until the pectin is completely dissolved, ensuring an even consistency.
Step 3: Adding Flavor and Sourness
Now for the fun part! Add the light corn syrup, the dissolved lemon zest (or citric acid), finely grated ginger, and vanilla extract.
The ginger adds a subtle warmth that beautifully complements the strawberries. Mix everything well.
Step 4: Pouring Into Molds
Next, prepare your gummy molds. If you’re feeling fancy, silicone molds give you the best shapes (and are easy to pop out!).
Pour your mixture into the molds, filling them to the brim. If you accidentally overfill, no worries—the gummies will still be delightful!
Step 5: Setting the Gummies
Let your filled molds cool at room temperature for about 30 minutes. After they’ve cooled, transfer them to the refrigerator and chill for at least two hours, or until they are firmly set.
Patience is a virtue here—the right setting time means chewier gummies!
Step 6: Coating for Extra Flavor
Once the gummies are set, pop them out of the molds. In a small bowl, mix together ¼ cup of granulated sugar with ½ teaspoon of powdered lemon zest.
Toss your gummies in this mixture to coat them. This tiny step adds an extra zing that will have your taste buds dancing!
Tips & Tricks
To make sure your gummy-making experience is as smooth as possible, here are a few handy tips:
- Mold Type Matters: Silicone molds are your best bet for easy removal. Avoid metal molds if you can.
- Measurement Accuracy: Ensure your ingredient measurements are precise. A grain of sugar can change gummy density!
- Flavor Experiments: Don’t hesitate to add other fruit purees (like raspberry or mango!) for a fun twist.
- For Enhanced Sourness: Adjust the amount of lemon zest or citric acid based on your taste preference. A little extra can go a long way!
- Keep It Clean: Once you’re done, the sticky residue can be a pain. Soak your utensils and molds in warm water for easier cleaning.
Can I Store Homemade Sour Strawberry Gummies?
Absolutely! Once your gummies are cooled and coated, store them in an airtight container. They can last up to two weeks at room temperature.
However, if you live in a humid area, it’s better to keep them in the fridge. Just make sure to separate layers with parchment paper to avoid sticking.
What Can I Serve with Homemade Sour Strawberry Gummies?
These gummies make a great standalone snack. If you want to get creative, consider using them as a fun topping for yogurt or ice cream. You could also toss them into a fruit salad for a spontaneous sweetness explosion!
And let’s not forget—they make fantastic additions to goodie bags for parties or family gatherings. You’ll be the star of the show when guests realize you made candy from scratch!
Variations
While the classic sour strawberry gummy is delightful, why not venture into exciting variations? Here are five ideas to inspire your next gummy-making spree:
- Tropical Paradise: Swap strawberries for fresh pineapple and add coconut extract for a tropical twist. You’ll be whisked away to a beach, if only in your imagination.
- Berry Medley: Use a mix of strawberries, blueberries, and raspberries. This not only enhances color but also offers a vibrant assortment of flavors in every bite.
- Peachy Keen: Replace strawberries with pureed peaches, and add some peach nectar for an extra fruity punch. The sweet and sour balance will keep you smiling.
- Mango Madness: Mango puree combined with a touch of lime juice opens up a flavor-packed gummy that’s like sunshine in your mouth.
- Green Goodness: Think outside the fruit box. Spinach puree blended with apple juice provides a green gummy that’s healthy and surprisingly delicious!

Conclusion
Making homemade sour strawberry gummies is not just about creating a delicious treat. It’s an experience filled with discovery and creativity. You get to tailor the flavor, adjust the sweetness, and even share the joy with family and friends.
Whether you’re crafting them for a party, a sweet gift, or just for a delightful weekend project, these gummies will bring a smile to your face.
So gather those ingredients, put on some fun music, and dive into the world of gummy-making. Who knows? You might just find your new favorite pastime!
You’ll also like the following recipes!

Homemade Sour Strawberry Gummies – Treat Indulgently
Description
Ah, gummy candy. A staple of childhood joy, unbridled sweetness, and, let’s face it, a guilty pleasure we all occasionally indulge in.
But what if I told you that making these chewy delights at home is not just possible, but incredibly rewarding?
Ingredients
For coating
Instructions
Step 1: Preparing the Strawberry Puree
-
First things first, let’s get that strawberry puree ready. If you’re using fresh strawberries, wash them thoroughly and remove the stems.
Thaw your frozen strawberries if you’re going that route. Place the strawberries in a blender and puree until smooth. Measure 12 ounces. Feel free to snack on a few strawberries during this process. You know you want to!
Step 2: Mixing the Ingredients
-
In a medium saucepan, combine 1⅔ cups of sugar and ½ cup of filtered spring water. Stir in the strawberry puree and bring the mixture to a boil over medium heat. Keep stirring—nobody likes burnt sugar!
Once boiling, reduce the heat to low and sprinkle in the pectin. Continue stirring until the pectin is completely dissolved, ensuring an even consistency.
Step 3: Adding Flavor and Sourness
-
Now for the fun part! Add the light corn syrup, the dissolved lemon zest (or citric acid), finely grated ginger, and vanilla extract.
The ginger adds a subtle warmth that beautifully complements the strawberries. Mix everything well.
Step 4: Pouring Into Molds
-
Next, prepare your gummy molds. If you’re feeling fancy, silicone molds give you the best shapes (and are easy to pop out!).
Pour your mixture into the molds, filling them to the brim. If you accidentally overfill, no worries—the gummies will still be delightful!
Step 5: Setting the Gummies
-
Let your filled molds cool at room temperature for about 30 minutes. After they've cooled, transfer them to the refrigerator and chill for at least two hours, or until they are firmly set.
Patience is a virtue here—the right setting time means chewier gummies!
Step 6: Coating for Extra Flavor
-
Once the gummies are set, pop them out of the molds. In a small bowl, mix together ¼ cup of granulated sugar with ½ teaspoon of powdered lemon zest.
Toss your gummies in this mixture to coat them. This tiny step adds an extra zing that will have your taste buds dancing!
Nutrition Facts
Servings 30
- Amount Per Serving
- Calories 39kcal
- % Daily Value *
- Sodium 5mg1%
- Total Carbohydrate 10g4%
- Sugars 8g
* Percent Daily Values are based on a 2,000 calorie diet. Your daily value may be higher or lower depending on your calorie needs.
Note
- Mold Type Matters: Silicone molds are your best bet for easy removal. Avoid metal molds if you can.
- Measurement Accuracy: Ensure your ingredient measurements are precise. A grain of sugar can change gummy density!
- Flavor Experiments: Don’t hesitate to add other fruit purees (like raspberry or mango!) for a fun twist.
- For Enhanced Sourness: Adjust the amount of lemon zest or citric acid based on your taste preference. A little extra can go a long way!
- Keep It Clean: Once you’re done, the sticky residue can be a pain. Soak your utensils and molds in warm water for easier cleaning.