Before diving into the wonderful world of peanut butter jam thumbprint cookies, let’s talk about how to elevate this delightful treat. Think about all the ways you can enjoy these cookies with a sidekick. Milk is an absolute classic. Whether you prefer whole, almond, or oat milk, a chilled glass complements the creamy richness of the cookies beautifully.
Meanwhile, a hot cup of coffee or tea brings out the warm flavors in the peanut butter, creating that cozy feeling we all crave. For a unique twist, consider a scoop of vanilla ice cream. Imagine warm cookies melting into the ice cream—pure bliss! Lastly, any berry-infused fruit salad can contrast the cookie’s richness, adding freshness to every bite.

What is Peanut Butter Jam Thumbprint Cookies Recipe?
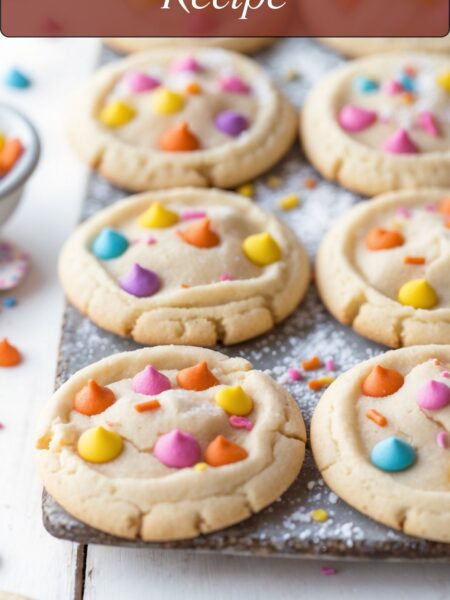
A peanut butter jam thumbprint cookie is a unique twist on a classic favorite. Imagine a buttery cookie dough infused with creamy peanut butter, each one featuring a small, delicious indentation filled with your choice of jam.
They’re a blend of chewy and melt-in-your-mouth textures, with each bite revealing a burst of sweet and nutty goodness. This cookie represents a loving nod to childhood simplicity, yet elevates the experience with its rich flavors.
What Does It Taste Like?
Let’s be real; the first bite is sheer delight. The cookie offers a balance of sweetness and savory nuttiness. The peanut butter shines through, making it rich but not overwhelming. As you delve deeper into the jam-filled center, a fruity explosion brings freshness to the mix.
Whether you choose strawberry, raspberry, or grape, each flavor adds its unique profile. You’re savoring creamy, sweet, and slightly salty, all in one indulgent bite. It’s a multi-faceted experience that will coax a smile from even the sleepiest cookie lovers.
Why This Recipe Works
I could rave about this recipe for hours! Here are four solid reasons why this peanut butter jam thumbprint cookie recipe truly stands out:
Simplicity of Ingredients: You don’t need a treasure trove of ingredients to whip up these cookies. The essentials are pantry staples. Butter, sugar, eggs, and peanut butter come together effortlessly. With little fuss, anyone can bake them, making the recipe family-friendly.
Flavor Harmony: The blend of peanut butter and jam is like a dance. The nuttiness of the peanut butter plays nicely against the sweetness of the jam. This creates a delightful play on taste that keeps you coming back. Each variety of jam offers a new adventure, ensuring variety in every batch.
Easy to Make with Little Mess: Baking can sometimes feel overwhelming, but this recipe is straightforward. The process involves mixing and then forming, with minimal cleanup needed afterward. Less mess equals more joy during baking!
Versatile Treat: Whether you’re hosting a gathering, packing lunchboxes, or enjoying a midnight snack, these cookies fit the bill. They’re a crowd-pleaser with kids and adults alike. You can easily adapt the recipe for allergies or preferences—more on that later!
Ingredients for Peanut Butter Jam Thumbprint Cookies
Here’s everything you’ll need to make these mouthwatering cookies:
Dough Ingredients:
- 3/4 cup (110g) chopped roasted salted peanuts, finely chopped
- 1/2 teaspoon ground cinnamon (optional but adds warmth)
- 1/2 cup (8 Tbsp; 113g) unsalted butter, softened to room temperature
- 1 large egg, also at room temperature
- 1 and 1/4 cups (156g) all-purpose flour, spooned and leveled
- 1/2 teaspoon baking soda, for lift
- 1/4 cup (50g) white granulated sugar
- 3/4 cup (195g) smooth peanut butter (preferably natural or no-stir)
- 1 teaspoon pure vanilla extract or vanilla bean paste
- 6 tablespoons (120g) fruit jam or preserves of your choice (strawberry, raspberry, or grape work great)
- 1/2 cup (100g) packed light or dark brown sugar, for depth of flavor
- 1/4 teaspoon fine sea salt
Peanut Butter White Chocolate Drizzle (optional but highly recommended):
- 1/2 teaspoon neutral oil (like coconut or canola)
- One 4-ounce quality white chocolate bar (113g), finely chopped
- 1 heaping tablespoon creamy peanut butter

Step-by-Step Instructions
Step 1: Preheat the Oven
The first step is to preheat your oven to 350°F (175°C). This creates the ideal environment for your cookies to bake evenly. An oven thermometer can help ensure accuracy if you’re unsure about your oven’s temperature.
Step 2: Prepare the Baking Sheet
Line your baking sheet with parchment paper or a silicone baking mat. This helps prevent sticking and keeps the cookies from getting overly dark on the bottom.
Step 3: Mix Dry Ingredients
In a large mixing bowl, whisk together the flour, baking soda, salt, and chopped peanuts. If you include cinnamon, add it to this mixture. This step ensures even distribution of the dry ingredients.
Step 4: Cream Butter and Sugars
In another bowl, cream together the softened butter, granulated sugar, and brown sugar until it’s light and fluffy. This can take about 2-3 minutes with an electric mixer. The goal is to incorporate enough air into the mixture to lead to fluffy cookies.
Step 5: Add Peanut Butter and Egg
Next, mix in the peanut butter and the egg, followed by the vanilla extract. Ensure it’s blended smoothly. You should have a creamy mixture.
Step 6: Combine Dry and Wet Ingredients
Gradually add the dry mixture into the wet mixture. Stir until just combined. Be careful not to overmix, as this could make the cookies tough.
Step 7: Shape the Cookies
Scoop about a tablespoon of dough and roll it into a ball. Place the dough balls on the prepared baking sheet, leaving space between each cookie. You’ll want to gently press your thumb into the center of each cookie to create a well.
Step 8: Fill with Jam
Fill each thumbprint with the jam of your choice. Don’t overfill, as the jam will bubble while baking.
Step 9: Bake
Pop the baking sheet into the oven and bake for about 10-12 minutes. The edges should be slightly golden, while the centers will look a tad undercooked. This is perfect; they’ll set as they cool.
Step 10: Cool Down and Optional Drizzle
Let the cookies cool on the baking sheet for about 5 minutes before transferring them to a wire rack. If you’d like a drizzle, melt together the white chocolate and peanut butter with the neutral oil, then drizzle it over the cooled cookies.
Notes
Storage: These cookies can be kept in an airtight container for up to a week, although they’ll likely disappear much sooner.
Room Temperature Ingredients: Ensure your butter and egg are at room temperature for the best mixing results.
Chilling Dough: If the dough seems too sticky, chill it for about 30 minutes before shaping the cookies.
Choose Quality Jam: Opt for high-quality jam for the best flavor impact.
Avoid Overbaking: Keep an eye on the cookies; they should look slightly underbaked when you take them out, as they will firm up as they cool.
Nutrition Information
Approximate nutritional information per cookie (based on the entire batch yielding about 24 cookies):
- Calories: 120
- Protein: 3g
- Carbohydrates: 14g
- Fat: 6g
- Fiber: 1g
- Sugar: 5g
How to Store the Leftovers?
Store your leftover cookies in an airtight container at room temperature for up to a week. For longer-lasting freshness, consider freezing them. Just place them in a freezer-safe bag or container, separating layers with parchment paper. They should last for about 3 months in the freezer.
Sides for Peanut Butter Jam Thumbprint Cookies
Now that you have the cookies, consider what to pair them with for snack time or dessert.
Milk: A classic pairing! The coolness of milk goes hand in hand with the nutty warmth of these cookies. Whether you choose regular or plant-based milk, it’s a perfect match.
Coffee: Just picture an early morning with a fresh brew. Dunk that cookie, let the flavors mingle, and you’ll have a morning ritual to look forward to.
Ice Cream: Warm cookies accompanied by cold ice cream create a dreamy dessert scenario. Vanilla works best, but don’t shy away from chocolate or peanut butter flavors, either.
Fruit Salad: For a juxtaposition of flavors, add a fruity side. Fresh berries or a zesty citrus salad can lighten the richness of the cookies while enhancing the fruity notes from the jam.
Alternative Ingredient Choices
Sometimes, the pantry throws a curveball. Here are some substitutions you can make if you’re running low on an ingredient.
Peanut Butter: Almond butter or sunbutter (sunflower seed butter) can be used for those with peanut allergies. They each lend their unique flavor while keeping the cookie structure intact.
Butter: Coconut oil or a vegan butter substitute will work if you want to keep things dairy-free. Both can provide the fat needed for texture.
Granulated Sugar: For a healthier option, try using coconut sugar or maple syrup. If using syrup, adjust the flour since it introduces additional moisture.
Fruit Jam: Don’t be afraid to switch it up! Nut butter itself can be used instead of jam for a less-sweet option. Apple butter or even a chocolate spread works well.

Conclusion
Peanut butter jam thumbprint cookies are more than just cookies; they evoke memories, joy, and a little bit of love. With just a handful of ingredients and a simple method, you can create a treat that impresses. Whether you’re baking for your family or bringing a batch to share, these cookies are sure to warm hearts and brighten smiles. So why wait? Preheat that oven, gather the ingredients, and immerse yourself in a delicious baking adventure. You won’t regret it!
You’ll also like the following recipes!


Peanut Butter Jam Thumbprint Cookies – Treat Indulgently
Description
I’ve always had a soft spot for cookies, but peanut butter jam thumbprint cookies hold a special place in my heart. A warm, gooey cookie with a hint of nostalgia that transports me back to my childhood kitchen.
Picture this: the sweet, nutty aroma wafting through the air, the excitement of creating little thumbprint wells filled with colorful fruit jam. It’s a kitchen adventure that’s not just fun, it’s fulfilling. This recipe combines basic ingredients with the delightful pairing of peanut butter and fruit jam, resulting in cookies that are nothing short of a tasty triumph. Buckle up for a sweet journey!
Ingredients
Dough Ingredients:
Peanut Butter White Chocolate Drizzle (optional but highly recommended):
Instructions
Step 1: Preheat the Oven
-
The first step is to preheat your oven to 350°F (175°C). This creates the ideal environment for your cookies to bake evenly. An oven thermometer can help ensure accuracy if you’re unsure about your oven’s temperature.
Step 2: Prepare the Baking Sheet
-
Line your baking sheet with parchment paper or a silicone baking mat. This helps prevent sticking and keeps the cookies from getting overly dark on the bottom.
Step 3: Mix Dry Ingredients
-
In a large mixing bowl, whisk together the flour, baking soda, salt, and chopped peanuts. If you include cinnamon, add it to this mixture. This step ensures even distribution of the dry ingredients.
Step 4: Cream Butter and Sugars
-
In another bowl, cream together the softened butter, granulated sugar, and brown sugar until it’s light and fluffy. This can take about 2-3 minutes with an electric mixer. The goal is to incorporate enough air into the mixture to lead to fluffy cookies.
Step 5: Add Peanut Butter and Egg
-
Next, mix in the peanut butter and the egg, followed by the vanilla extract. Ensure it’s blended smoothly. You should have a creamy mixture.
Step 6: Combine Dry and Wet Ingredients
-
Gradually add the dry mixture into the wet mixture. Stir until just combined. Be careful not to overmix, as this could make the cookies tough.
Step 7: Shape the Cookies
-
Scoop about a tablespoon of dough and roll it into a ball. Place the dough balls on the prepared baking sheet, leaving space between each cookie. You’ll want to gently press your thumb into the center of each cookie to create a well.
Step 8: Fill with Jam
-
Fill each thumbprint with the jam of your choice. Don’t overfill, as the jam will bubble while baking.
Step 9: Bake
-
Pop the baking sheet into the oven and bake for about 10-12 minutes. The edges should be slightly golden, while the centers will look a tad undercooked. This is perfect; they’ll set as they cool.
Step 10: Cool Down and Optional Drizzle
-
Let the cookies cool on the baking sheet for about 5 minutes before transferring them to a wire rack. If you’d like a drizzle, melt together the white chocolate and peanut butter with the neutral oil, then drizzle it over the cooled cookies.
Nutrition Facts
Servings 32
- Amount Per Serving
- Calories 120kcal
- % Daily Value *
- Total Fat 6g10%
- Total Carbohydrate 14g5%
- Dietary Fiber 1g4%
- Sugars 5g
- Protein 3g6%
* Percent Daily Values are based on a 2,000 calorie diet. Your daily value may be higher or lower depending on your calorie needs.
Note
Storage: These cookies can be kept in an airtight container for up to a week, although they'll likely disappear much sooner.
Room Temperature Ingredients: Ensure your butter and egg are at room temperature for the best mixing results.
Chilling Dough: If the dough seems too sticky, chill it for about 30 minutes before shaping the cookies.
Choose Quality Jam: Opt for high-quality jam for the best flavor impact.
Avoid Overbaking: Keep an eye on the cookies; they should look slightly underbaked when you take them out, as they will firm up as they cool.