Before diving into this delicious pistachio sour cream cheesecake recipe, let’s talk pairings. This dessert can stand alone, but why not amplify the experience? Whether you plan on hosting friends or enjoying a cozy night in, consider these options:
- Coffee or Espresso: A rich cup complements the creamy texture of the cheesecake beautifully. The bitterness balances the sweetness.
- Fresh Berries: Strawberries, raspberries, or blueberries can add a fresh twist. Their tartness cuts through the richness.
- Chocolate Sauce: A drizzle of dark chocolate sauce can take the cheesecake to another level. The bitterness of chocolate mingles seamlessly with the nuttiness of pistachios.
- Whipped Cream: Nothing says indulgence like a dollop of freshly whipped cream. You can even infuse it with a hint of vanilla or almond for added flavor.
- Sweet Wine: A glass of sweet dessert wine, like a Moscato or Riesling, pairs well. Its sweetness echoes the flavors in the cheesecake, making for a harmonious pairing.
Now, let’s get into this delightful cheesecake recipe that will surely become a favorite.

What is Pistachio Sour Cream Cheesecake?
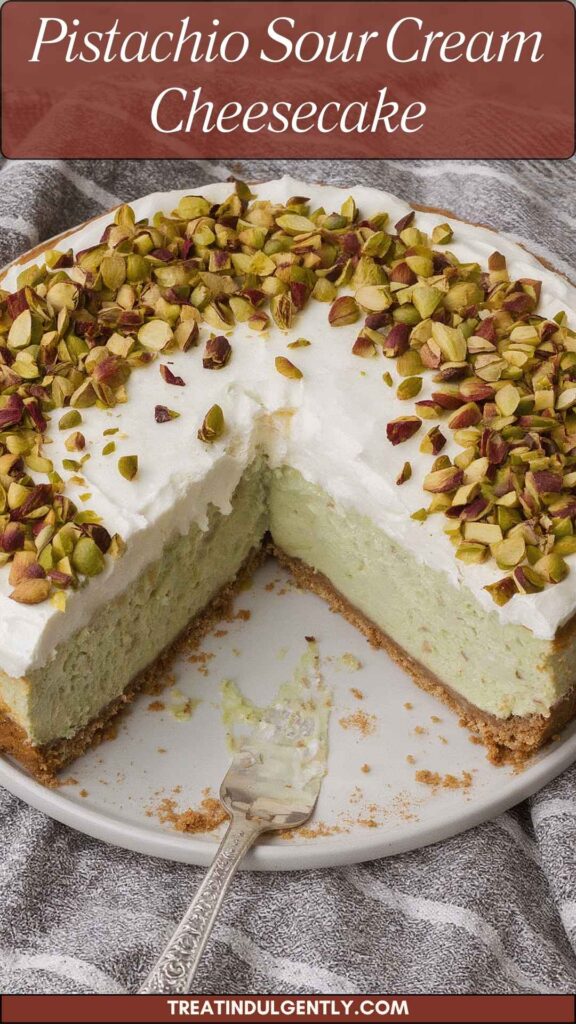
Pistachio sour cream cheesecake is a creamy, dreamy dessert that combines traditional cheesecake elements with a delightful pistachio twist. Cream cheese is whipped and combined with tangy sour cream, creating a richness that’s truly luxurious.
With pistachio butter and pistachio flour incorporated into the filling, every bite bursts with nutty flavor. This cheesecake is baked to perfection with a buttery crust made from vanilla wafer cookies, creating a delightful contrast in textures.
Why You’ll Love This Pistachio Sour Cream Cheesecake Recipe
You might wonder what makes this cheesecake so special. Well, let’s break it down.
- Rich Flavors: The pistachio butter gives a subtle sweetness, while the sour cream adds a nice tang. Coupled with vanilla and a hint of rose water, these flavors meld together beautifully. This combination makes each forkful an absolute delight.
- Texture: Creamy and smooth, the cheesecake filling contrasts perfectly with the crumbly crust and crunchy pistachio topping. It’s a symphony of textures that keep your palate engaged.
- Versatilty: This cheesecake can be served at various occasions—from a gourmet dinner party to a laid-back Sunday dessert. You can dress it up with toppings or serve it simply to enjoy its inherent flavors.
- Healthier Options: While cheesecake often carries a reputation for being heavy, ingredients like sour cream not only add flavor but also necessary moisture, allowing you to enjoy dessert without guilt.
- A Showstopper: The vibrant green hue, embellished with roasted pistachios, can elevate any dessert spread. Trust me, it’s a feast for the eyes!
As I recount making this cheesecake for my family last weekend, I remember my niece’s face lighting up when she had her first bite. “Auntie, this is the best cheesecake ever!” It’s moments like these that make recipes worth sharing.
The Ingredients You Will Need
For the Crust:
- Pinch of Sea Salt: Enhances flavor.
- 5 tablespoons / 70 g Unsalted Butter: Adds richness.
- 2 tablespoons / 24 g Soft Brown Sugar: Introduces a subtle caramel note.
- 8 ounces / 200 g Crushed Vanilla Wafer Cookies: Forms the base.
- 1 teaspoon Orange Zest: Provides a burst of freshness.
- 5 tablespoons / 50 g Finely Milled Pistachio Flour or Powdered Pistachios: Deepens the nutty flavor.
For the Filling:
- ⅔ cup / 160 g Sour Cream: Creates creaminess with a tang.
- 4 Large Eggs: Provide structure.
- 16 ounces / 454 g Full-Fat Block Cream Cheese: Essential for texture.
- ⅔ cup / 170 g Smooth Pistachio Butter: The star of the show.
- 3 tablespoons / 22 g All-Purpose Flour: Helps set the cheesecake.
- 1 teaspoon Rose Water: Adds a floral note (optional).
- 1 ½ teaspoons Natural Pistachio Extract: Intensifies flavor.
- A Few Drops of Green Food Coloring: For visual appeal (optional).
- ⅔ cup / 133 g Fine White Sugar: Sweetens the filling.
- 1 teaspoon Fine Sea Salt: Balances flavors.
For the Topping:
- Chopped Roasted Pistachios: For crunch and garnish.
- Pinch of Fine Sea Salt: Enhances the topping.
- 1 cup / 240 g Sour Cream: Creates a creamy topping.
- ¼ cup / 50 g White Sugar: Sweetens the topping.

Directions
Step 1: Prepare the Crust
Start by preheating your oven to 350°F (175°C). In a mixing bowl, combine the crushed vanilla wafers, melted butter, brown sugar, orange zest, and a pinch of sea salt. Stir until fully combined.
Next, press this mixture firmly into the bottom of a 9-inch springform pan. Make sure it’s even; this crust will be the foundation of your cheesecake. Bake for about 8-10 minutes, or until lightly golden. Let it cool while you prepare the filling.
Step 2: Make the Filling
In a large mixing bowl, beat the softened cream cheese until creamy and smooth—approximately 2-3 minutes with an electric mixer. Gradually add the sugar and mix until combined. Next, beat in the sour cream until well incorporated.
Add the pistachio butter and mix again. One by one, add the eggs, mixing on low speed after each addition. Be careful not to over-mix.
Now, add the flour, pistachio extract, and rose water (if using). Mix until just combined. If you’re feeling adventurous, add a few drops of green food coloring for a pop of color.
Step 3: Bake the Cheesecake
Carefully pour the filling over the cooled crust in the springform pan. Bake for about 50-60 minutes or until the edges look set, but the center remains slightly jiggly. This jiggle is crucial; the cheesecake will continue to set as it cools.
Once baked, turn off the oven and leave the cheesecake inside with the door ajar for about an hour. This helps prevent cracks.
Step 4: Prepare the Topping
In a mixing bowl, combine the sour cream and sugar. Spread this mixture over the cooled cheesecake. It adds creaminess and balances the richness of the cake. Chill in the refrigerator for at least 4 hours or preferably overnight.
Step 5: Serve and Enjoy
Before serving, sprinkle the chopped roasted pistachios on top and a pinch of salt. Carefully remove the sides of the springform pan. Slice, serve, and witness the smiles as they take their first bites!
Notes
- Consistency is Key: Ensure all ingredients, especially cream cheese and eggs, are at room temperature. This aids in a smooth mixture.
- Don’t Overbake: The cheesecake should be a bit jiggly in the center when you pull it out of the oven to achieve that perfect creamy texture.
- Chill Time: Allow plenty of time for the cheesecake to chill. It not only enhances flavor but also helps with texture.
- Garnish Appropriately: Feel free to get creative with your toppings. Fresh fruit, chocolate drizzle, or even edible flowers can add a special touch.
- Test for Doneness: If unsure, gently shake the pan. If the sides are set but the center wobbles slightly, it’s finished cooking.
Storage Tips
- Refrigerate: Store any leftovers in the refrigerator for up to 5 days.
- Freezing: Cheesecake can be frozen for up to 3 months. Wrap tightly in plastic wrap and then place in an airtight container.
- Thawing: To thaw, move it to the fridge a day before serving to ensure it slowly comes back to life without compromising its texture.
- Individual Portions: Consider cutting the cheesecake into individual slices and freezing for an easy dessert later.
- Avoid Condensation: When freezing, ensure the cheesecake cools completely and is well-wrapped to avoid moisture causing ice crystals.
Nutrition Information
Per slice (assuming 12 slices):
- Calories: 350
- Protein: 7g
- Total Fat: 25g
- Saturated Fat: 15g
- Carbohydrates: 28g
- Fiber: 1g
- Sugar: 18g
This cheesecake delicately balances a rich dessert experience with a dose of protein and healthy fats from nuts. Enjoy guilt-free!
Serving Suggestions
- With Fresh Berries: Serve alongside vibrant strawberries or blueberries. Their natural tartness beautifully contrasts the richness of the cheesecake.
- A Drizzle of Sauce: Top with chocolate or caramel sauce. This adds moisture and an extra layer of flavor.
- Coffee Pairing: Serve with a hot cup of coffee or espresso. The warmth of the beverage complements the creamy texture.
- Chilled Slices: Offer slices straight from the refrigerator—perfect for a warm day. Cool cheesecake is refreshing.
- Whipped Toppings: Finish with a dollop of vanilla whipped cream. This elevates each bite and adds a light touch.
What Other Substitutes Can I Use in Pistachio Sour Cream Cheesecake Recipe?
- Almond Butter: Replace pistachio butter with almond butter for a different nutty flavor while keeping the dish rich.
- Greek Yogurt: Use Greek yogurt instead of sour cream. This will add a tangy twist and a boost of protein.
- Sugar Alternatives: Consider coconut sugar or agave syrup in place of white sugar. These options provide a different sweetness and a lower glycemic index.
- Graham Crackers: If vanilla wafers aren’t available, graham crackers are a delightful alternative for the crust. Adjust sweetness for a more balanced flavor.
- Cream Cheese Alternatives: For a lighter version, try using reduced-fat cream cheese. It could slightly alter the texture but maintains the dense qualities of traditional cheesecake.

Conclusion
Pistachio sour cream cheesecake is not just a dessert; it’s an experience to savor. Each slice reveals layers of flavor, texture, and sheer indulgence. Whether it’s a gathering with friends or a quiet evening at home, this cheesecake caters to various occasions.
Over the years, my kitchen adventures have led me to discover countless recipes, but this one reigns supreme. It takes relatively minimal effort to make, but the rewards are delightful. Every friend, family member, or neighbor who has tasted this cake raves about it, and I couldn’t be prouder of this creation.
I encourage you to put on your apron, gather those ingredients, and dive into making this masterpiece. It offers sweetness without guilt and sophistication without the fuss. Plus, who wouldn’t love sharing a homemade cheesecake with those they cherish?
So, ready your mixing bowl and your enthusiasm. The world of classy desserts is about to get a touch of pistachio goodness!
You’ll also like the following recipes!

Pistachio Sour Cream Cheesecake – Treat Indulgently
Description
Imagine biting into a creamy slice of cheesecake, where a nutty flavor dances on your taste buds and a touch of tang from sour cream surprises you. That's the magic of pistachio sour cream cheesecake. It’s inviting, elegant, and certainly not your average dessert. The vibrant green color and crunchy pistachio topping create an allure that's hard to resist.
Now, as a registered dietitian and food enthusiast with a penchant for all things delicious, I've explored countless recipes. Some leave a lasting impression, while others fade into culinary obscurity. This specific cheesecake, however, stands firmly in the first group. What’s more? It combines health-conscious ingredients without skimping on taste.
Bear with me. As we journey through making this cake, I’ll share everything you need to know about crafting this masterpiece in your kitchen!
Ingredients
For the Crust:
For the Filling:
For the Topping:
Instructions
Step 1: Prepare the Crust
-
Start by preheating your oven to 350°F (175°C). In a mixing bowl, combine the crushed vanilla wafers, melted butter, brown sugar, orange zest, and a pinch of sea salt. Stir until fully combined.
Next, press this mixture firmly into the bottom of a 9-inch springform pan. Make sure it's even; this crust will be the foundation of your cheesecake. Bake for about 8-10 minutes, or until lightly golden. Let it cool while you prepare the filling.
Step 2: Make the Filling
-
In a large mixing bowl, beat the softened cream cheese until creamy and smooth—approximately 2-3 minutes with an electric mixer. Gradually add the sugar and mix until combined. Next, beat in the sour cream until well incorporated.
Add the pistachio butter and mix again. One by one, add the eggs, mixing on low speed after each addition. Be careful not to over-mix.
Now, add the flour, pistachio extract, and rose water (if using). Mix until just combined. If you're feeling adventurous, add a few drops of green food coloring for a pop of color.
Step 3: Bake the Cheesecake
-
Carefully pour the filling over the cooled crust in the springform pan. Bake for about 50-60 minutes or until the edges look set, but the center remains slightly jiggly. This jiggle is crucial; the cheesecake will continue to set as it cools.
Once baked, turn off the oven and leave the cheesecake inside with the door ajar for about an hour. This helps prevent cracks.
Step 4: Prepare the Topping
-
In a mixing bowl, combine the sour cream and sugar. Spread this mixture over the cooled cheesecake. It adds creaminess and balances the richness of the cake. Chill in the refrigerator for at least 4 hours or preferably overnight.
Step 5: Serve and Enjoy
-
Before serving, sprinkle the chopped roasted pistachios on top and a pinch of salt. Carefully remove the sides of the springform pan. Slice, serve, and witness the smiles as they take their first bites!
Nutrition Facts
Servings 8
- Amount Per Serving
- Calories 350kcal
- % Daily Value *
- Total Carbohydrate 28g10%
- Dietary Fiber 1g4%
- Sugars 18g
- Protein 7g15%
* Percent Daily Values are based on a 2,000 calorie diet. Your daily value may be higher or lower depending on your calorie needs.
Note
- Consistency is Key: Ensure all ingredients, especially cream cheese and eggs, are at room temperature. This aids in a smooth mixture.
- Don’t Overbake: The cheesecake should be a bit jiggly in the center when you pull it out of the oven to achieve that perfect creamy texture.
- Chill Time: Allow plenty of time for the cheesecake to chill. It not only enhances flavor but also helps with texture.
- Garnish Appropriately: Feel free to get creative with your toppings. Fresh fruit, chocolate drizzle, or even edible flowers can add a special touch.
- Test for Doneness: If unsure, gently shake the pan. If the sides are set but the center wobbles slightly, it's finished cooking.