Matcha is a vibrant green tea that has gained international popularity for its health benefits and unique flavor profile. It pairs wonderfully with sakura, or cherry blossom, creating a visual and taste experience that’s both stunning and satisfying.
Before we dive into the luscious layers of flavor in this cake, let’s talk about what pairs beautifully with a sakura matcha mousse cake.
Pairings for Your Sakura Matcha Mousse Cake
1. Green Tea: This classic choice complements matcha perfectly. The warm, earthy tones of green tea enhance the flavors and provide a calming effect.
2. Fresh Berries: Strawberries or raspberries add a fruity, tart contrast that pairs well with the sweet creaminess of the mousse. Best served on the side or as a garnish.
3. Almond Biscotti: For a delightful crunch, serve slices of almond biscotti. The nutty flavors contrast nicely with the softness of the cake.
With those pairings in mind, let’s dive into the sweet details of the recipe.

Why This Recipe Works
Making the perfect sakura matcha mousse cake is no small feat. Here’s why this recipe is bound to impress.
1. Light and Fluffy Texture: The combination of whipped cream and mascarpone cheese creates a cloud-like mousse. Each bite feels like a gentle embrace.
2. Balanced Flavors: The bitterness of matcha is perfectly balanced by the sweetness of the mousse and the subtle floral notes from sakura. It’s a harmonious blend that dances on your palate.
3. Versatile Ingredients: This recipe uses ingredients that are easily found in most kitchens yet result in a gourmet dessert. There’s no need for specialty stores!
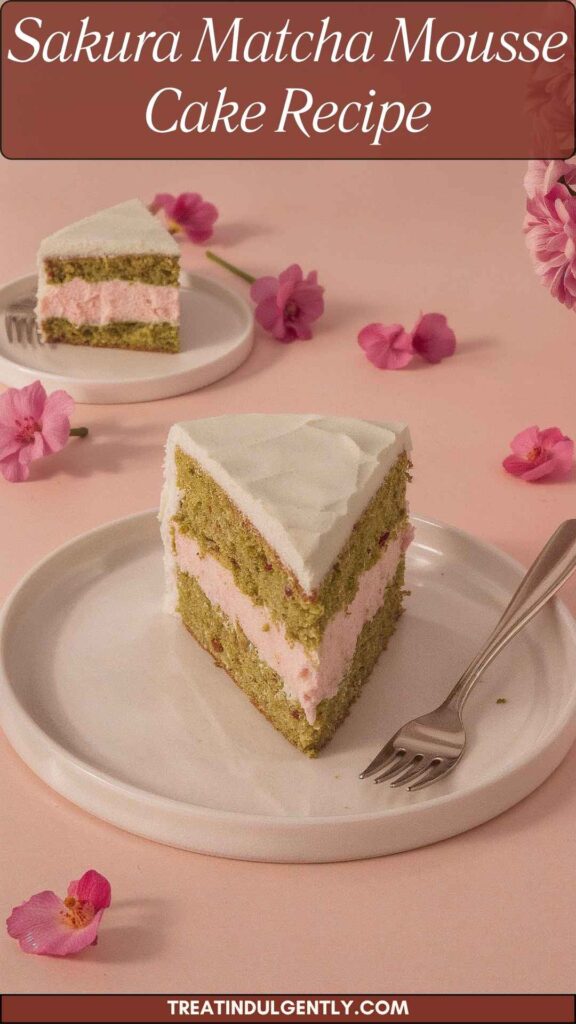
4. Elegant Presentation: The beautiful pastel colors and layering of the mousse make it a showstopper at any gathering. You’ll be proud to serve it, and your guests will be dazzled.
How Does It Taste Like?
Imagine taking a forkful of this cake. You first encounter a creamy texture that melts in your mouth. The earthy notes of matcha slowly unfold as you savor it, followed by floral hints of sakura that linger on your taste buds.
This dessert is a delightful affair—a balance of sweet and slightly bitter, creamy and airy. A bite can transport you to a serene cherry blossom garden.
What Sets This Recipe Apart?
In a sea of matcha cakes, this recipe shines with its thoughtful inclusion of sakura notes and the luxurious lightness of mousse. Unlike many recipes that rely solely on matcha, this one finds a perfect partner in sakura.
The addition of cherry purée gives it a beautiful color and subtly ties into the theme of spring, making it not just a treat for your taste buds, but also a feast for the eyes.
The Ingredients
For the Matcha Cake:
3/8 cup (1.5 oz / 40 grams) cake flour: Provides a light structure.
2 teaspoons high-quality matcha green tea powder: Imparts that distinct matcha flavor.
1 tablespoon neutral vegetable oil: Keeps the cake moist.
3 tablespoons full-fat milk: Adds richness and flavor.
1/4 teaspoon lemon zest: Brightens the flavors with a hint of citrus.
1/4 teaspoon fine sea salt: Enhances all the flavors within the cake.
2 large egg yolks and whites, separated: The whites create lift while the yolks add richness.
3 tablespoons caster sugar: Ensures sweetness without graininess.
1/2 teaspoon vanilla bean paste: Elevates the overall taste.
For the Mousse:
3/4 cup heavy cream, chilled: Essential for achieving that airy texture.
1/2 cup mascarpone cheese: Adds creaminess and luxuriousness.
2 1/2 sheets gelatin: Provides stability to the mousse.
1 teaspoon pure vanilla extract: Augments the overall flavor.
2-3 tablespoons strained cherry purée (or a few drops of natural red food coloring for color): Adds a subtle sweetness and color.
1/4 cup whole milk: Contributes to the mousse’s creamy consistency.
1/3 cup granulated sugar: Sweetens the mousse beautifully.
1 tablespoon yuzu juice (optional): A hint of citrus that adds tanginess.

Instructions
Ready to dive into the process? This may seem elaborate, but don’t worry—it’s simpler than it sounds.
Step 1: Make the Matcha Cake
- Preheat your oven to 325°F (160°C). Grease and line an 8-inch round cake pan with parchment paper.
- Whisk together the matcha powder, cake flour, and salt in a bowl. This will ensure the matcha is evenly distributed.
- In a separate bowl, combine egg yolks, caster sugar, and vanilla bean paste. Whisk until the mixture is pale and thick.
- Add the vegetable oil, milk, and lemon zest to the yolk mixture and whisk until smooth.
- Gradually fold in the dry ingredients until just combined. Do not overmix!
- In another bowl, whisk the egg whites until stiff peaks form. Gently fold them into the batter, taking care not to deflate all the air.
- Pour the batter into the prepared pan and smooth out the top. Bake for 25-30 minutes, or until a toothpick inserted comes out clean.
- Let the cake cool in the pan for 10 minutes before transferring it to a wire rack to cool completely.
Step 2: Prepare the Mousse
- While the cake cools, take the gelatin and soften it in cold water according to package instructions.
- In a bowl, combine mascarpone cheese and sugar. Mix until smooth.
- In a saucepan, gently heat the cherry purée, yuzu juice, and milk until warm, but not boiling. Remove it from the heat, then stir in the softened gelatin until fully dissolved.
- Slowly add the warm mixture into the mascarpone mixture, whisking until fully combined.
- In a separate bowl, whisk the heavy cream until soft peaks form. Gently fold this whipped cream into the mascarpone mixture until well blended.
Step 3: Assemble the Cake
- Carefully slice the cooled matcha cake in half horizontally to make two layers.
- Place one layer on a serving platter. Pour about half of the mousse mixture over the first layer and spread it evenly.
- Add the second layer of cake on top and pour the remaining mousse over it. Smooth out the top.
- Refrigerate the cake for at least 4 hours (or overnight) to allow it to set.
Notes
Here are a few tips to ensure your sakura matcha mousse cake turns out beautifully:
Choose High-Quality Matcha: This significantly influences the flavor and color; don’t skimp on it!
Gelatin is Key: If using powdered gelatin, make sure to activate it correctly for the best consistency.
Temperature Matters: Ensure cream and mascarpone are at room temperature before mixing; this prevents lumps.
Chill Everything: Keep your mixing bowl and beaters cold when whipping cream. It helps achieve that perfect texture.
Be Patient: Allow the cake to set fully before serving. The wait is worth it!
Nutrition Information
When indulging in cake, it’s always good to know what you’re getting. Here’s an approximate breakdown per slice (assuming 10 slices from the cake):
- Calories: 250
- Protein: 4g
- Carbohydrates: 32g
- Fat: 13g
- Sugar: 15g
How Do You Store Sakura Matcha Mousse Cake?
Store any leftover cake slices in an airtight container in the refrigerator. It’s best enjoyed within 3-4 days. The flavors tend to deepen over time, making each bite even more delightful.
Sides for Sakura Matcha Mousse Cake
Here are a few ideas to elevate your dessert experience:
Fresh Fruit Compote: A dollop of mixed berry compote adds brightness and a sweet-tart contrast to the rich mousse.
Whipped Coconut Cream: A vegan-friendly option that adds a tropical twist and dollops beautifully atop the cake.
Chocolate Shavings: Sprinkle some dark chocolate shavings over the mousse for added richness and visual appeal.
Alternatives for Ingredients
Ran out of something? No worries—here are some alternatives:
Cake Flour: You can use all-purpose flour mixed with a bit of cornstarch (2 tablespoons) as a substitute.
Mascarpone Cheese: Cream cheese can be used as an alternative, though the flavor will be slightly different.
Heavy Cream: Coconut cream works beautifully for a vegan option.
Cherry Purée: If you can’t find cherry purée, strawberry or raspberry purée can offer a delicious spin.

Conclusion
The sakura matcha mousse cake is not just a dessert; it’s an experience. Each layer invites you to slow down, savor the moment, and appreciate the beauty of flavors that celebrate both tradition and creativity. This treat combines the best of nature’s ingredients, presenting them in a way that’s visually spectacular and deliciously satisfying.
So the next time you want to impress friends or simply treat yourself, dive into this recipe. You might just find it’s the sweetest journey you’ve taken in the kitchen. Enjoy!
You’ll also like the following recipes!

Sakura Matcha Mousse Cake Recipe – Treat Indulgently
Description
Imagine a cake so light it could float away yet rich in flavor. My journey to create the perfect sakura matcha mousse cake started on a sunny afternoon when I stumbled upon some beautiful cherry blossoms in full bloom.
I couldn’t resist the urge to capture that beauty in a dessert. After several iterations, I am excited to share this delightful recipe that marries the delicate flavors of sakura with the earthy notes of matcha.
There’s something magical about mousse cakes. They’re light, airy, and indulgent all at once. This sakura matcha mousse cake stands out not just for its taste but also for its stunning visual appeal. If you're ready to embark on a culinary adventure, read on. I promise, this cake is worth every whisk and fold!
Ingredients
For the Matcha Cake:
For the Mousse:
Instructions
Step 1: Make the Matcha Cake
-
- Preheat your oven to 325°F (160°C). Grease and line an 8-inch round cake pan with parchment paper.
- Whisk together the matcha powder, cake flour, and salt in a bowl. This will ensure the matcha is evenly distributed.
- In a separate bowl, combine egg yolks, caster sugar, and vanilla bean paste. Whisk until the mixture is pale and thick.
- Add the vegetable oil, milk, and lemon zest to the yolk mixture and whisk until smooth.
- Gradually fold in the dry ingredients until just combined. Do not overmix!
- In another bowl, whisk the egg whites until stiff peaks form. Gently fold them into the batter, taking care not to deflate all the air.
- Pour the batter into the prepared pan and smooth out the top. Bake for 25-30 minutes, or until a toothpick inserted comes out clean.
- Let the cake cool in the pan for 10 minutes before transferring it to a wire rack to cool completely.
- Preheat your oven to 325°F (160°C). Grease and line an 8-inch round cake pan with parchment paper.
Step 2: Prepare the Mousse
-
- While the cake cools, take the gelatin and soften it in cold water according to package instructions.
- In a bowl, combine mascarpone cheese and sugar. Mix until smooth.
- In a saucepan, gently heat the cherry purée, yuzu juice, and milk until warm, but not boiling. Remove it from the heat, then stir in the softened gelatin until fully dissolved.
- Slowly add the warm mixture into the mascarpone mixture, whisking until fully combined.
- In a separate bowl, whisk the heavy cream until soft peaks form. Gently fold this whipped cream into the mascarpone mixture until well blended.
- While the cake cools, take the gelatin and soften it in cold water according to package instructions.
Step 3: Assemble the Cake
-
- Carefully slice the cooled matcha cake in half horizontally to make two layers.
- Place one layer on a serving platter. Pour about half of the mousse mixture over the first layer and spread it evenly.
- Add the second layer of cake on top and pour the remaining mousse over it. Smooth out the top.
- Refrigerate the cake for at least 4 hours (or overnight) to allow it to set.
- Carefully slice the cooled matcha cake in half horizontally to make two layers.
Nutrition Facts
Servings 10
- Amount Per Serving
- Calories 250kcal
- % Daily Value *
- Total Fat 13g20%
- Total Carbohydrate 32g11%
- Sugars 15g
- Protein 4g8%
* Percent Daily Values are based on a 2,000 calorie diet. Your daily value may be higher or lower depending on your calorie needs.
Note
- Choose High-Quality Matcha: This significantly influences the flavor and color; don’t skimp on it!
- Gelatin is Key: If using powdered gelatin, make sure to activate it correctly for the best consistency.
- Temperature Matters: Ensure cream and mascarpone are at room temperature before mixing; this prevents lumps.
- Chill Everything: Keep your mixing bowl and beaters cold when whipping cream. It helps achieve that perfect texture.
- Be Patient: Allow the cake to set fully before serving. The wait is worth it!