When I think about what pairs perfectly with salted peanut butter chip cookies, a few options come to mind. A tall, cold glass of milk is a classic choice. It balances the sweetness while adding a creamy texture that complements the cookies.
For adults, a rich cup of black coffee or a frothy latte works wonders with the cookie’s flavors. If you’re feeling a bit adventurous, try serving these cookies alongside a scoop of vanilla ice cream. The warm cookie melting into the cold ice cream creates a delightful contrast that’s hard to beat. Trust me, your taste buds will thank you.

What is Salted Peanut Butter Chip Cookies Recipe?
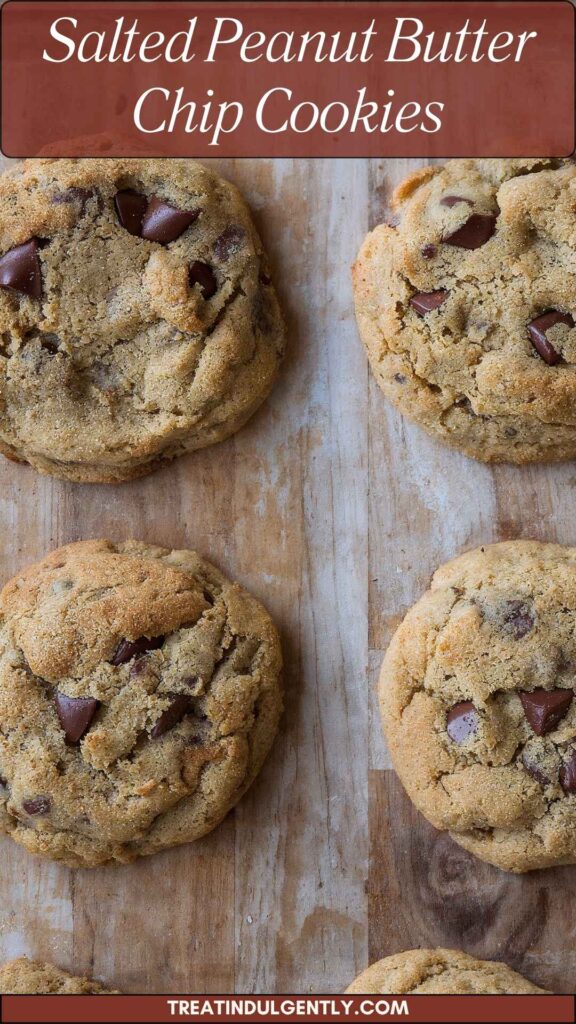
Simply put, salted peanut butter chip cookies are a delightful twist on the classic chocolate chip cookie with the addition of creamy peanut butter. This recipe marries the rich essence of peanut butter with the sweet, melty chocolate chips and a sprinkle of sea salt for that perfect balance of flavors. It’s easy to prepare and provides a chewy, gooey texture that should put a smile on anyone’s face.
I discovered this recipe during a rainy afternoon. With the rain pattering on the window and nothing good on TV, I felt like baking. Enter the salted peanut butter chip cookies recipe. I wanted something warm, comforting, and easy. As I gathered the ingredients, I could already imagine the delicious treat I was about to create.
How Does It Taste Like?
The moment you take a bite, you experience a medley of flavors. The cookie is soft yet chewy with a lovely crunch from the chocolate chips and optional roasted peanuts. The salt enhances the sweetness, providing that savory depth that makes you want just one more bite. It’s like a velvet ribbon of flavor spreads across your palate.
Each nibble sings sweet notes with tiny sparks of salt dancing around, elevating the taste to a whole new level.
Why You’ll Love This?
You’ll adore these cookies for several reasons. First and foremost, they are easy to whip up. You don’t need to be a baking guru to nail this recipe. Second, the combination of peanut butter and chocolate is timeless. Whether it’s a rainy day, a party, or just a midweek treat, these cookies fit any occasion.
Moreover, the entire process is fulfilling. Mixing the dough, shaping the cookies, and finally, the moment where you pull them from the oven is pure joy. And did I mention how amazing your kitchen will smell? But, the best part? Watching family and friends devour them within minutes. Trust me, these cookies will make you a hero in the kitchen.
Ingredients
Here’s what you need to create these delightful goodies:
- 1/2 cup creamy peanut butter (at room temperature)
- 1/4 teaspoon sea salt, plus more for sprinkling
- 1/4 cup granulated sugar
- 1 tablespoon plain Greek yogurt or sour cream
- 3/4 teaspoon baking soda
- 1 teaspoon vanilla extract
- 1/3 cup chopped roasted peanuts (optional, for crunch)
- 1/2 tablespoon honey
- 1 egg plus 1 egg yolk
- 3/4 teaspoon baking powder
- 1 1/2 cups chocolate chips (I used mini chocolate chips)
- 1/2 cup unsalted butter, at room temperature
- 1 1/3 cups all-purpose flour
- 3/4 cup dark brown sugar
- 1/4 teaspoon ground cinnamon (optional, adds warmth)
These ingredients are pretty simple and something most people have in their kitchen, which makes this a convenient recipe.

Step-by-Step Directions
Step 1: Preheat the Oven
Start by preheating your oven to 350°F (175°C). This sets the stage for baking, allowing your cookies to rise perfectly and develop a lovely golden color.
Step 2: Prepare Baking Sheets
Line your baking sheets with parchment paper. This will prevent the cookies from sticking and ensures an easy release once they’re baked. You can also use silicone baking mats to achieve a similar effect.
Step 3: Mix Butter and Sugars
In a large bowl, combine the softened unsalted butter, granulated sugar, and dark brown sugar. Beat it with an electric mixer on medium speed until the mixture is creamy. This usually takes about 2 minutes. Scrape down the sides occasionally to ensure everything is well combined.
Step 4: Add Peanut Butter and Other Ingredients
Next, it’s time to add in the creamy peanut butter. Blend it into the sugar mixture until smooth. After that, mix in the Greek yogurt or sour cream, egg, and egg yolk. Don’t forget the vanilla extract! It adds that lovely aroma and flavor we all love so much.
Step 5: Incorporate Dry Ingredients
In another bowl, whisk together the all-purpose flour, baking soda, baking powder, sea salt, and ground cinnamon (if using). Gradually add this dry mixture to the wet ingredients. Mix on low speed until just combined. Be careful not to over-mix; this will keep your cookies soft.
Step 6: Fold in Chocolate Chips and Peanuts
Using a spatula, gently fold in the chocolate chips and chopped roasted peanuts, if you’re using them. This adds a delightful crunchy texture to the cookies.
Step 7: Scoop the Dough
Using a tablespoon or a cookie scoop, drop rounded balls of dough onto your prepared baking sheets. Leave enough space between each cookie; they will spread as they bake.
Step 8: Bake
Place the baking sheets in the preheated oven and bake for about 10-12 minutes, or until the edges are lightly golden. Make sure not to overbake! You want them soft in the middle.
Step 9: Cool
Allow the cookies to cool on the baking sheets for about 5 minutes before transferring them to wire racks to cool completely. Don’t skip this step—this is where the magic happens, and they set up perfectly.
Tips on Making Salted Peanut Butter Chip Cookies Recipe
- Use Room Temperature Ingredients: Keeping your butter and eggs at room temperature helps in achieving a smooth and creamy batter.
- Don’t Skip the Salt: Adding a pinch of salt to the cookie dough enhances both the peanut butter and chocolate flavors—don’t skimp!
- Chill the Dough (Optional): If you prefer thicker cookies, chill the dough for 30 minutes before baking.
- Experiment with Mix-Ins: Consider adding other mix-ins such as butterscotch chips, chopped nuts, or dried fruit for varied flavors.
- Check for Doneness: Pull the cookies out of the oven when they’re just set. They will continue to firm up while cooling.
Nutrition Information
Each cookie (based on this recipe making about 24 cookies) contains roughly:
- Calories: 140
- Protein: 3g
- Carbohydrates: 18g
- Dietary Fiber: 1g
- Sugars: 9g
- Fat: 7g
- Saturated Fat: 3.5g
- Cholesterol: 20mg
Keep in mind that if you swap out any ingredients or add extras, it will affect the nutritional value.
How Do You Store This Salted Peanut Butter Chip Cookies Recipe?
To keep your cookies fresh, store them in an airtight container at room temperature. They typically last about a week. If you want to keep them longer, consider freezing them. Just make sure to place them in a freezer-safe container or bag. When you’re ready for a treat, you can thaw them out or even pop them in the microwave for a few seconds.
What Other Substitutes Can You Use in Salted Peanut Butter Chip Cookies Recipe?
- Almond Butter: For a different nutty flavor, almond butter works wonderfully as a peanut butter alternative.
- Coconut Oil: This can replace butter for a dairy-free option. It adds a unique taste but note the cookies will have a different texture.
- Agave Syrup: If you want a lower glycemic sweetener, agave syrup can be used instead of honey.
- Whole Wheat Flour: Use whole wheat flour instead of all-purpose for a healthier option with more fiber, though it may change the texture slightly.
- Chia Seeds: For a vegan alternative, replace the egg with 1 tablespoon of chia seeds mixed with 3 tablespoons of water. Allow it to sit for a few minutes until it thickens.

Conclusion
Baking salted peanut butter chip cookies is more than a recipe; it’s an experience that brings joy and nostalgia. The simple ingredients blend together brilliantly, creating a cookie that’s chewy, sweet, and just a touch salty. Whether you’re baking for yourself, your family, or hosting friends, these cookies will surely impress.
Don’t wait for a special occasion; every day is a great reason to whip up a batch! Feel free to experiment with the recipe, make it your own, and enjoy the little acts of love that homemade baking brings. Now, grab your apron and let’s get baking!
You’ll also like the following recipes!

Salted Peanut Butter Chip Cookies – Treat Indulgently
Description
Imagine walking into a kitchen that smells of warm cookies fresh from the oven. There’s something magical about that aroma, right? Today, I want to take you on a journey to create that magic with homemade salted peanut butter chip cookies.
We’re talking about a recipe that combines the nutty richness of peanut butter with the sweetness of chocolate chips and just a hint of salt. These cookies are not just another treat; they are an experience.
Now, I’ve tried countless cookie recipes over the years, but there’s something special about this one. It’s simple yet indulgent, and the flavor combinations are downright addictive. Plus, they are a hit with both kids and adults. Let’s dive into what makes this recipe stand out and why you will want to make it again and again.
Ingredients
Instructions
Step 1: Preheat the Oven
-
Start by preheating your oven to 350°F (175°C). This sets the stage for baking, allowing your cookies to rise perfectly and develop a lovely golden color.
Step 2: Prepare Baking Sheets
-
Line your baking sheets with parchment paper. This will prevent the cookies from sticking and ensures an easy release once they're baked. You can also use silicone baking mats to achieve a similar effect.
Step 3: Mix Butter and Sugars
-
In a large bowl, combine the softened unsalted butter, granulated sugar, and dark brown sugar. Beat it with an electric mixer on medium speed until the mixture is creamy. This usually takes about 2 minutes. Scrape down the sides occasionally to ensure everything is well combined.
Step 4: Add Peanut Butter and Other Ingredients
-
Next, it’s time to add in the creamy peanut butter. Blend it into the sugar mixture until smooth. After that, mix in the Greek yogurt or sour cream, egg, and egg yolk. Don’t forget the vanilla extract! It adds that lovely aroma and flavor we all love so much.
Step 5: Incorporate Dry Ingredients
-
In another bowl, whisk together the all-purpose flour, baking soda, baking powder, sea salt, and ground cinnamon (if using). Gradually add this dry mixture to the wet ingredients. Mix on low speed until just combined. Be careful not to over-mix; this will keep your cookies soft.
Step 6: Fold in Chocolate Chips and Peanuts
-
Using a spatula, gently fold in the chocolate chips and chopped roasted peanuts, if you’re using them. This adds a delightful crunchy texture to the cookies.
Step 7: Scoop the Dough
-
Using a tablespoon or a cookie scoop, drop rounded balls of dough onto your prepared baking sheets. Leave enough space between each cookie; they will spread as they bake.
Step 8: Bake
-
Place the baking sheets in the preheated oven and bake for about 10-12 minutes, or until the edges are lightly golden. Make sure not to overbake! You want them soft in the middle.
Step 9: Cool
-
Allow the cookies to cool on the baking sheets for about 5 minutes before transferring them to wire racks to cool completely. Don’t skip this step—this is where the magic happens, and they set up perfectly.
Nutrition Facts
Servings 24
- Amount Per Serving
- Calories 140kcal
- % Daily Value *
- Total Fat 7g11%
- Saturated Fat 3.5g18%
- Cholesterol 20mg7%
- Total Carbohydrate 18g6%
- Dietary Fiber 1g4%
- Sugars 9g
- Protein 3g6%
* Percent Daily Values are based on a 2,000 calorie diet. Your daily value may be higher or lower depending on your calorie needs.
Note
- Use Room Temperature Ingredients: Keeping your butter and eggs at room temperature helps in achieving a smooth and creamy batter.
- Don’t Skip the Salt: Adding a pinch of salt to the cookie dough enhances both the peanut butter and chocolate flavors—don’t skimp!
- Chill the Dough (Optional): If you prefer thicker cookies, chill the dough for 30 minutes before baking.
- Experiment with Mix-Ins: Consider adding other mix-ins such as butterscotch chips, chopped nuts, or dried fruit for varied flavors.
- Check for Doneness: Pull the cookies out of the oven when they’re just set. They will continue to firm up while cooling.