When it comes to dessert, tiramisu ladyfingers can truly stand on their own. Yet, pairing them with complementary items can elevate the experience to new heights. Imagine enjoying your tiramisu alongside a light, zesty fruit salad.
The brightness of citrus fruits can cut through the creaminess, adding a refreshing contrast. Or consider a small cup of espresso—its rich, bitter notes harmonize beautifully with the sweet, creamy layers of a tiramisu.
Another delightful option is a scoop of vanilla gelato. The creaminess of the gelato alongside the texture of tiramisu makes for a dessert combination you won’t soon forget. Finally, how about some dark chocolate-covered strawberries?
Their sweet-tart profile can create an exciting juxtaposition with the flavors of the tiramisu, making each bite a pleasure.

What Are Tiramisu Ladyfingers?
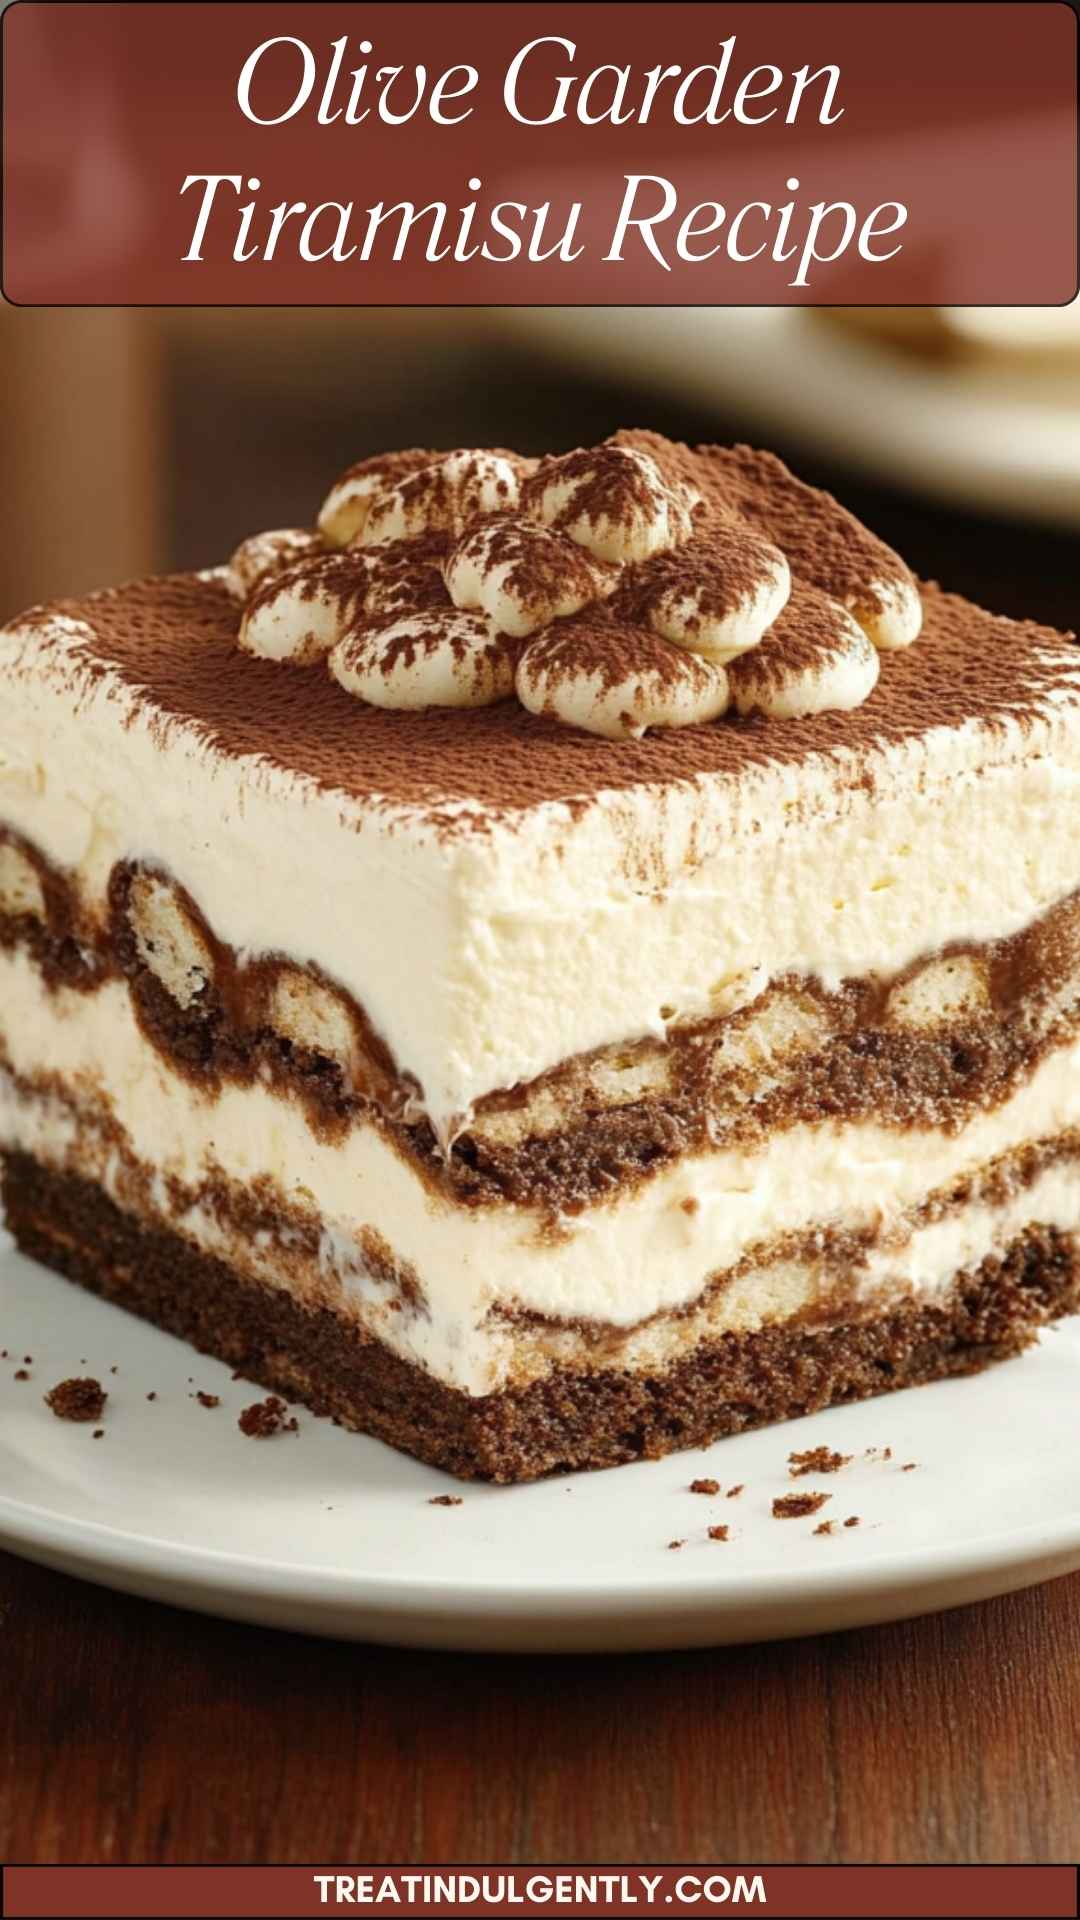
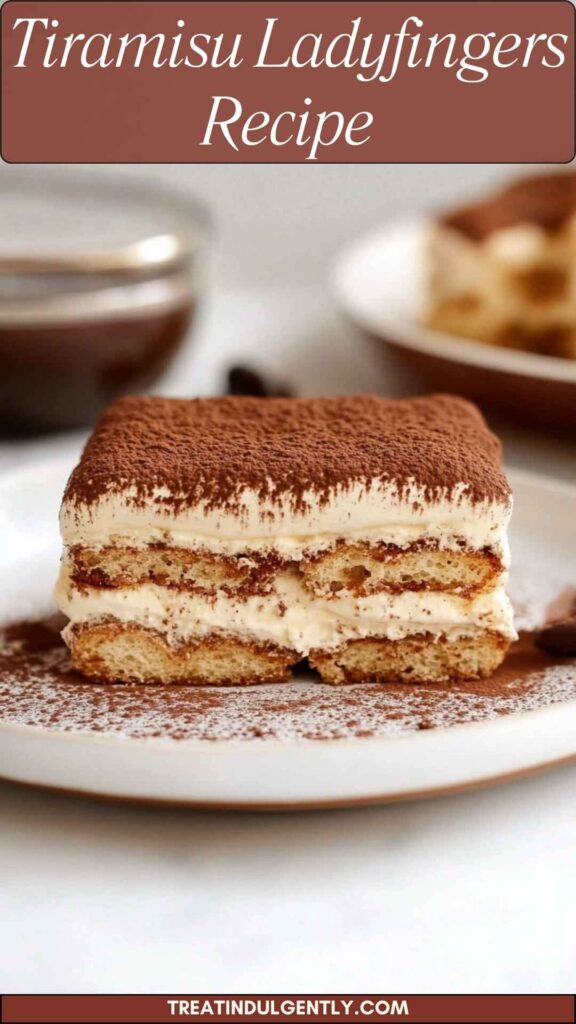
Tiramisu ladyfingers, or “savoiardi” as they are called in Italian, are sponge-type biscuits that play a vital role in the tiramisu dessert. Their unique texture allows them to absorb coffee and liqueur without losing their structure, creating the beloved layers that tiramisu is known for.
Each ladyfinger is light and airy, with just the right balance of sweetness. Traditionally, they measure about four inches long and have a lovely golden hue, making them visually appealing too.
What Does It Taste Like?
Imagine a bite of tiramisu ladyfingers: light, fluffy, and slightly sweet, with an underlying coffee flavor. The ladyfingers themselves are not overpowering; rather, they create a perfect canvas for the rich mascarpone cream and the aromatic coffee.
The dusting of cocoa powder adds a hint of bitterness, balancing out the sweetness and enhancing the flavor. This delightful combination makes each mouthful feel indulgent yet approachable.
Why This Recipe Works
Let’s break down why this recipe for tiramisu ladyfingers will not disappoint you.
1. Perfect Texture: The light and airy nature of the ladyfingers allow them to soak up the rich coffee without becoming soggy. This texture is essential for achieving that iconic tiramisu experience.
2. Simple Ingredients: With just a handful of basic ingredients—eggs, sugar, flour, and vanilla—you can create something extraordinary. This simplicity means you can easily whip them up whenever the craving strikes.
3. Versatile Use: While their primary purpose is in tiramisu, these ladyfingers can serve other marvellous functions. Think parfaits, trifle desserts, or even as a coffee-flavored snack with a cup of tea.
4. Homemade Quality: Making your own ladyfingers allows for fresh flavors and a personal touch that store-bought ones can’t match. Plus, there’s something uniquely satisfying about baking from scratch.
Ingredients for Tiramisu Ladyfingers
To create delectable tiramisu ladyfingers, you will need the following ingredients:
Filling
- 540g mascarpone cheese, softened
- 540g chilled heavy cream
- 8 large egg yolks (roughly 140g), at room temperature
- 200g superfine sugar
- ½ tsp vanilla bean paste
- 1 tbsp rum or coffee liqueur
Assembly
- 48 ladyfinger biscuits
- 660g freshly brewed, cooled strong coffee
- Unsweetened Dutch cocoa powder for dusting
- 2 tbsp dark chocolate shavings

Step-by-Step Instructions
Now that we have our ingredients ready, let’s dive into the process.
Step 1: Prepare the Egg Yolk Mixture
Begin by whisking the egg yolks and sugar together in a bowl. You want them to become pale and creamy. This may take about 5 minutes. Don’t rush this step; the air incorporated will help create a lovely texture.
Step 2: Add Mascarpone and Vanilla
Gently fold the mascarpone cheese into the egg mixture. I find it effective to work slowly here to maintain that dreamy consistency. Add in the vanilla bean paste and stir until it’s just combined.
Step 3: Whip the Heavy Cream
In a separate bowl, whip the chilled heavy cream until stiff peaks form. You want it to hold its shape but still be smooth and creamy. This will add volume and lightness to the tiramisu.
Step 4: Combine Everything
Using a spatula, fold the whipped cream into the mascarpone mixture. It’s essential to be gentle so as not to deflate the cream. You’re looking for a light, airy final result.
Step 5: Brew Coffee
While you’re preparing the cream mixture, brew your strong coffee. Allow it to cool completely before using it. If you want, you can mix in rum or coffee liqueur for extra flavor.
Step 6: Soak the Ladyfingers
Quickly dip each ladyfinger into the cooled coffee. Don’t let them soak for too long; you want them to absorb flavor but not turn mushy. A quick dip on each side usually suffices.
Step 7: Layer It Up
In a rectangular dish, start layering your ladyfingers on the bottom. Next, spread a layer of the creamy mascarpone mixture on top.
Repeat this layering process until you use all the ingredients, finishing with the cream on top.
Step 8: Chill
Cover the dish with plastic wrap and refrigerate it for at least 4 hours, preferably overnight. This time allows the flavors to meld together wonderfully.
Step 9: Dust and Serve
Right before serving, dust the top with unsweetened cocoa powder and sprinkle with dark chocolate shavings for that classic finish.
Notes
Here are some quick tips for ensuring your tiramisu ladyfingers turn out perfectly:
- Room Temperature Eggs: Make sure your eggs are at room temperature for easy mixing.
- Don’t Soak Too Long: A quick dip in coffee is all you need for the ladyfingers.
- Chill Time is Key: Give it sufficient time to set in the fridge. Patience here pays off!
- Use Quality Ingredients: Better ingredients yield a better final product. Go for high-quality mascarpone and coffee.
- Try Different Flavors: Feel free to experiment with flavored liqueurs or swap the cocoa dusting for a different topping!
How to Store the Leftovers?
If you happen to have leftovers (which, let’s be honest, is often not the case), store them in an airtight container in the fridge. They should be good for about 3-4 days. Note that the flavors continue to develop over time, which can enhance the taste!
Sides for Tiramisu Ladyfingers
To complement your tiramisu ladyfingers, consider these delightful options:
1. Fresh Berries: Strawberries, raspberries, or blueberries add a refreshing touch. Their tartness can balance the richness of tiramisu.
2. Coffee or Espresso: Serving a shot alongside the dessert keeps it classic. Plus, it’s perfect for those who love to sip something warm.
3. Whipped Cream: A dollop of lightly sweetened whipped cream on the side provides a luscious contrast and additional creaminess.
4. Biscotti: Pairing with crunchy biscotti can enhance the texture experience. Dipping them in your coffee can be a divine treat.
Alternative Choices to Ingredients
What if you don’t have all the ingredients? No worries! Here are some alternatives:
1. Mascarpone Substitute: You can use cream cheese or a ricotta mix if mascarpone is unavailable, although the texture will differ slightly.
2. Heavy Cream Alternative: Use coconut cream for a non-dairy option. Just ensure it is well-chilled before whipping.
3. Egg Free: If you prefer a no-egg recipe, you can use a vegan custard or silken tofu blended until smooth.
4. Coffee Alternatives: If you’re not a coffee fan, consider brewing some strong tea for dipping. Earl Grey can give a unique flavor twist.

Conclusion
Tiramisu ladyfingers are more than just ingredients in a classic dessert; they embody indulgence and the joy of sharing good food. With a sprinkle of cocoa, a drizzle of coffee, and a layered construction of flavors, they can take any dessert experience to new heights.
With the right steps and a dash of love, making your tiramisu ladyfingers can become your party trick! The one that leaves guests raving about your culinary skills and maybe even requesting the recipe.
So go ahead, gather your ingredients, and dive into making these scrumptious ladyfingers. Happy baking!
You’ll also like the following recipes!

Tiramisu Ladyfingers Recipe – Treat Indulgently
Description
As the sun sets and the tantalizing aroma of coffee fills the air, a dessert comes to mind that captures the essence of indulgence. Tiramisu, with its luscious layers of mascarpone cream, strong coffee, and those iconic ladyfingers, brings joy to anyone fortunate enough to savor it.
But why settle for ordinary when you can master the art of making your own tiramisu ladyfingers? These delightful biscuits serve as the backbone of this classic Italian dessert.
Let me take you on a flavorful journey as we dive into the world of tiramisu ladyfingers.
Whether you're a kitchen novice or a passionate home cook, this guide aims to equip you with everything you need to know about these delightful treats—from their flavor profile to a step-by-step recipe that will make you the star of your next gathering.
Ingredients
Filling
Assembly
Instructions
Step 1: Prepare the Egg Yolk Mixture
-
Begin by whisking the egg yolks and sugar together in a bowl. You want them to become pale and creamy. This may take about 5 minutes. Don't rush this step; the air incorporated will help create a lovely texture.
Step 2: Add Mascarpone and Vanilla
-
Gently fold the mascarpone cheese into the egg mixture. I find it effective to work slowly here to maintain that dreamy consistency. Add in the vanilla bean paste and stir until it's just combined.
Step 3: Whip the Heavy Cream
-
In a separate bowl, whip the chilled heavy cream until stiff peaks form. You want it to hold its shape but still be smooth and creamy. This will add volume and lightness to the tiramisu.
Step 4: Combine Everything
-
Using a spatula, fold the whipped cream into the mascarpone mixture. It’s essential to be gentle so as not to deflate the cream. You’re looking for a light, airy final result.
Step 5: Brew Coffee
-
While you’re preparing the cream mixture, brew your strong coffee. Allow it to cool completely before using it. If you want, you can mix in rum or coffee liqueur for extra flavor.
Step 6: Soak the Ladyfingers
-
Quickly dip each ladyfinger into the cooled coffee. Don’t let them soak for too long; you want them to absorb flavor but not turn mushy. A quick dip on each side usually suffices.
Step 7: Layer It Up
-
In a rectangular dish, start layering your ladyfingers on the bottom. Next, spread a layer of the creamy mascarpone mixture on top.
Repeat this layering process until you use all the ingredients, finishing with the cream on top.
Step 8: Chill
-
Cover the dish with plastic wrap and refrigerate it for at least 4 hours, preferably overnight. This time allows the flavors to meld together wonderfully.
Step 9: Dust and Serve
-
Right before serving, dust the top with unsweetened cocoa powder and sprinkle with dark chocolate shavings for that classic finish.
Nutrition Facts
Servings 12
- Amount Per Serving
- Calories 384kcal
- % Daily Value *
- Total Fat 18.3g29%
- Saturated Fat 5.9g30%
- Cholesterol 175mg59%
- Sodium 376mg16%
- Total Carbohydrate 36g12%
- Dietary Fiber 1g4%
- Sugars 18g
- Protein 18g36%
* Percent Daily Values are based on a 2,000 calorie diet. Your daily value may be higher or lower depending on your calorie needs.
Note
- Room Temperature Eggs: Make sure your eggs are at room temperature for easy mixing.
- Don’t Soak Too Long: A quick dip in coffee is all you need for the ladyfingers.
- Chill Time is Key: Give it sufficient time to set in the fridge. Patience here pays off!
- Use Quality Ingredients: Better ingredients yield a better final product. Go for high-quality mascarpone and coffee.
- Try Different Flavors: Feel free to experiment with flavored liqueurs or swap the cocoa dusting for a different topping!