
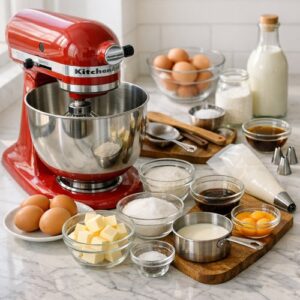
Ingredients
Method
Step 1: Prepare Your Mise en Place and Equipment
- Before you begin, gather everything you'll need. I recommend investing in a good-quality stand mixer—the KitchenAid 5-quart is my professional go-to because it gives you consistent results every time. You'll also want parchment paper, two baking sheets, and a piping bag fitted with a large round tip (I prefer Ateco #806, which creates that elegant, uniform shape). Proper equipment makes the difference between rustic-looking pastries and truly professional ones.
Step 2: Create the Choux Pastry Base
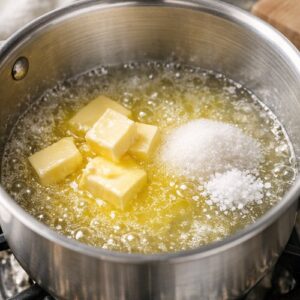
- Combine your filtered water, butter, kosher salt, and sugar in a heavy-bottomed saucepan over medium heat. Watch as the butter melts completely into the water—this is crucial. Once you see small bubbles forming around the edges (not a rolling boil), remove from heat and stir in your sifted bread flour until fully incorporated. The mixture should look like mashed potatoes at this stage. Return the pan to medium heat for about one minute, stirring constantly. This step dries out the dough slightly, which is essential for proper rise. You're looking for a thin film to form on the bottom of the pan—this signals proper gelatinization. Transfer to your stand mixer bowl and let cool for about 3-4 minutes.
Step 3: Incorporate Eggs with Precision
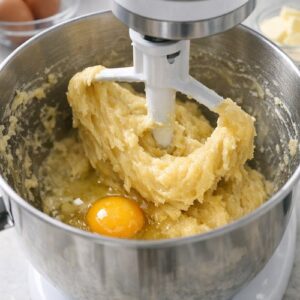
- Using the paddle attachment on medium speed, begin adding eggs one at a time. After adding the first egg, beat for about 30 seconds until fully incorporated before adding the next. The dough will look broken and separated after each addition—don't worry, this is exactly what should happen. After the third egg, add your vanilla extract. The dough should be glossy and hold a peak when you lift the paddle, but still be pipeable. If your dough is too thick after the fourth egg, you may not need the entire egg. Add it gradually until you reach the perfect consistency. This is where experience teaches you to trust your instincts.
Step 4: Pipe the Eclair Shells
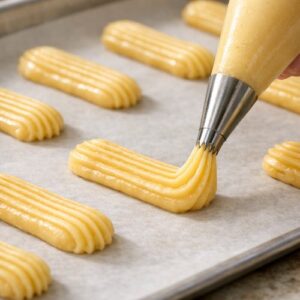
- Line your baking sheets with parchment paper and transfer your choux dough to the piping bag. Pipe 4-inch long éclairs, spacing them about 2 inches apart. Consistency in length and thickness is what creates that professional appearance. I like to use a small offset spatula dipped in water to smooth any peaks at the end of each eclair. Let the piped éclairs rest at room temperature for 10 minutes. This allows the structure to set slightly before baking, which contributes to more even rise and that beautiful golden-brown exterior.
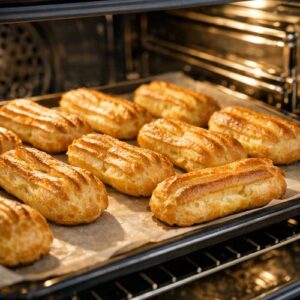
Step 5: Bake for Golden Perfection
- Preheat your oven to 200°C (400°F). Place the baking sheets in the oven and bake for 35-40 minutes without opening the door. The éclairs need to bake until they're deeply golden and feel hollow when gently pressed. This is the moment that determines whether your shells will be crisp and delicate or dense and heavy. In the final 5 minutes of baking, you can carefully crack the oven door open slightly to allow steam to escape, which helps ensure crispness. Once done, transfer to a cooling rack immediately.
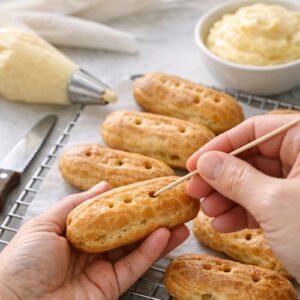
Step 6: Fill the Éclairs with Precision
- Once the shells are completely cool, use a serrated knife or a small wooden skewer to poke holes into the bottom of each éclair. Transfer your prepared pastry cream to a piping bag fitted with a small round tip, and carefully inject the cream into each shell from the bottom. You'll feel a slight resistance when the shell is full. Proper filling distribution creates even height when plated and prevents cream from leaking out the sides. If you prefer, you can also slice the éclairs in half horizontally and spread the filling inside, but I find the injection method creates a more elegant presentation with less risk of cracking the delicate pastry.
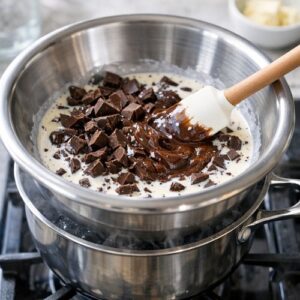
Step 7: Create the Glossy Chocolate Glaze
- Combine your chopped semisweet chocolate with the heavy cream in a heat-safe bowl. I use a double boiler method to ensure gentle, even melting. Heat the cream over simmering water, pouring it over the chocolate and letting it sit for 30 seconds before stirring. Add the butter, salt, and corn syrup if using, stirring until completely smooth. The glaze should be pourable but not too thin—it should coat the back of a spoon like heavy cream. If it's too thick, warm it slightly over the double boiler. If it's too thin, let it cool for a few minutes while stirring occasionally.
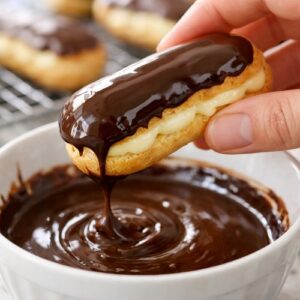
Step 8: Coat with Professional Technique
- This is where your éclairs transform from good to stunning. Holding each filled éclair by the bottom, dip the top third into the chocolate glaze at a slight angle. The key is a confident, smooth motion—hesitation creates uneven coating. The glaze should create a thin, mirror-like finish that's barely thicker than paper. Return each glazed éclair to a parchment-lined tray and allow the glaze to set at room temperature for about 20 minutes. Resist the urge to refrigerate, as this can cause bloom (that white, matte finish). You want that gloss to remain pristine.
Notes
- Golden hour natural light is non-negotiable - Photograph your plated éclairs within an hour of the sun being low on the horizon. Position your plate so light hits the glaze at a 45-degree angle. This creates that coveted "3D gloss" effect where you can actually see dimension in the chocolate coating. Avoid harsh midday sun, which creates flat, unflattering shadows.
- Use a white bounce board to fill shadows - Position a white foam board or poster board on the opposite side of your light source. This gently bounces light back into the shadowed side of the éclairs, creating even, beautiful illumination without harsh contrasts. The bounce should be subtle—you're aiming for professional food styling, not a high-key editorial look.
- Shoot at a 45-degree angle, not straight down - This angle shows off the height of the pastry shell and the glossy chocolate coating simultaneously. Your camera should be at approximately the same height as the top of the plated éclairs. This perspective makes viewers feel invited to reach across the table and take one for themselves.