This post contains affiliate links. As an Amazon Associate I earn from qualifying purchases.
This chocolate eclair recipe doesn’t just taste incredible—it stops people in their tracks the moment it touches the table. I’ve been making these since my early days in my family’s kitchen, and I can tell you with absolute certainty: there’s something about the glossy chocolate crown and the delicate pastry shell that makes even seasoned dinner guests lean forward in anticipation. If you’re looking to create a dessert that’s both visually stunning and nutritionally balanced enough to feel mindful about enjoying, this is your answer. I’ve combined my clinical nutrition background with the pure indulgence these eclairs deserve, proving that luxurious and thoughtful eating can absolutely coexist.
What makes this recipe special isn’t just the technique—it’s the approach. Like my other favorite show-stopping desserts such as the best profiterole recipe, these eclairs showcase how choux pastry can be transformed into something truly magnificent. The difference here is in the presentation and the quality of ingredients we’re using.

The Visual Elements That Make This Dish Stunning
When I first realized how much the visual presentation mattered, I was preparing éclairs for a small dinner party. One guest walked in, saw them arranged on a slate platter with that glossy chocolate glaze catching the light, and actually gasped. That moment changed everything for me. I realized I wasn’t just making a dessert—I was creating an edible work of art that would be remembered long after the taste faded.
The beauty of chocolate éclairs lies in their architectural elegance and the interplay of colors, textures, and composition that makes them so visually captivating.
- Deep, glossy chocolate coating – The semisweet chocolate glaze creates a mirror-like finish that catches light beautifully. This lustrous surface signals quality and indulgence before anyone takes a bite, and the rich mahogany tone provides stunning contrast against lighter plates or serving surfaces.
- Golden, crisp pastry exterior – The choux pastry bakes to a beautiful caramelized golden-brown that speaks to proper technique and careful heat control. This texture contrasts magnificently with the smooth chocolate coating and hints at the delicate, airy interior within.
- Vertical height and elongated form – The classic eclair shape creates natural lines that draw the eye upward. When arranged in a row or in a slight pyramid formation, they create visual rhythm and sophistication that’s instantly recognizable as French patisserie.
Choosing Ingredients for Maximum Visual Impact
I approach ingredient selection the way a painter selects colors for a canvas. Every component plays a role in the final visual presentation, and I’m passionate about sourcing each element with intention. The quality of your chocolate, the freshness of your eggs, and the type of butter you use all contribute not just to flavor, but to how your éclairs will look on the plate.
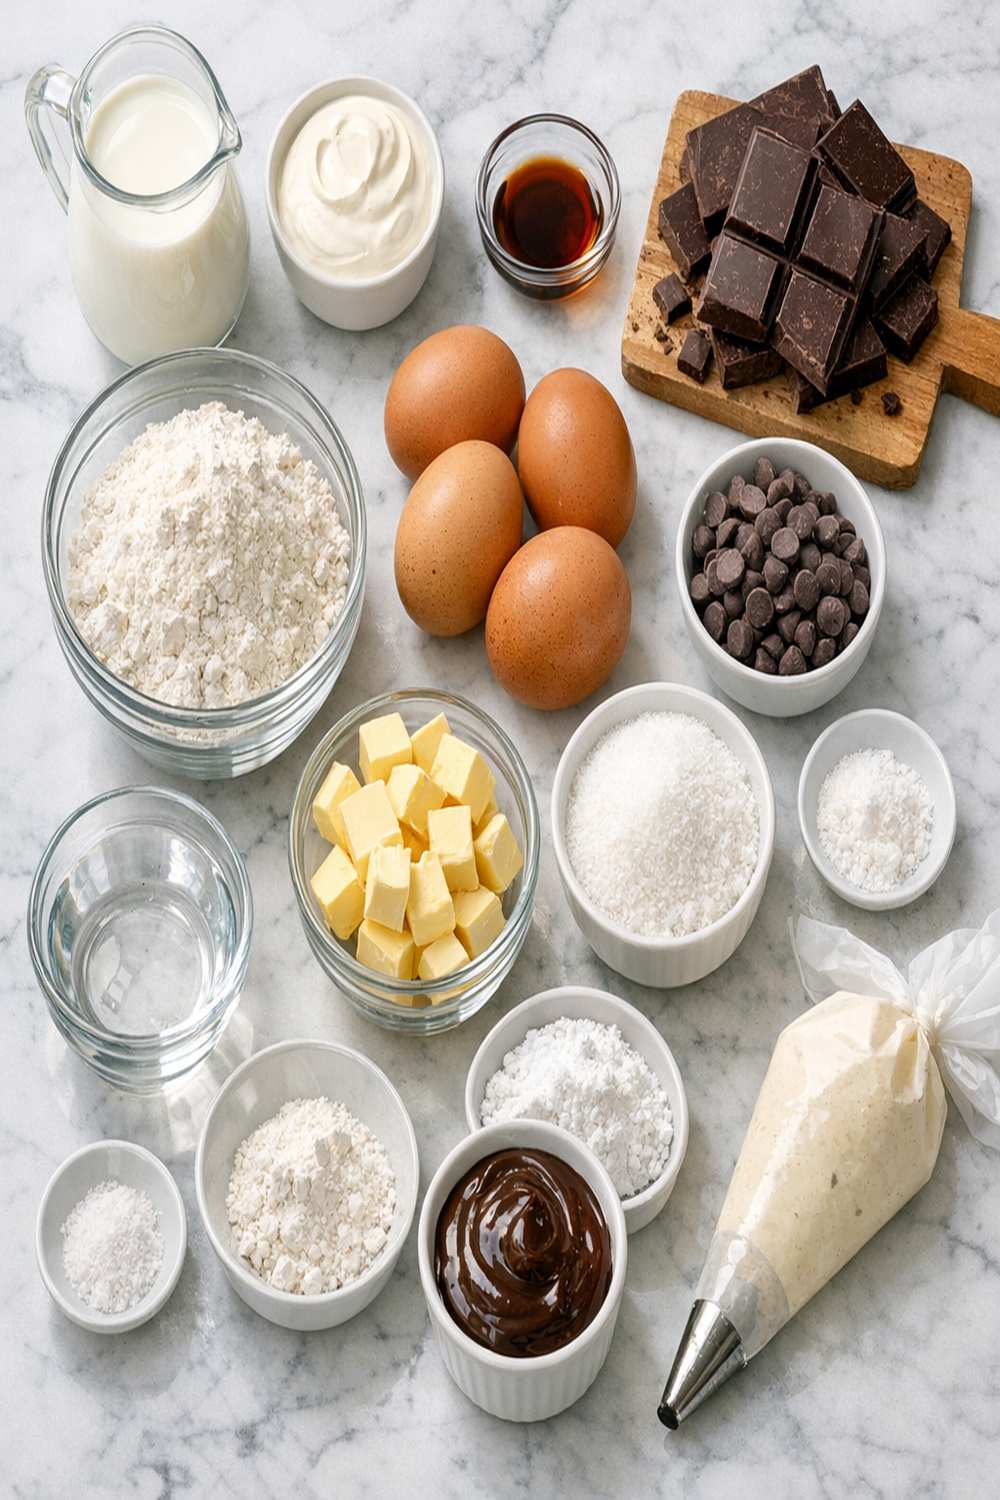
For the Choux Pastry
- 240 mL filtered water (room temperature works best for even hydration)
- 145 g bread flour (measured by spooning and leveling, then sifted for aeration)
- 1 teaspoon pure vanilla extract (optional but adds aromatic depth)
- 115 g unsalted butter (European-style with higher fat content creates better lift and color)
- 226 g large eggs (measured in their shells, approximately 4 eggs at room temperature)
- 1 tablespoon granulated white sugar (enhances browning and subtle sweetness)
- ½ teaspoon kosher salt (reduces if using table salt, which is denser)
For the Pastry Cream Filling
- 1½ batches vanilla pastry cream or chocolate pastry cream (see my best cream patisserie recipe for detailed instructions)
For the Chocolate Glaze
- 340 g semisweet chocolate (chopped into small, uniform pieces for even melting)
- Generous pinch of kosher salt (balances sweetness and enhances chocolate flavor)
- 180 mL heavy whipping cream (full-fat creates silky, luxurious texture)
- 2 tablespoons light corn syrup (optional, creates extra shine and prevents bloom)
- 28 g unsalted butter (adds glossy finish and prevents cracking)
Yield: Makes 12 beautiful, elegant éclairs
How to Make Picture-Perfect Chocolate Éclairs
Creating these éclairs is about understanding how each step contributes to the final visual masterpiece. I’ll walk you through my process, highlighting the moments where presentation and technique intersect. This is where the magic happens, and I want you to feel confident with every step.
Step 1: Prepare Your Mise en Place and Equipment
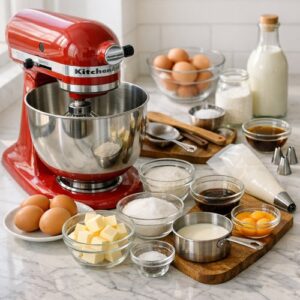
Before you begin, gather everything you’ll need. I recommend investing in a good-quality stand mixer—the KitchenAid 5-quart is my professional go-to because it gives you consistent results every time. You’ll also want parchment paper, two baking sheets, and a piping bag fitted with a large round tip (I prefer Ateco #806, which creates that elegant, uniform shape). Proper equipment makes the difference between rustic-looking pastries and truly professional ones.

Step 2: Create the Choux Pastry Base
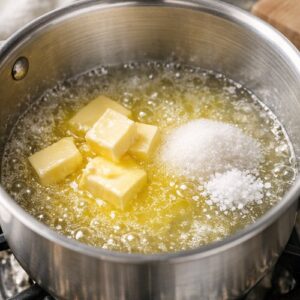
Combine your filtered water, butter, kosher salt, and sugar in a heavy-bottomed saucepan over medium heat. Watch as the butter melts completely into the water—this is crucial. Once you see small bubbles forming around the edges (not a rolling boil), remove from heat and stir in your sifted bread flour until fully incorporated. The mixture should look like mashed potatoes at this stage.
Return the pan to medium heat for about one minute, stirring constantly. This step dries out the dough slightly, which is essential for proper rise. You’re looking for a thin film to form on the bottom of the pan—this signals proper gelatinization. Transfer to your stand mixer bowl and let cool for about 3-4 minutes.

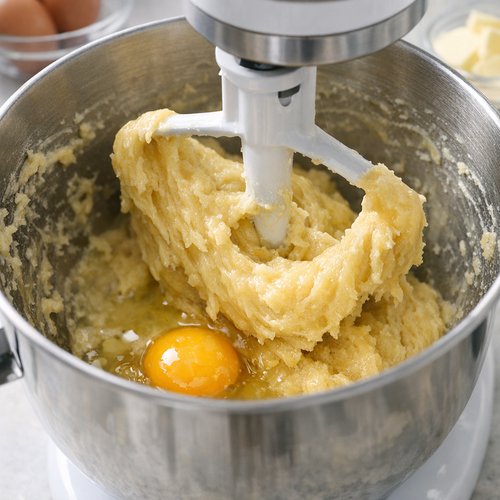
Step 3: Incorporate Eggs with Precision
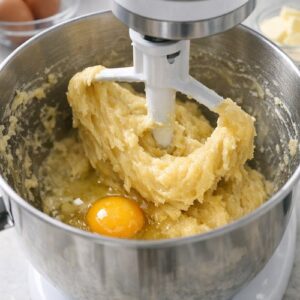
Using the paddle attachment on medium speed, begin adding eggs one at a time. After adding the first egg, beat for about 30 seconds until fully incorporated before adding the next. The dough will look broken and separated after each addition—don’t worry, this is exactly what should happen. After the third egg, add your vanilla extract. The dough should be glossy and hold a peak when you lift the paddle, but still be pipeable.
If your dough is too thick after the fourth egg, you may not need the entire egg. Add it gradually until you reach the perfect consistency. This is where experience teaches you to trust your instincts.
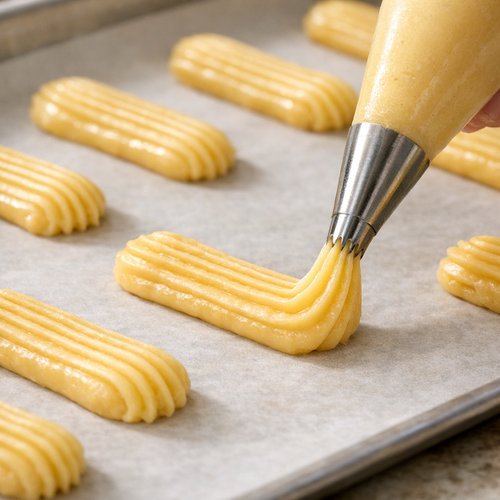
Step 4: Pipe the Eclair Shells
Line your baking sheets with parchment paper and transfer your choux dough to the piping bag. Pipe 4-inch long éclairs, spacing them about 2 inches apart. Consistency in length and thickness is what creates that professional appearance. I like to use a small offset spatula dipped in water to smooth any peaks at the end of each eclair.
Let the piped éclairs rest at room temperature for 10 minutes. This allows the structure to set slightly before baking, which contributes to more even rise and that beautiful golden-brown exterior.
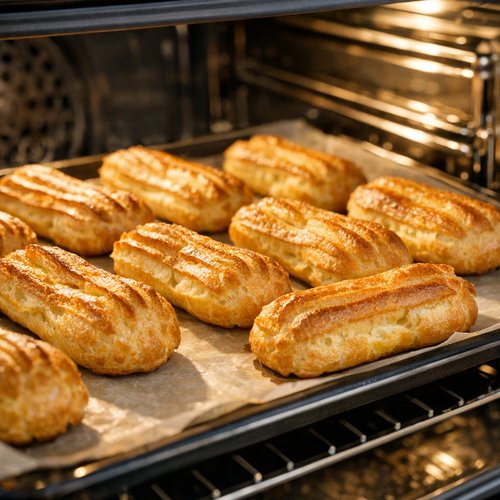
Step 5: Bake for Golden Perfection
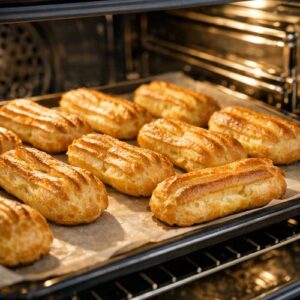
Preheat your oven to 200°C (400°F). Place the baking sheets in the oven and bake for 35-40 minutes without opening the door. The éclairs need to bake until they’re deeply golden and feel hollow when gently pressed. This is the moment that determines whether your shells will be crisp and delicate or dense and heavy.
In the final 5 minutes of baking, you can carefully crack the oven door open slightly to allow steam to escape, which helps ensure crispness. Once done, transfer to a cooling rack immediately.
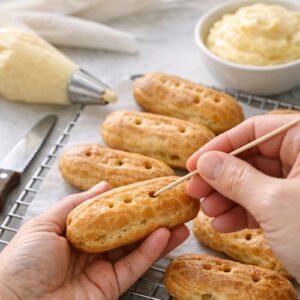
Step 6: Fill the Éclairs with Precision
Once the shells are completely cool, use a serrated knife or a small wooden skewer to poke holes into the bottom of each éclair. Transfer your prepared pastry cream to a piping bag fitted with a small round tip, and carefully inject the cream into each shell from the bottom. You’ll feel a slight resistance when the shell is full. Proper filling distribution creates even height when plated and prevents cream from leaking out the sides.
If you prefer, you can also slice the éclairs in half horizontally and spread the filling inside, but I find the injection method creates a more elegant presentation with less risk of cracking the delicate pastry.

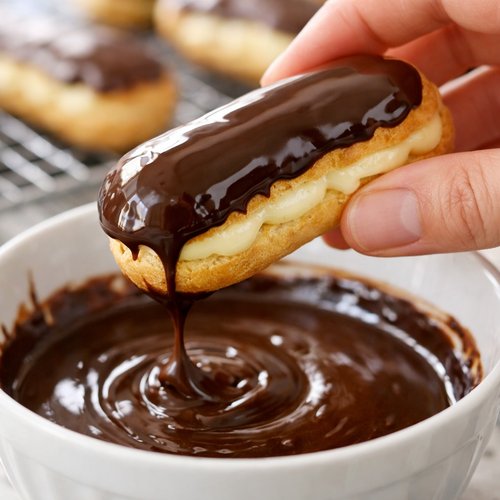
Step 7: Create the Glossy Chocolate Glaze
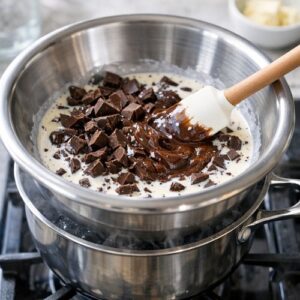
Combine your chopped semisweet chocolate with the heavy cream in a heat-safe bowl. I use a double boiler method to ensure gentle, even melting. Heat the cream over simmering water, pouring it over the chocolate and letting it sit for 30 seconds before stirring. Add the butter, salt, and corn syrup if using, stirring until completely smooth.
The glaze should be pourable but not too thin—it should coat the back of a spoon like heavy cream. If it’s too thick, warm it slightly over the double boiler. If it’s too thin, let it cool for a few minutes while stirring occasionally.

Step 8: Coat with Professional Technique
This is where your éclairs transform from good to stunning. Holding each filled éclair by the bottom, dip the top third into the chocolate glaze at a slight angle. The key is a confident, smooth motion—hesitation creates uneven coating. The glaze should create a thin, mirror-like finish that’s barely thicker than paper.
Return each glazed éclair to a parchment-lined tray and allow the glaze to set at room temperature for about 20 minutes. Resist the urge to refrigerate, as this can cause bloom (that white, matte finish). You want that gloss to remain pristine.
The Plating Masterclass
The moment of plating is where your éclairs transform from kitchen creation into restaurant-quality presentation. After years of carefully studying how professional patisseries present their work, I’ve developed a systematic approach that works beautifully every single time.
- Negative space arrangement – Place your éclairs on the plate with intentional breathing room between each one. Rather than clustering three éclairs in the center, position them in a slight diagonal line across a white or slate-colored plate. This creates visual sophistication and allows the glaze to catch light beautifully from different angles. I typically use plates at least 10 inches wide for a trio of éclairs.
- Height variation through composition – Rather than laying all éclairs flat, consider leaning one slightly against the other or elevating one end by a half-inch using a small spoon underneath. This creates dynamic visual interest and suggests that these are delicate, precious objects worthy of careful presentation. The subtle elevation also helps light reflect off the glaze more dramatically.
- Garnish with restraint and intention – A single leaf of fresh mint, a light dusting of cocoa powder applied through a fine sieve, or a few micro chocolate curls placed strategically on the plate (not on the éclair itself) add sophistication without overwhelming the elegant simplicity of the form. I find that less is more here—these éclairs are already visually complete.
Photography Tips for This Dish
I’ve learned that photographing éclairs requires understanding how light interacts with that glossy chocolate glaze. Here’s how I ensure my images do justice to these beautiful pastries.
- Golden hour natural light is non-negotiable – Photograph your plated éclairs within an hour of the sun being low on the horizon. Position your plate so light hits the glaze at a 45-degree angle. This creates that coveted “3D gloss” effect where you can actually see dimension in the chocolate coating. Avoid harsh midday sun, which creates flat, unflattering shadows.
- Use a white bounce board to fill shadows – Position a white foam board or poster board on the opposite side of your light source. This gently bounces light back into the shadowed side of the éclairs, creating even, beautiful illumination without harsh contrasts. The bounce should be subtle—you’re aiming for professional food styling, not a high-key editorial look.
- Shoot at a 45-degree angle, not straight down – This angle shows off the height of the pastry shell and the glossy chocolate coating simultaneously. Your camera should be at approximately the same height as the top of the plated éclairs. This perspective makes viewers feel invited to reach across the table and take one for themselves.
Seasonal Color Variations
While the classic chocolate éclair is absolutely timeless, I love adapting these for the seasons. The beauty of the choux base is that it remains perfectly elegant while you play with filling and glaze variations.
Spring presentation: Fill your éclairs with vanilla pastry cream and top with a white chocolate glaze, then garnish with a fresh strawberry slice placed delicately on top. The pink and white combination signals spring while maintaining elegance.
Summer variation: Switch to a lighter lemon or raspberry pastry cream filling, and create a glossy dark chocolate glaze. The bright filling peeking through where the pastry was piped creates visual interest. Garnish with a single fresh raspberry on top.
Autumn update: Use a cinnamon-spiced pastry cream and finish with a chocolate glaze infused with a touch of espresso powder for depth. A delicate caramel drizzle across the plate creates warmth that echoes the season.
Winter elegance: Fill with a peppermint-infused pastry cream and top with a dark chocolate glaze. Add a tiny pinch of crushed candy cane or peppermint stick on the plate beside each éclair for festive sophistication.
Can I Store Chocolate Éclair Recipe?
One of the most common questions I receive is about storage, and I appreciate it because proper storage directly affects the visual presentation of your final dish. Here’s my professional guidance on keeping these éclairs looking and tasting their best.
The unfilled éclair shells can be baked up to 2 days in advance and stored in an airtight container at room temperature. I find they actually taste slightly better on day two, as the flavors meld. Before serving, you can refresh them in a 150°C (300°F) oven for about 5 minutes to restore crispness.
Filled and glazed éclairs are best served within 4-6 hours of assembly. The longer they sit, the more the pastry absorbs moisture from the cream filling, causing it to lose that satisfying crisp texture that makes the contrast so beautiful. If you must store them longer, keep them refrigerated in a covered container for up to 24 hours maximum, but plan to serve them chilled directly from the refrigerator in that case.
I do not recommend freezing assembled éclairs, as the glaze will crack when thawed and the pastry texture suffers considerably. However, unfilled shells freeze beautifully for up to 3 months in a freezer-safe container. Thaw at room temperature for 30 minutes before filling.
Expert’s Nutritional Tip
As a registered dietitian, I’ve made peace with the fact that éclairs are an indulgent treat—and that’s perfectly fine. What matters is mindfulness around how we enjoy them. Here’s my professional insight: the semisweet chocolate in the glaze contains polyphenols and antioxidants, particularly if you choose chocolate that’s at least 60% cacao. These compounds have genuine nutritional value, which means you’re not just eating for pleasure, you’re getting measurable benefits.
The eggs in the choux pastry provide choline, essential for brain health and cognitive function. The pastry cream’s dairy contributes bioavailable calcium and protein. When you choose quality ingredients—like European butter with higher fat content and farm-fresh eggs—you’re getting superior nutrient density. One éclair provides approximately 280-320 calories, 18g fat, 28g carbohydrates, and 5g protein. The point isn’t to obsess over numbers but to understand that this indulgent dessert carries real nutritional weight. Enjoy it fully, savor every bite, and trust that quality ingredients make a difference.
Make-Ahead Guide for Entertaining
I’ve built my reputation partly on being able to entertain with grace, and that requires strategic planning. Here’s my professional timeline for preparing chocolate éclairs when you’re hosting.
3 days before: Make your pastry cream (either vanilla or chocolate). Store it in an airtight container in the refrigerator, where it keeps perfectly. The flavors actually deepen slightly with time.
2 days before: Bake your choux shells. Store them in an airtight container at room temperature. This gives you the luxury of not feeling rushed the day of your event.
Day of, morning: Prepare your chocolate glaze and let it cool to room temperature. Keep it in a bowl covered with plastic wrap. You can rewarm it gently over a double boiler about 30 minutes before serving.
Day of, 2 hours before guests arrive: Fill your éclairs with pastry cream using the injection method. This is when they’re most fragile, so handle gently.
Day of, 1 hour before guests arrive: Glaze your éclairs. Allow them to set at room temperature (not refrigerated) for the glossiest finish.
Day of, 15 minutes before serving: Plate your éclairs. They’re ready to dazzle.
Common Mistakes to Avoid
Over the years, I’ve seen talented home cooks make the same mistakes with éclairs. Learning from these mishaps will elevate your results immediately.
Mistake 1: Opening the oven door too early or too often. The choux pastry needs that steam environment to puff properly. Every time you open the door, you release steam and invite collapse. Trust the process and resist the urge to peek. Use an oven light if your oven has one.
Mistake 2: Using butter that’s too cold when making the choux base. If your butter is straight from the refrigerator, it won’t melt evenly into the water, creating temperature inconsistencies that affect how the flour hydrates. Let your butter sit at room temperature for 30 minutes before beginning.
Mistake 3: Glazing while the éclairs are still warm. Warm pastry shells will make your chocolate glaze melt and slide off in an uneven mess. The éclairs must be completely cool before glazing. I often glaze them several hours after baking.
Mistake 4: Overfilling the shells. I understand the temptation to maximize cream filling, but overfilled éclairs look sloppy and burst when handled. Fill until you feel gentle resistance, then stop. Each shell should look neat and contained.
What to Serve Alongside for a Complete Visual Spread
When I’m plating chocolate éclairs for entertaining, I think about the entire visual landscape of the dessert course. These elegant pastries deserve complementary elements that enhance rather than compete.
A beautiful pavlova alongside your éclairs creates a stunning textural contrast—the crisp, cloud-like meringue against the smooth pastry creates visual interest. Alternatively, if you want something that maintains elegance without competing for attention, consider a simple blender sorbet served in a small glass alongside each plate. The vibrant color of a raspberry or passion fruit sorbet creates a beautiful accent without overwhelming the éclairs themselves.
- Candied violets or edible flowers – A single flower placed on the plate beside your éclairs adds a romantic, sophisticated touch. The delicate color suggests refinement without visual clutter.
- Cocoa powder dusted on the plate – Using a fine sieve, create a light arc of cocoa powder on the white plate. This echoes the chocolate theme and adds professional depth to your presentation.
- Shaved chocolate curls in a small nest – Create elegant chocolate shavings using a vegetable peeler on a block of chocolate at room temperature. Arrange a small nest of these curls beside your éclairs for textural interest.
Chocolate Eclair Recipe
Ingredients
Method
- Before you begin, gather everything you'll need. I recommend investing in a good-quality stand mixer—the KitchenAid 5-quart is my professional go-to because it gives you consistent results every time. You'll also want parchment paper, two baking sheets, and a piping bag fitted with a large round tip (I prefer Ateco #806, which creates that elegant, uniform shape). Proper equipment makes the difference between rustic-looking pastries and truly professional ones.
- Combine your filtered water, butter, kosher salt, and sugar in a heavy-bottomed saucepan over medium heat. Watch as the butter melts completely into the water—this is crucial. Once you see small bubbles forming around the edges (not a rolling boil), remove from heat and stir in your sifted bread flour until fully incorporated. The mixture should look like mashed potatoes at this stage. Return the pan to medium heat for about one minute, stirring constantly. This step dries out the dough slightly, which is essential for proper rise. You're looking for a thin film to form on the bottom of the pan—this signals proper gelatinization. Transfer to your stand mixer bowl and let cool for about 3-4 minutes.
- Using the paddle attachment on medium speed, begin adding eggs one at a time. After adding the first egg, beat for about 30 seconds until fully incorporated before adding the next. The dough will look broken and separated after each addition—don't worry, this is exactly what should happen. After the third egg, add your vanilla extract. The dough should be glossy and hold a peak when you lift the paddle, but still be pipeable. If your dough is too thick after the fourth egg, you may not need the entire egg. Add it gradually until you reach the perfect consistency. This is where experience teaches you to trust your instincts.
- Line your baking sheets with parchment paper and transfer your choux dough to the piping bag. Pipe 4-inch long éclairs, spacing them about 2 inches apart. Consistency in length and thickness is what creates that professional appearance. I like to use a small offset spatula dipped in water to smooth any peaks at the end of each eclair. Let the piped éclairs rest at room temperature for 10 minutes. This allows the structure to set slightly before baking, which contributes to more even rise and that beautiful golden-brown exterior.

- Preheat your oven to 200°C (400°F). Place the baking sheets in the oven and bake for 35-40 minutes without opening the door. The éclairs need to bake until they're deeply golden and feel hollow when gently pressed. This is the moment that determines whether your shells will be crisp and delicate or dense and heavy. In the final 5 minutes of baking, you can carefully crack the oven door open slightly to allow steam to escape, which helps ensure crispness. Once done, transfer to a cooling rack immediately.
- Once the shells are completely cool, use a serrated knife or a small wooden skewer to poke holes into the bottom of each éclair. Transfer your prepared pastry cream to a piping bag fitted with a small round tip, and carefully inject the cream into each shell from the bottom. You'll feel a slight resistance when the shell is full. Proper filling distribution creates even height when plated and prevents cream from leaking out the sides. If you prefer, you can also slice the éclairs in half horizontally and spread the filling inside, but I find the injection method creates a more elegant presentation with less risk of cracking the delicate pastry.
- Combine your chopped semisweet chocolate with the heavy cream in a heat-safe bowl. I use a double boiler method to ensure gentle, even melting. Heat the cream over simmering water, pouring it over the chocolate and letting it sit for 30 seconds before stirring. Add the butter, salt, and corn syrup if using, stirring until completely smooth. The glaze should be pourable but not too thin—it should coat the back of a spoon like heavy cream. If it's too thick, warm it slightly over the double boiler. If it's too thin, let it cool for a few minutes while stirring occasionally.
- This is where your éclairs transform from good to stunning. Holding each filled éclair by the bottom, dip the top third into the chocolate glaze at a slight angle. The key is a confident, smooth motion—hesitation creates uneven coating. The glaze should create a thin, mirror-like finish that's barely thicker than paper. Return each glazed éclair to a parchment-lined tray and allow the glaze to set at room temperature for about 20 minutes. Resist the urge to refrigerate, as this can cause bloom (that white, matte finish). You want that gloss to remain pristine.

Notes
FAQs
Why did my éclairs come out flat or dense instead of puffing up?
The most common culprit is moisture management in the choux dough. If your dough was too wet, the éclairs won’t have the structure to puff. Make sure you’re heating the flour mixture briefly on the stovetop—this step is crucial for gelatinizing the starch and drying out the dough slightly. Also verify that your oven temperature is accurate using an oven thermometer, and never open the door during baking. Even a 10-degree temperature variance affects results dramatically.
How do I get that glossy, mirror-like chocolate finish on my glaze?
The glaze consistency is everything here. It should be pourable but not too thin. If it’s too thick, your coating will be uneven and matte. If it’s too thin, it will slide off completely. Add the corn syrup if you want extra shine—it prevents bloom and creates that coveted lustrous finish. Also crucial: glaze at room temperature on room-temperature éclairs. Warm pastry will cause the glaze to melt unevenly, and cold éclairs will cause the glaze to set too quickly, creating a dull finish.
Can I make these with a pastry bag instead of piping bag?
While technically possible, I strongly recommend investing in a proper piping bag and tips. A pastry bag gives you significantly more control over the consistency and shape of your éclairs. For the price of a quality piping bag and a few good tips (I recommend Ateco or Wilton), you’re investing in presentation that will noticeably improve your results. Consider it an investment in your entertaining arsenal.
My chocolate glaze cracked when it cooled. What went wrong?
Cracking usually indicates that your glaze cooled too quickly or had too much chocolate relative to fat. Make sure you’re using the proper ratio: the heavy cream and butter should be approximately one-third of the weight of the chocolate. Also, if you glazed éclairs that were very cold (straight from the refrigerator), the temperature shock can cause the glaze to crack. Always glaze at room temperature on room-temperature pastries.
How can I make the filling flavor stronger or more interesting?
The pastry cream base is incredibly adaptable. You can infuse the cream with flavoring—try adding a Madagascar vanilla bean split lengthwise and steeped in the heating cream before making the pastry cream, or add espresso powder, almond extract, or even a touch of Grand Marnier. You can also switch to my best cream patisserie recipe and experiment with flavor variations there. Just remember that the filling should remain thick enough to hold the éclairs’ shape, so don’t make it too runny with added liquids.
Nutrition Information
Each chocolate éclair (based on 12 servings) contains approximately: 310 calories, 19g total fat, 32g carbohydrates, 5g protein, and 1.2g fiber. According to USDA nutritional databases, the semisweet chocolate provides 85mg of polyphenolic compounds, primarily flavonoids with antioxidant properties. The eggs contribute 40mcg of choline, essential for neural development and cognitive function.
The inclusion of quality butter means you’re getting fat-soluble vitamins including vitamin A and vitamin E. The pastry cream adds calcium (approximately 85mg per éclair) and additional protein. These aren’t “health foods” in the traditional sense, but they represent honest indulgence made with ingredients that have genuine nutritional density. The colorful filling variations (if you choose chocolate or fruit pastry cream) signal the presence of additional phytonutrients and antioxidants.
More Visually Stunning Recipes
- Best Profiterole Recipe – Similar choux technique with smaller, bite-sized elegance perfect for a composed dessert plate
- Best Cream Patisserie Recipe – The foundational pastry cream technique that unlocks dozens of elegant desserts
- Bavarian Cream Dessert Recipe – A lighter, mousse-like alternative filling that creates visual interest through layers
Final Thoughts on Creating Edible Art
Making chocolate éclairs has taught me something profound about the intersection of technique and joy. These pastries sit at that beautiful intersection where clinical precision meets luxurious indulgence, where measured ingredients become something transcendent. Every time I guide someone through creating their first batch of éclairs and see their face when they pull golden shells from the oven, I’m reminded why I do this work.
These éclairs represent possibility—the possibility that you, in your own kitchen, can create something that looks restaurant-quality and tastes absolutely divine. They represent an intentional pause in your day, a moment where you’re feeding not just bodies but souls. They represent the joy of gathering around a table with people you love and sharing something beautiful and delicious.
The techniques in this recipe are transferable. Once you master choux pastry, you can create profiteroles, cream puffs, and pâte à choux applications that will become part of your entertaining repertoire forever. You’re not just learning to make éclairs; you’re becoming the kind of cook who creates moments of beauty in the kitchen.
I encourage you to make these not just for special occasions but to practice the techniques regularly. Make them on Tuesday evening, just because. Perfect your glaze technique, experiment with filling flavors, photograph them in your own kitchen light. Most importantly, make them with intention and serve them with pride. Your guests will taste the care you’ve put into every element, from ingredient selection to final plating.
Savor the joy of cooking!