I discovered the transformative power of meal prep on a Sunday afternoon in my kitchen, surrounded by the aromatic steam of simmering broths and the quiet satisfaction of knowing my entire week was about to become infinitely easier.
When you make this authentic ramen once on Sunday—truly investing just a few hours in the process—you’re giving yourself four or five mornings where breakfast or lunch arrives ready to nourish you, no rushed decisions required.
As a registered dietitian, I’ve spent years helping busy people understand that indulgence and mindfulness aren’t opposites; they’re partners in a life well-lived. This ramen teaches that lesson beautifully. You’ll want to explore other make-ahead recipes like our Beef Recipes Curry to round out your weekly rotation.
Authentic Ramen Recipe Meal Prep: Cook Once, Eat All Week
I’ll never forget the Tuesday evening when a patient came into my office and told me she’d finally understood what I meant about food being medicine and joy simultaneously. She’d spent her Sunday afternoon preparing a proper ramen broth—the kind that requires patience, quality ingredients, and genuine care—and for five consecutive mornings, she’d woken to the luxury of a hot, nourishing bowl waiting in her refrigerator. No guilt. No drive-through. Just the quiet comfort of knowing someone (herself!) had invested in her wellbeing.
That’s what this recipe represents to me: the intersection of self-care and indulgence. Building an authentic ramen from scratch might sound complicated, but when you approach it as a weekly ritual rather than a daily chore, everything shifts. You’re not rushing; you’re creating.
You’re not compromising; you’re choosing the finest chicken thighs your local butcher has to offer, the most fragrant ginger from the farmer’s market, the most delicate fresh shiitake mushrooms.
Why This Recipe Is Perfect for Meal Prep
- Four to five complete, restaurant-quality bowls from one cooking session — You’ll invest approximately three hours on Sunday and reclaim roughly 25 minutes of morning time each weekday, translating to over two hours of freedom across your week.
- The broth improves with time, developing deeper, more complex flavors — Unlike quick weeknight meals, ramen actually tastes better on Wednesday and Thursday than it does on Monday, because those umami-rich flavors continue to deepen and marry together in the refrigerator.
- Complete versatility across multiple meal occasions — Monday’s bowl arrives as a warming breakfast; Wednesday’s transforms into lunch with added vegetables; Friday’s becomes dinner with fresh toppings and a soft egg. One recipe, infinite presentations.
Your Weekly Meal Plan With This Recipe
I structure my ramen meal prep to evolve throughout the week, keeping your palate engaged while maintaining the efficiency of batch cooking. The broth remains constant—that’s your foundation, your investment—but the toppings and presentation shift to keep things feeling fresh and intentional.
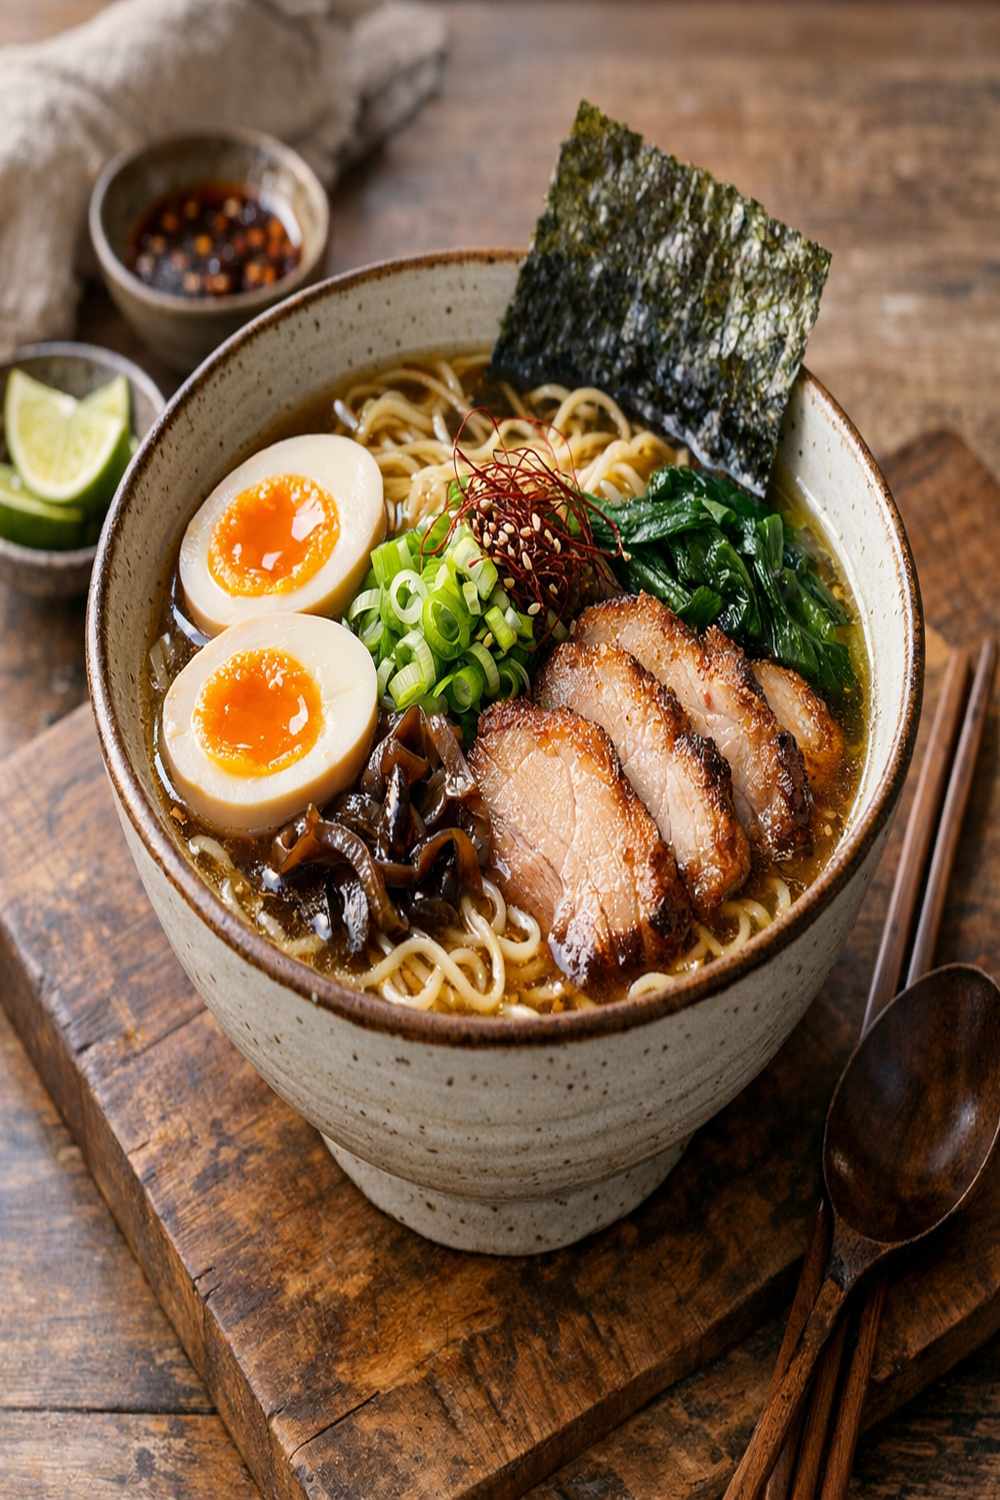
- Monday Morning: The Classic Breakfast Bowl — Warm your broth gently, add fresh noodles, top with a soft-boiled marinated egg, fresh scallions, and a drizzle of sesame oil. This is breakfast as meditation.
- Wednesday Lunch: The Vegetable-Forward Transformation — Reheat your broth, add blanched yu choy or spinach, increase the mushroom ratio, and top with sliced radishes and fresh garlic oil. This version emphasizes the greens, making it feel like an entirely different meal.
- Friday Dinner: The Celebration Bowl — This is where you bring out the finishing touches. Fresh chili garlic oil, bean sprouts for crunch, additional soft-boiled eggs (because Friday deserves extra), and perhaps some thinly sliced chicken on top. This feels indulgent because it is.
The Ingredients – Scaled for a Full Week
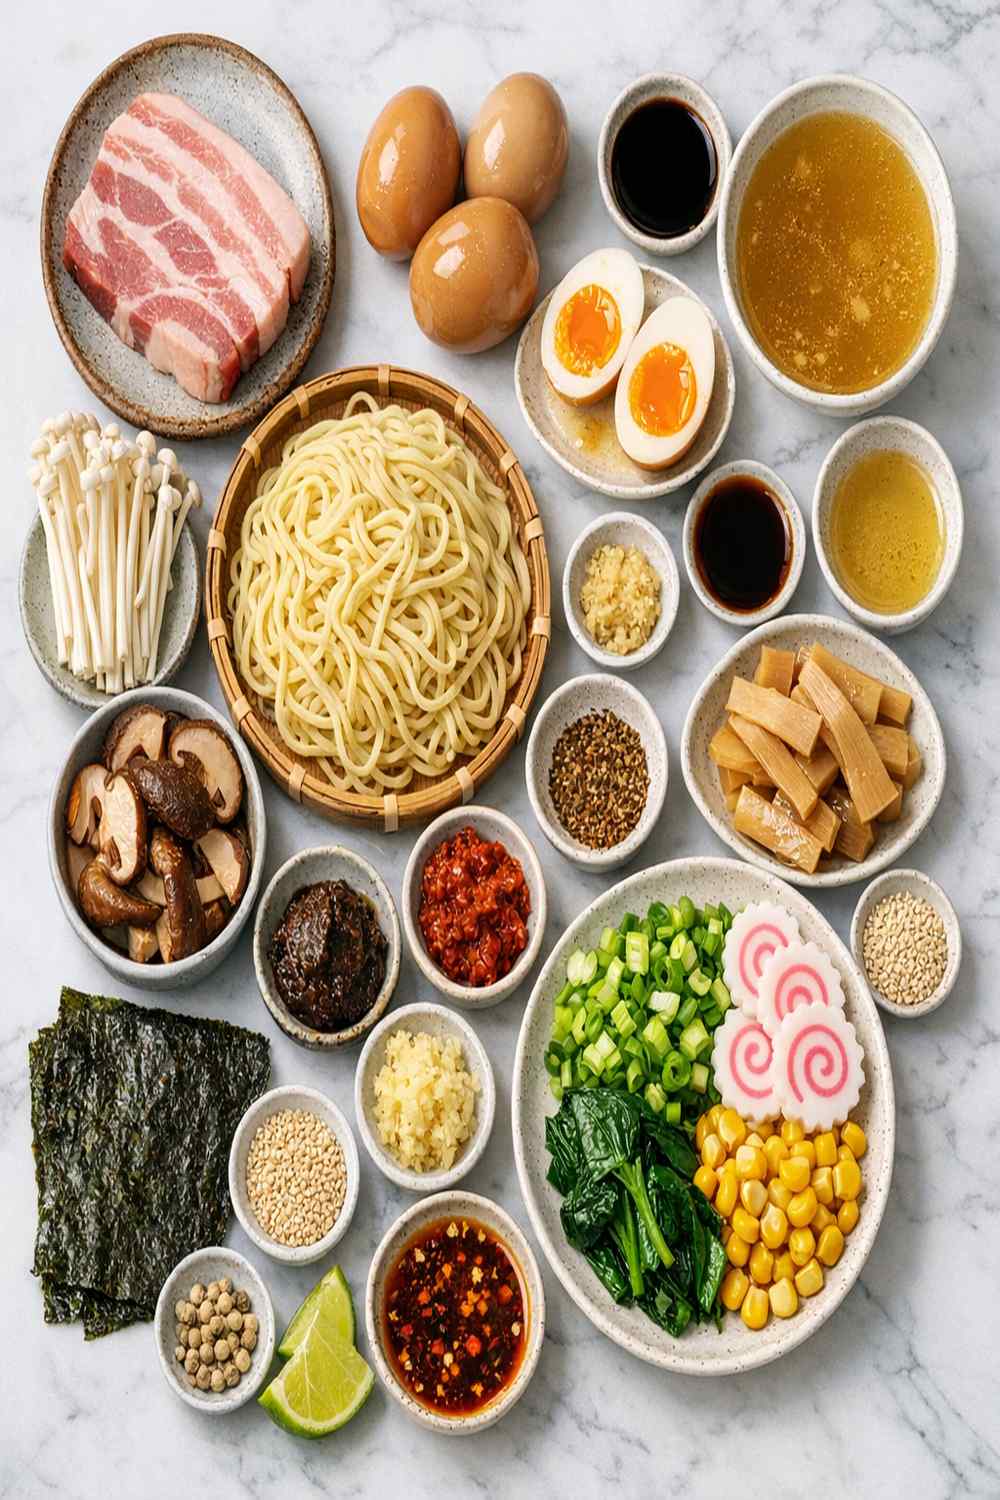
I’ve scaled these ingredients to yield four generous servings that will comfortably carry you through the week with potential for one additional serving. Each component is selected based on how it holds up during storage—fresh elements remain separate until serving, while the aromatic broth base actually improves with time. When sourcing your chicken thighs, I cannot overstate the importance of working with a local butcher or high-quality source. Look for heritage breeds if available; the fat content and flavor intensity will transform your final broth into something genuinely luxurious.
- 2 tablespoons dark soy sauce, preferably mushroom variety (contributes umami complexity that deepens over several days)
- 3 tablespoons mirin (adds natural sweetness and depth; store in a cool cabinet, it keeps beautifully)
- 8 ounces fresh shiitake mushrooms, stems removed and sliced (these develop an almost meaty texture as they sit in the broth)
- 2 teaspoons brown sugar (enhances caramelization during the initial cooking phase)
- 4 fresh red chili peppers (adjust quantity based on your heat preference; I keep seeds if I want more intensity)
- 3 cloves garlic, minced and prepared for garlic oil (infuse in sesame oil on serving day)
- Chili garlic oil for finishing (make fresh or source high-quality prepared version)
- 2-inch piece fresh ginger, sliced (peel first, then slice; the flavor becomes more integrated by day three)
- Sliced radishes or bean sprouts for garnish (keep in separate containers; these provide textural contrast)
- 4 portions dried ramen noodles (cook fresh on serving day or keep in sealed containers)
- 4 scallions, trimmed and cut into thirds (store separately from broth; add fresh just before serving)
- 4 large eggs for soft-boiling and marinating (room temperature before cooking yields better results)
- 5 to 6 cups high-quality chicken stock with minimal sodium (homemade is ideal, but if using store-bought, select bone broth or artisanal preparations)
- 1 large bunch yu choy or fresh spinach (store separately; blanch just before serving)
- 1 tablespoon light soy sauce (balances the darkness of its heavier counterpart)
- 2 pounds boneless chicken thighs with skin on (from pasture-raised birds if possible; the skin renders fat that creates an incredible broth foundation)
- 6 dried shiitake mushrooms, optional (rehydrate separately in warm water; use that soaking liquid in your broth for additional depth)
- ¼ teaspoon cayenne pepper (adds background heat without overwhelming)
- 5 cloves fresh garlic, whole (the whole cloves mellow considerably during broth simmering, becoming almost sweet)
- 2 tablespoons sesame oil (finish each bowl, never heat this oil)
The Meal Prep Process: How to Make Authentic Ramen Recipe in Bulk
Approaching this as a system rather than a recipe changes everything. You’re not just cooking; you’re building an infrastructure that supports your wellbeing all week. Block three hours on your Sunday afternoon, gather your highest-quality cookware, and treat this with the care it deserves.
I use my heaviest Dutch oven or stockpot—something that distributes heat evenly and won’t scorch your beautiful broth base. Have your containers ready, your labels prepared, your refrigerator organized before you begin.
Step 1: Prepare Your Aromatics and Protein
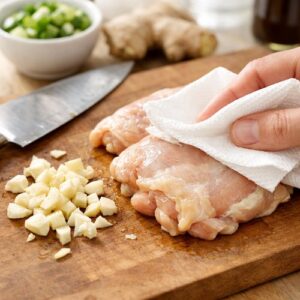
Begin by patting your chicken thighs completely dry with paper towels—this allows proper browning rather than steaming. Roughly chop your garlic cloves (no need for precision here), slice your ginger into coins, and halve your fresh chilies lengthwise, leaving the seeds intact for now. These aromatics will become the flavor foundation of everything, so handle them with intention. Don’t rush this preparatory work; it sets the stage for everything that follows.

Step 2: Sear Your Chicken for Depth
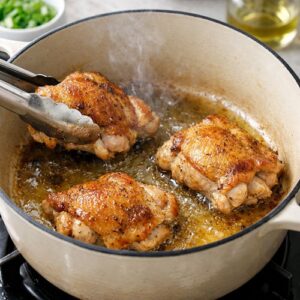
Heat your heaviest pot over medium-high heat until it’s genuinely hot—you want a shimmer across the entire surface. Add just enough neutral oil (I use grapeseed) to coat the bottom lightly. Place your chicken thighs skin-side down and let them sit undisturbed for 4-5 minutes. You’re building fond—those beautiful browned bits that will carry tremendous flavor into your broth. Resist the urge to move them. Once they’re golden, flip and sear the other side for 2-3 minutes. Remove to a clean plate.

Step 3: Build Your Aromatics Base
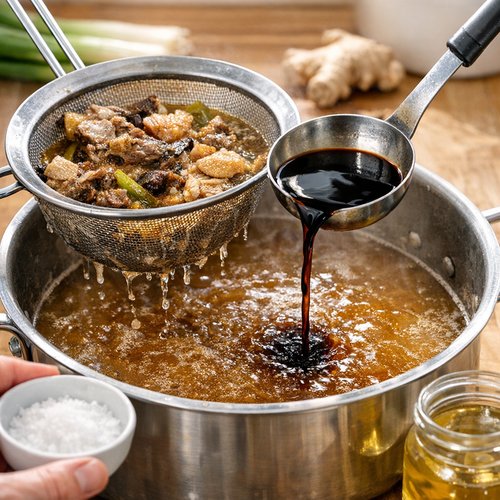
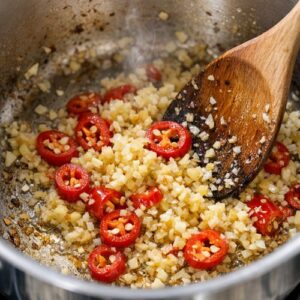
In the same pot (don’t clean it!), add your prepared garlic, ginger, and chilies. Stir constantly for 60-90 seconds until fragrant—you’ll smell the kitchen transform. This is where the magic begins. Add your soy sauces and mirin here, stirring for another minute to incorporate everything. You’re creating a caramelized paste that will be the soul of your broth. This step takes less than three minutes but contributes immeasurably.

Step 4: Return Chicken and Add Stock
Place your seared chicken thighs back into the pot along with your high-quality stock. Add the brown sugar here as well. Bring everything to a gentle boil, then immediately reduce to a low simmer. You want small, lazy bubbles breaking the surface, not a rolling boil that will cloud your broth and toughen your chicken. This is a 90-minute commitment from this point forward—let it be gentle and patient.

Step 5: Simmer While Preparing Secondary Elements
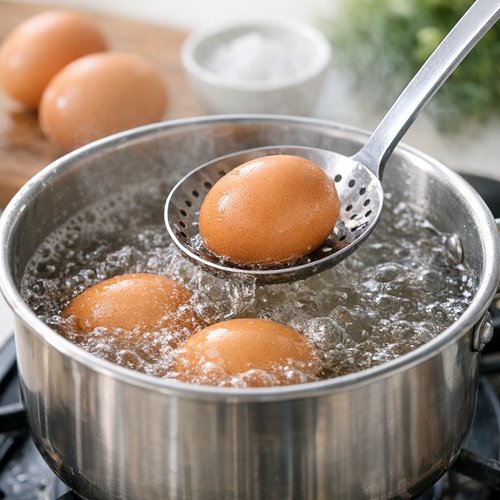
While your broth works its magic, prepare your soft-boiled eggs. Bring a separate pot of salted water to boil, gently lower room-temperature eggs into it, and cook for exactly 6.5 minutes for a jammy, set-white yolk. Immediately transfer to an ice bath. Once cooled, peel carefully (older eggs peel more easily) and place in a container with equal parts soy sauce and mirin—these will marinate and develop flavor throughout the week.
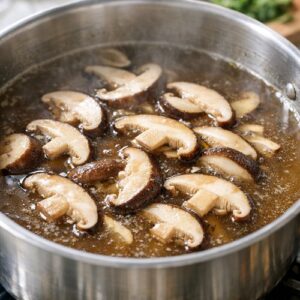
During this same window, prepare your fresh shiitake mushrooms by removing stems and slicing caps into thirds. If using dried shiitake, rehydrate them in warm water for 20 minutes, then strain that soaking liquid into your broth for additional umami. Keep your fresh scallions, yu choy, and radishes separate and refrigerated.
Step 6: Final Broth Refinement and Straining
After 90 minutes of simmering, taste your broth. Adjust seasoning with additional soy sauce, mirin, or salt as needed—remember, this will concentrate slightly as it cools and stores. Carefully remove the chicken thighs and place them on a cutting board to cool slightly. Using a fine-mesh strainer lined with cheesecloth, strain your broth into another pot, discarding the solids (the garlic, ginger, and chilies have given everything they have to offer).
Once your chicken has cooled enough to handle, shred it into bite-sized pieces, removing any bones that might have separated. Keep this separate from your broth for maximum flexibility during the week.
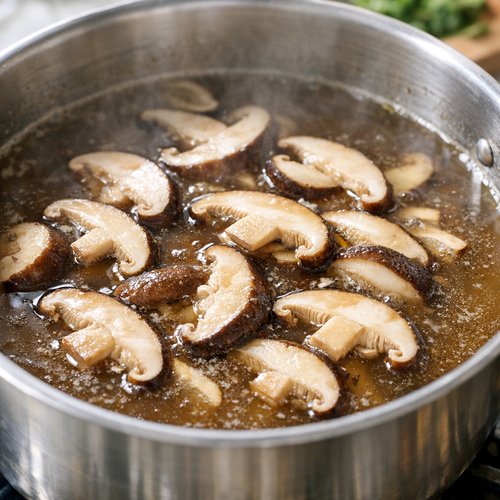
Step 7: Add Fresh Mushrooms to Broth and Cool
Return your strained broth to the pot and add your fresh sliced shiitake mushrooms. Bring to a gentle simmer for 8-10 minutes until the mushrooms have softened and released their earthy flavors into the liquid. This is where the broth deepens even further. Remove from heat and let everything cool to room temperature—this takes about an hour. Never place hot broth directly into your refrigerator; let it cool first.
Step 8: Cook Your Noodles Ahead (Optional)
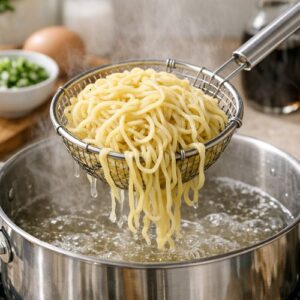
You can cook your ramen noodles now and store them separately, or wait until serving day to cook them fresh. I prefer cooking them fresh for optimal texture, but if you’re looking to minimize Sunday kitchen time, cook them now, toss with a small amount of sesame oil to prevent sticking, and store in sealed containers. They’ll reheat beautifully with a quick warm-water rinse.

Storage and Organization System
- Glass containers with secure lids for your broth and shredded chicken — I use high-quality glass containers that seal completely, which prevents absorption of odors and keeps your broth tasting pure throughout the week. Avoid plastic, which absorbs flavors and can leach compounds into your food. Fill containers to within one inch of the top, leaving room for natural expansion as the broth cools.
- Separate small containers for fresh toppings — Your scallions, sliced radishes, bean sprouts, and garlic oil all deserve individual containers. This keeps them from becoming waterlogged and preserves their textural integrity. Fresh elements should be added just before eating, not hours in advance.
- Clear labeling with dates and contents using waterproof labels — Write the date you prepared each container and what it contains. Place these labels on the side of containers so you can see everything at a glance when opening your refrigerator. This takes 60 seconds and prevents guesswork throughout the week.
How to Reheat Without Losing Quality
Monday morning (within 24 hours of preparation): Pour your broth into a heavy-bottomed saucepan and heat over medium heat, stirring occasionally, until it reaches a gentle simmer—approximately 5-7 minutes. Never use the microwave for broth reheating; you lose the nuanced flavors. While the broth warms, cook your ramen noodles in a separate pot of boiling water for 3-4 minutes, drain, and place in your serving bowl. Pour the hot broth over the noodles, add your shredded chicken, top with thinly sliced fresh scallions, a halved marinated egg, and a drizzle of sesame oil.
Wednesday lunch (by day three): Your broth will have thickened slightly as it cools—this is completely normal. Reheat using the same stovetop method. This is the day to add blanched yu choy or spinach (blanch these fresh in boiling water for 45 seconds, then add to your bowl just before serving). The extended refrigeration time means your broth has developed even more complex flavors, so you might find it needs less additional seasoning.
Friday dinner (by day five): Use the stovetop method again, allowing slightly longer heating time as the broth may have developed some surface solidification from the rendered fat (this is desirable; it means your broth is richly made). This is when you bring out all your fresh garnishes: fresh chili garlic oil drizzled over the top, a generous handful of bean sprouts for crunch, thinly sliced fresh garlic infused in sesame oil, additional soft-boiled eggs halved over the surface. This feels celebratory because you’ve nourished yourself beautifully all week.
Can I Freeze Authentic Ramen Recipe?
Yes, absolutely, though I find the broth is most beautiful consumed within five days of preparation. If you need to extend the life of your preparation, freeze your broth in portion-sized containers for up to three months. Pour it into ice cube trays first if you want maximum flexibility in portion sizes, then transfer frozen cubes to freezer bags labeled with the date.
The shredded chicken also freezes beautifully for up to two months. Keep it in a separate container from the broth, as the chicken will become slightly less tender through the freezing process (though still absolutely delicious). To thaw, place your frozen container in the refrigerator overnight, then reheat gently on the stovetop.
Do not freeze your noodles or fresh toppings—these should always be prepared fresh. The beauty of this meal prep approach is that you’re freezing your time investment (the broth and chicken) while keeping fresh elements, well, fresh. This hybrid approach gives you maximum flexibility across many weeks without sacrificing quality.
Nutrition Information
Per serving (including broth, chicken, noodles, one egg, and basic toppings): approximately 520 calories, 28 grams protein, 62 grams carbohydrates, 14 grams fat, and 8 grams fiber. The broth contributes collagen and gelatin (derived from the bone broth base and rendered chicken fat), which supports joint health and gut function—elements that USDA data increasingly recognizes as critical for long-term wellness.
What I appreciate most about this ramen from a nutritional perspective is how the protein-to-carbohydrate ratio supports sustained satiety. The combination of collagen-rich broth, complete protein from the chicken thighs and egg, and the resistant starch from the cooled and reheated noodles creates a meal that genuinely stabilizes blood sugar and keeps you satisfied for hours. This isn’t a meal that leaves you hungry at 3 PM; this is nourishment that respects your body’s actual needs. Across your five-serving week, you’re consuming approximately 2,600 grams of protein and substantial amounts of bioavailable minerals from the mushrooms and ginger.
What to Pair With Authentic Ramen Recipe Throughout the Week
The beauty of having your main dish prepared is that you can focus your energy on simple, complementary sides that keep each day feeling distinct. I think of ramen as a complete meal requiring minimal addition, but strategic pairing prevents the monotony that sometimes accompanies meal prep.
- Monday pairing: A simple brioche side — Our Brioche Recipe Braided pairs beautifully with ramen when served as a standalone side, offering textural contrast and the simple pleasure of warm, buttered bread. Toast your brioche slice lightly and enjoy it alongside your bowl.
- Wednesday pairing: A light cucumber salad — Fresh cucumbers dressed with rice vinegar, sesame oil, and a touch of soy sauce provide brightness and acidity that balances the rich ramen broth. The cooling properties of cucumber complement the warming nature of your broth.
- Friday pairing: Steamed edamame and seaweed salad — By Friday, reach for something celebratory but light. These sides feel restaurant-quality without requiring additional cooking.
Expert’s Nutritional Tip: The Power of Rendered Chicken Fat
As a registered dietitian, I want to address something important about the chicken thighs and their rendered fat in this broth. For decades, we were told to fear dietary fat, but contemporary research—supported by organizations like the American Heart Association—now recognizes that fat from high-quality sources supports nutrient absorption, hormone production, and satiety. The fat from pasture-raised chicken thighs contains higher ratios of omega-3 fatty acids compared to conventionally raised birds, and when you render this fat slowly during broth simmering, you’re creating a vehicle that allows your body to absorb the fat-soluble vitamins A, D, E, and K present in your vegetables and aromatics.
This is why I insist so firmly on sourcing quality chicken thighs from your local butcher or a trusted farm source. The flavor difference is profound, yes, but the nutritional difference is equally significant. You’re not simply cooking; you’re making a calculated choice to nourish yourself at the cellular level.
Make-Ahead Guide: Maximum Efficiency
Saturday evening preparation: Wash and trim all your fresh aromatics (garlic, ginger, chilies, scallions). Peel your ginger and store it wrapped in a damp paper towel. This takes 15 minutes and sets you up for Sunday success. Shop for your ingredients, ideally visiting your butcher or specialty market for the highest-quality chicken thighs available.
Sunday morning: Allow 30 minutes for additional prep—removing mushroom stems, preparing your eggs for boiling, organizing your containers and labels. This spreads the Sunday workload across both days, making it feel less overwhelming.
Sunday afternoon: Execute your three-hour cooking window. Begin at 1 PM if you want your meal prep complete by 4 PM, leaving evening hours free. Position your kitchen for efficiency: cutting board and knives in one zone, your pot and cooking equipment in another, your cooling and storage area in a third. This zoning approach maximizes your flow.
Common Mistakes to Avoid
- Cooking the broth at too high a temperature: A rolling boil will cloud your broth, toughen your chicken, and extract flavors unevenly. Keep that heat low and patient. You want small bubbles, almost a whisper of cooking, not an aggressive boil. This is the most common mistake I see, and it’s entirely avoidable with intention.
- Adding fresh toppings too far in advance: Scallions, radishes, bean sprouts, and garlic oil should be added mere minutes before consumption. Adding them hours ahead means they’ll absorb broth, lose their textural integrity, and become soft rather than crisp. Keep these completely separate until the moment your bowl reaches your table.
- Neglecting to cool your broth before refrigeration: Placing hot broth directly into your refrigerator raises the internal temperature of your fridge, creating an environment where bacteria can proliferate. Cool everything to room temperature on the counter—this takes an hour—before transferring to cold storage.
- Sourcing low-quality chicken: This is where the biggest difference lives. Pale, thin-skinned, conventional chicken thighs will yield a thin, disappointing broth no matter how perfectly you execute every other step. Spend your resources here. Find a butcher. Develop a relationship. Ask about heritage breeds. Your body will thank you.
Seasonal Variations: Adapt and Evolve
Spring adaptation: Reduce your dried shiitake mushrooms, adding instead fresh spring mushrooms like oyster varieties when available. Add fresh pea shoots as a topping instead of heavier greens. Incorporate lighter aromatics—perhaps less ginger, slightly less soy sauce—letting the broth brighten as the season does. Add fresh lemon juice as a finishing element.
Summer adaptation: Serve your ramen at room temperature on particularly hot days, treating it more as a noodle salad. Add crisp cucumber, fresh herbs like mint and cilantro, and cold soft-boiled eggs. Your broth becomes a light dressing rather than a warm embrace. This is ramen for hot afternoons.
Fall adaptation: Add root vegetables to your broth during the final simmering stage—diced carrots, parsnips, or mushrooms take on wonderful sweetness as the season shifts. Increase your chili slightly; the warming spice feels appropriate. Add a touch of white miso at the very end for additional umami depth.
Winter adaptation: This is when your ramen becomes the soul-warming meal it was always meant to be. Increase your aromatics—add more ginger, more garlic, perhaps a star anise. Layer in root vegetables. Serve it steaming, letting the fragrant steam warm your face as you bring the bowl toward you. Winter is ramen’s season.
Authentic Ramen Recipe
Ingredients
Method
- Begin by patting your chicken thighs completely dry with paper towels—this allows proper browning rather than steaming. Roughly chop your garlic cloves (no need for precision here), slice your ginger into coins, and halve your fresh chilies lengthwise, leaving the seeds intact for now. These aromatics will become the flavor foundation of everything, so handle them with intention. Don’t rush this preparatory work; it sets the stage for everything that follows.
- Heat your heaviest pot over medium-high heat until it’s genuinely hot—you want a shimmer across the entire surface. Add just enough neutral oil (I use grapeseed) to coat the bottom lightly. Place your chicken thighs skin-side down and let them sit undisturbed for 4-5 minutes. You’re building fond—those beautiful browned bits that will carry tremendous flavor into your broth. Resist the urge to move them. Once they’re golden, flip and sear the other side for 2-3 minutes. Remove to a clean plate.
- In the same pot (don’t clean it!), add your prepared garlic, ginger, and chilies. Stir constantly for 60-90 seconds until fragrant—you’ll smell the kitchen transform. This is where the magic begins. Add your soy sauces and mirin here, stirring for another minute to incorporate everything. You’re creating a caramelized paste that will be the soul of your broth. This step takes less than three minutes but contributes immeasurably.
- Place your seared chicken thighs back into the pot along with your high-quality stock. Add the brown sugar here as well. Bring everything to a gentle boil, then immediately reduce to a low simmer. You want small, lazy bubbles breaking the surface, not a rolling boil that will cloud your broth and toughen your chicken. This is a 90-minute commitment from this point forward—let it be gentle and patient.

- While your broth works its magic, prepare your soft-boiled eggs. Bring a separate pot of salted water to boil, gently lower room-temperature eggs into it, and cook for exactly 6.5 minutes for a jammy, set-white yolk. Immediately transfer to an ice bath. Once cooled, peel carefully (older eggs peel more easily) and place in a container with equal parts soy sauce and mirin—these will marinate and develop flavor throughout the week. During this same window, prepare your fresh shiitake mushrooms by removing stems and slicing caps into thirds. If using dried shiitake, rehydrate them in warm water for 20 minutes, then strain that soaking liquid into your broth for additional umami. Keep your fresh scallions, yu choy, and radishes separate and refrigerated.

- After 90 minutes of simmering, taste your broth. Adjust seasoning with additional soy sauce, mirin, or salt as needed—remember, this will concentrate slightly as it cools and stores. Carefully remove the chicken thighs and place them on a cutting board to cool slightly. Using a fine-mesh strainer lined with cheesecloth, strain your broth into another pot, discarding the solids (the garlic, ginger, and chilies have given everything they have to offer). Once your chicken has cooled enough to handle, shred it into bite-sized pieces, removing any bones that might have separated. Keep this separate from your broth for maximum flexibility during the week.

- Return your strained broth to the pot and add your fresh sliced shiitake mushrooms. Bring to a gentle simmer for 8-10 minutes until the mushrooms have softened and released their earthy flavors into the liquid. This is where the broth deepens even further. Remove from heat and let everything cool to room temperature—this takes about an hour. Never place hot broth directly into your refrigerator; let it cool first.
- You can cook your ramen noodles now and store them separately, or wait until serving day to cook them fresh. I prefer cooking them fresh for optimal texture, but if you’re looking to minimize Sunday kitchen time, cook them now, toss with a small amount of sesame oil to prevent sticking, and store in sealed containers. They’ll reheat beautifully with a quick warm-water rinse.
Notes
FAQs
How long does prepared ramen broth keep in the refrigerator?
Your broth will maintain peak quality for five days when stored properly in airtight glass containers. On day six, begin to notice any off-odors or discoloration before consuming. The longer storage isn’t necessarily unsafe; it’s simply that the fresh, clean flavors you worked to cultivate begin to muddy slightly. If you know you won’t use your broth within five days, freeze it immediately. Frozen broth maintains quality for up to three months.
Can I use chicken breasts instead of thighs?
Technically, yes, but I don’t recommend it from either a flavor or nutritional perspective. Chicken thighs contain significantly more collagen and fat, which are precisely what creates an exceptional broth. Breasts are very lean and lack the richness necessary for this preparation. If you must use breasts, plan on reducing your total cooking time to approximately 45 minutes and accept that your finished broth will be thinner and less luxurious. Support your local butcher and choose thighs.
Can I make this recipe with vegetable broth instead of chicken broth?
Yes, this transforms into an exceptional vegetarian ramen. Use high-quality vegetable broth (homemade is ideal), double your fresh and dried shiitake mushrooms to provide umami depth, and consider adding miso paste in the final stages. The technique remains identical; only the base changes. You’ll have a completely different but equally delicious result.
What’s the best way to store my marinated eggs?
Keep them in their marinade (equal parts soy sauce and mirin) in a sealed container for up to seven days. Actually, they improve slightly over those days, becoming more deeply flavored. If you want multiple eggs available for different meals, prepare half of them for day one serving and half for day three serving, which staggers your consumption and ensures freshness. Always store them in the marinade, never dry.
Can I use instant ramen noodles for this meal prep?
You can, though I wouldn’t recommend it. Instant noodles are highly processed and contain unnecessary additives. Your fresh broth deserves fresh or at minimum, dried egg noodles from a quality source. Look for ramen noodles at Asian markets or through online specialty food retailers. The texture and flavor difference will be immediately noticeable and worth the small additional effort to source properly.
More Meal Prep Recipes
- Beef Recipes Curry — Another soul-warming preparation that improves with time and reheats beautifully throughout your week.
- Best Cream Patisserie Recipe — For those Sunday afternoons when you want to prepare a component that transitions between breakfast, dessert, and afternoon indulgence.
Here’s what I know after years of helping people reclaim their relationship with food and time: the most transformative meals are those we prepare for ourselves with genuine intention. This ramen ritual—your Sunday afternoon committed to your own nourishment—is an act of self-respect. You’re telling yourself that you’re worth the time, worth the quality ingredients, worth the careful technique. You’re not rushing; you’re building a week that reflects your values.
When Thursday morning arrives and you’re tired, and that bowl of ramen—deeper and more complex than it was on Monday—meets you with warmth and care, you’ll understand what this preparation represents. It’s not just food. It’s an investment in yourself. It’s proof that indulgence and mindfulness aren’t opposing forces; they’re partners in a life well-lived.
Savor the joy of cooking!