This post contains affiliate links. As an Amazon Associate I earn from qualifying purchases.
I still remember the first time I tried to make choux pastry in my family’s kitchen. I was maybe sixteen, inspired by watching my abuela pipe delicate cream puffs for holiday gatherings. Mine came out dense, flat, and utterly heartbreaking. I couldn’t understand what went wrong—I’d followed the recipe exactly. What I didn’t realize then, and what I know now as a registered dietitian with years of kitchen experience, is that choux pastry isn’t about following instructions blindly. It’s about understanding the why behind each step, the chemistry that transforms simple ingredients into something magical. If you’ve experienced similar disappointment, or if you’ve been intimidated by choux pastry altogether, I’m here to tell you: this technique is absolutely learnable, and once you master it, you’ll create pastries that rival any French pâtisserie. Let me show you how my family now makes the best profiteroles and cream puffs year-round.
Why Your Choux Pastry Never Turns Out Right (And How to Fix It)
Every day in my practice, I work with people who’ve internalized the belief that certain foods are “just not for them.” Baking can feel especially exclusionary—like you either have the gift or you don’t. But choux pastry failures rarely come from lack of talent. They come from misunderstanding a few critical technical points that most recipes gloss over. I’ve watched countless home bakers make the exact same mistakes I made, and I’ve learned precisely how to sidestep each one.
The most common culprit? Not cooking the dough long enough in the pan. Your choux pastry needs that initial mashing and heating to properly gelatinize the flour, which creates the structure that allows it to puff. Most recipes mention this step so casually that home cooks rush through it. The second major issue is adding eggs too quickly or at the wrong temperature, which breaks the emulsion and creates a grainy, lumpy dough that won’t pipe smoothly. And third—and this one surprised me even after years of baking—people often open the oven door during baking, releasing the steam that’s literally creating the lift. These three issues account for nearly every failed batch I’ve seen.
What Makes This Choux Pastry Recipe Different?
This isn’t a fussy French formula that requires specialty equipment or ingredients you can’t find. Instead, I’ve refined this recipe through dozens of test batches, professional training, and real-world kitchen challenges. The game-changer here is the precise ratio of liquid to flour, combined with a specific cooling-and-egg-addition method that ensures your dough reaches that perfect pipeable consistency every time. I also include detailed visual cues rather than relying solely on timing—because every oven, every kitchen’s humidity level, and every batch of eggs behaves slightly differently.
The recipe balances whole milk and water intentionally: the milk adds richness and helps browning, while water creates steam for lift. This hybrid approach is more forgiving than pure water, especially for beginners, while still delivering that luxurious, indulgent result I believe cooking deserves.
Before You Start: What You Need to Know
Before you gather your ingredients, let me share two insights that will transform your results. These aren’t mentioned in most recipes, but they’re foundational to understanding why this technique works.
- Choux pastry is an emulsion, just like mayonnaise – Your dough needs to hold together fat, liquid, and eggs in a stable suspension. This is why temperature matters and why you add eggs slowly. Rushing the egg addition breaks the emulsion, creating a grainy, separated mess. This single understanding will save your next batch.
- Steam is your secret ingredient, not magic – The water in your dough and the humid environment you create in the oven literally puff the pastry. If you open the oven door during baking, you release this steam and the pastries collapse. Patience here is non-negotiable.
The Ingredients
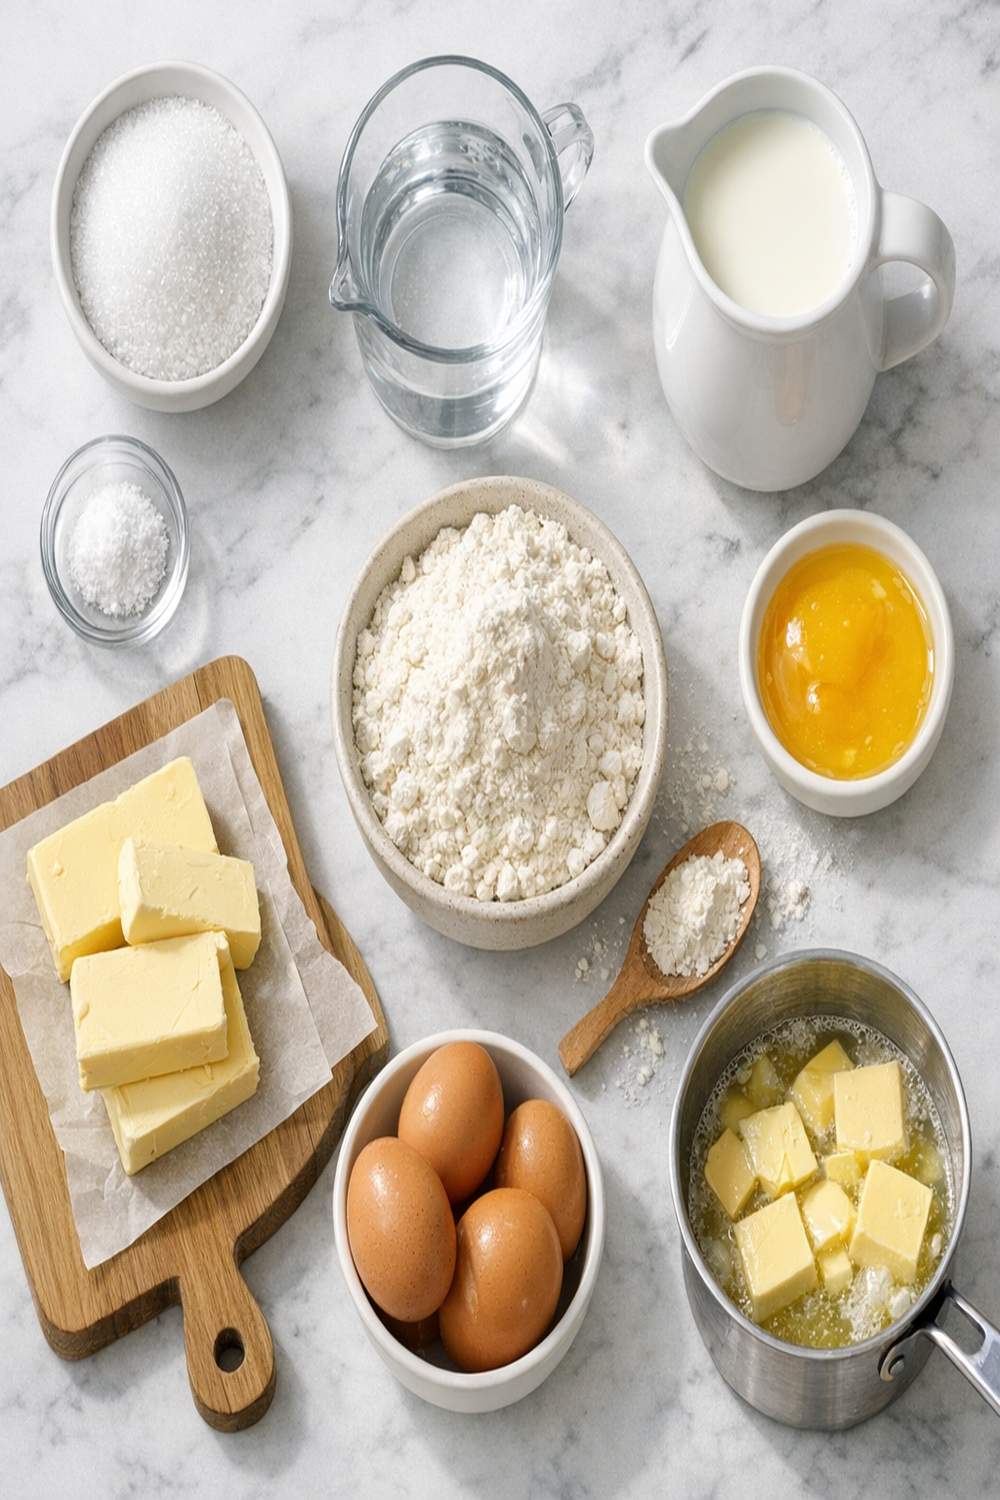
I’ve chosen each ingredient with intention. These aren’t generic pantry staples—they’re selected because they work together to create choux pastry that’s reliable, luxurious, and truly delicious. Let me walk you through why each one matters.
- 1 egg beaten with 1 tablespoon milk or water for egg wash (creates that signature shine and beautiful color during baking)
- 4 large eggs at room temperature (they emulsify more easily and incorporate air; cold eggs won’t combine smoothly)
- 1 cup all-purpose flour, spooned and leveled (the foundation of your structure—measuring by weight is ideal, but this technique prevents packing, which would make your pastry dense)
- ½ cup filtered water (combines with milk to create the steam that puffs your pastries)
- ½ cup whole milk, full-fat (creates richer flavor and better browning than low-fat versions)
- 8 tablespoons unsalted butter, cut into pieces (unsalted gives you control over flavor; the pieces melt evenly and incorporate better)
- 2 teaspoons granulated sugar (adds subtle sweetness and aids caramelization for that gorgeous golden-brown exterior)
- ¼ teaspoon fine sea salt (enhances flavor while preventing your pastry from tasting flat)
A note from my professional perspective: The fat content in your milk and eggs directly affects how your body absorbs the fat-soluble vitamins present in butter. Using full-fat milk here isn’t just about indulgence—it’s about maximizing the nutritional profile of what you’re eating. Mindfulness means choosing whole ingredients that nourish you.
Equipment You’ll Need
I’m particular about tools, because the right ones make cooking genuinely easier. For this recipe, you’ll want:
- Two baking sheets lined with parchment paper (parchment prevents sticking and conducts heat evenly)
- A piping bag fitted with a Wilton 1A or 1B tip (I prefer the 1A for cream puff shells—it gives you control and creates evenly-sized pastries)
- A cooling rack (allows air circulation underneath, preventing soggy bottoms)
- A medium saucepan with a heavy bottom (prevents scorching and distributes heat evenly)
- A stand mixer with paddle attachment, or a sturdy handheld mixer (choux dough is thick and requires real power; hand-whisking is possible but exhausting)
Step-by-Step: How to Make Choux Pastry Without Fail
You’ve got this. I’m going to walk you through each step with the precision and encouragement that makes this technique click. The beauty of choux pastry is that once you understand the mechanics, you’ll be confident making it forever. Let’s begin.
Step 1: Combine Your Liquid and Fat Base
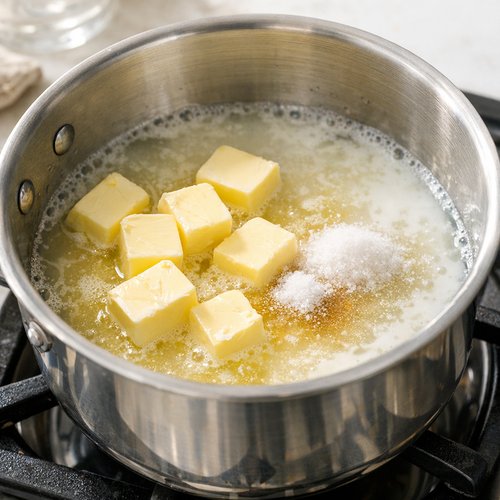
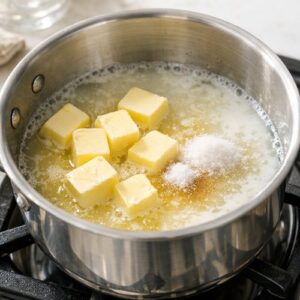
Place your medium saucepan on the stovetop over medium heat. Add your cut butter pieces, along with the filtered water, whole milk, salt, and granulated sugar. Watch this mixture carefully—you’re not in a rush. As the butter melts, stir occasionally with a wooden spoon or heat-safe spatula, ensuring everything combines evenly. This isn’t a vigorous stir; it’s a gentle, consistent movement that distributes the salt and sugar while the butter melts.
The mixture will transition from separate, oily components into a unified liquid. Once you see it beginning to simmer—tiny bubbles actively breaking the surface all over—you’ve reached the critical moment. Don’t let it boil aggressively; a gentle simmer is perfect. This temperature is about 200-210°F, and it’s precisely hot enough to cook your flour without scorching it.
Step 2: Add Your Flour and Cook the Dough
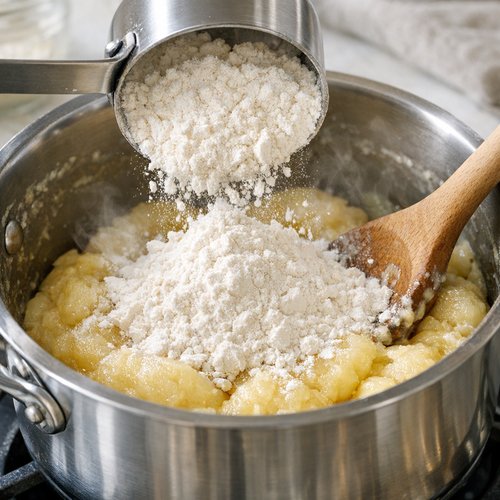
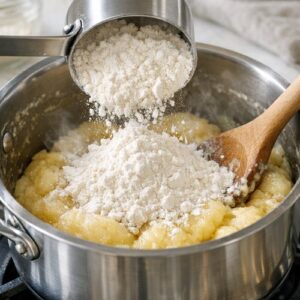
Here’s where patience becomes your greatest asset. Reduce the heat to low. Measure your flour carefully—spooned and leveled—and add all of it at once to your simmering liquid. Immediately begin stirring with vigor, breaking up any lumps that form. You’re looking to fully incorporate the flour within about 30 seconds, creating a thick, unified dough that forms a shaggy ball.
Now comes the crucial step that most recipes barely mention: mash this dough against the bottom and sides of the pan for a full minute. Use the back of your spoon or spatula, pressing firmly. What you’re doing is gelatinizing the starches in the flour through heat and friction. This cooking process creates the structure that allows your pastry to puff. You’ll notice the dough becoming smoother, slightly glossier, and more cohesive. This step is non-negotiable—don’t skip it or rush it.
Step 3: Cool the Dough Properly
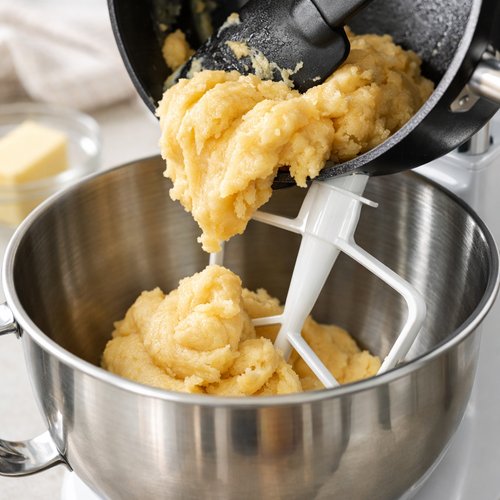
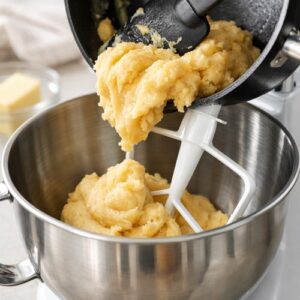
Remove the saucepan from heat. Transfer your dough immediately to the bowl of your stand mixer fitted with the paddle attachment. If you’re using a handheld mixer, transfer it to a large mixing bowl. Let it cool for 3-5 minutes. This cooling period is critical because you’re about to add room-temperature eggs. If your dough is still piping-hot, those eggs will scramble before they can emulsify properly. Set a timer and resist the urge to rush—this short rest makes all the difference.
While your dough cools, beat your eggs in a separate bowl until fully combined. You want a uniform, pale yellow mixture. Set this aside near your mixer.
Step 4: Add Eggs in Stages for Perfect Emulsification
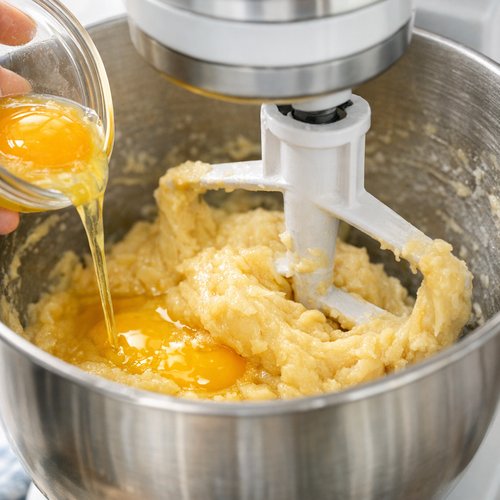
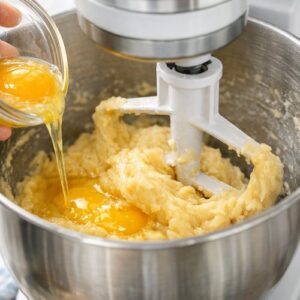
This is the step that separates success from disappointing, lumpy dough. Turn your mixer to low speed. With the paddle running, begin adding your beaten eggs in 3-4 separate additions, allowing 30 seconds of mixing between each addition. This gradual approach allows each portion of egg to fully incorporate and create an emulsion with the dough before the next addition arrives.
Your first addition will look jarring—the dough will appear curdled and separated, almost broken. This is completely normal. Keep the mixer running. By the second addition, you’ll see it beginning to come together. By the third addition, you’re watching a transformation: the dough becomes glossy, smooth, and cohesive.
For your final addition, add your eggs very slowly, almost pouring a thin stream while watching the dough’s texture carefully. Your goal is a shiny, thick, smooth choux pastry with a pipeable consistency—it should look like soft cookie dough or thick pudding. Stop adding beaten egg once you achieve this texture. You’ll likely have a few teaspoons of beaten egg remaining, which is perfect—save this for your egg wash in the next steps.
Expert’s Nutritional Tip: As a dietitian, I appreciate that choux pastry derives its structure from eggs, which provide complete protein containing all nine essential amino acids. This makes choux pastry more substantive nutritionally than many other pastries, despite its delicate appearance. The protein also contributes to satiety, so you’re likely to feel satisfied with a single cream puff rather than consuming multiple servings.
Step 5: Pipe Your Pastry Shells (Or Refrigerate for Later)
Your choux pastry dough is now complete and ready to use. If you’re baking immediately, transfer it to your piping bag fitted with the Wilton 1A tip. If you prefer to work ahead—and I often do—cover your dough bowl tightly and refrigerate for up to 3 days. You can even transfer the dough directly into a piping bag and refrigerate the bag itself; you’ll pipe and bake from cold, which actually prevents the dough from spreading too much during baking.
When you’re ready to pipe, preheat your oven to 400°F (204°C). Line two baking sheets with parchment paper. Here’s a small technique: lightly brush the parchment with water. This creates a humid microclimate that prevents your pastry shells from drying out or burning on the bottoms.
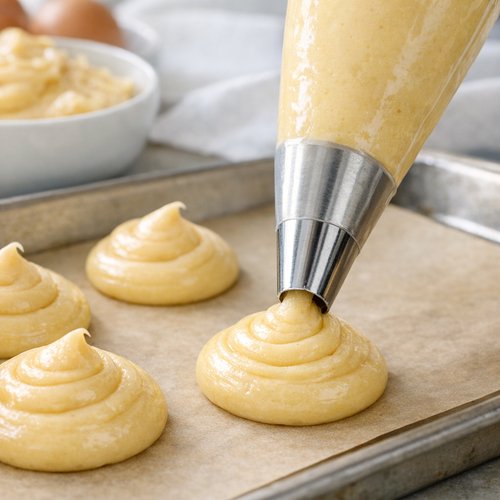
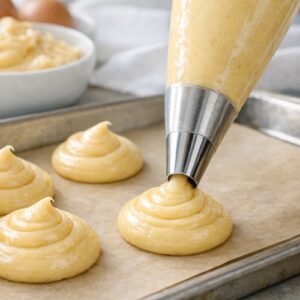
Fill your piping bag and pipe 2-inch mounds of dough onto the prepared baking sheets, spacing them about 3 inches apart. They’ll expand during baking, so this spacing prevents them from touching. After piping, use a finger moistened with water to gently smooth down any peaks on top of each mound. This creates a more even surface and prevents browning too quickly on the peaks. Brush each pastry lightly with your reserved egg wash.
Step 6: Bake With Confidence and Patience
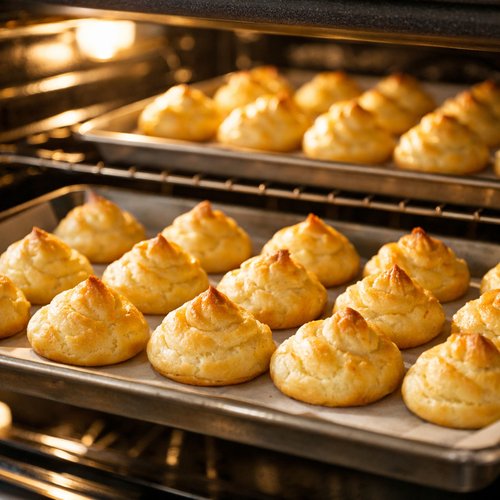
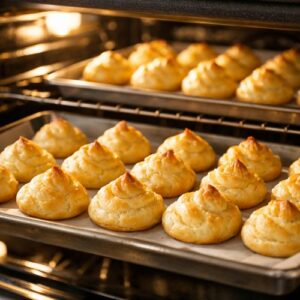
Place your baking sheets in the preheated 400°F oven. Set a timer for 20 minutes. Do not open the oven door during this time. I know the temptation is real—you want to peek and see what’s happening. But opening that door releases the steam that’s literally creating the puff. Have faith in the process.
After 20 minutes, your pastries should be beginning to puff and turn golden-brown. Keeping the pastries in the oven, carefully reduce the temperature to 350°F (177°C) and continue baking for 10-15 minutes more until they achieve a deep, even golden-brown color. The shells should look sturdy, not pale or soft-looking.
Remove the baking sheets from the oven and transfer each pastry to a cooling rack. Allow them to cool completely before filling—this takes about 30 minutes at room temperature. As they cool, the interiors set and the shells become crispy. This cooling step is just as important as the baking.
Step 7: Fill and Serve Your Choux Pastry Creation
Once completely cooled, you have two filling options. You can split the pastry shells horizontally and fill the interiors with your choice of fillings—whipped cream, pastry cream, lemon curd, fresh berries, or any combination that speaks to you. Alternatively, you can poke a small hole in the bottom or side of each shell and use your piping bag to fill them from the inside, which creates a more elegant presentation.
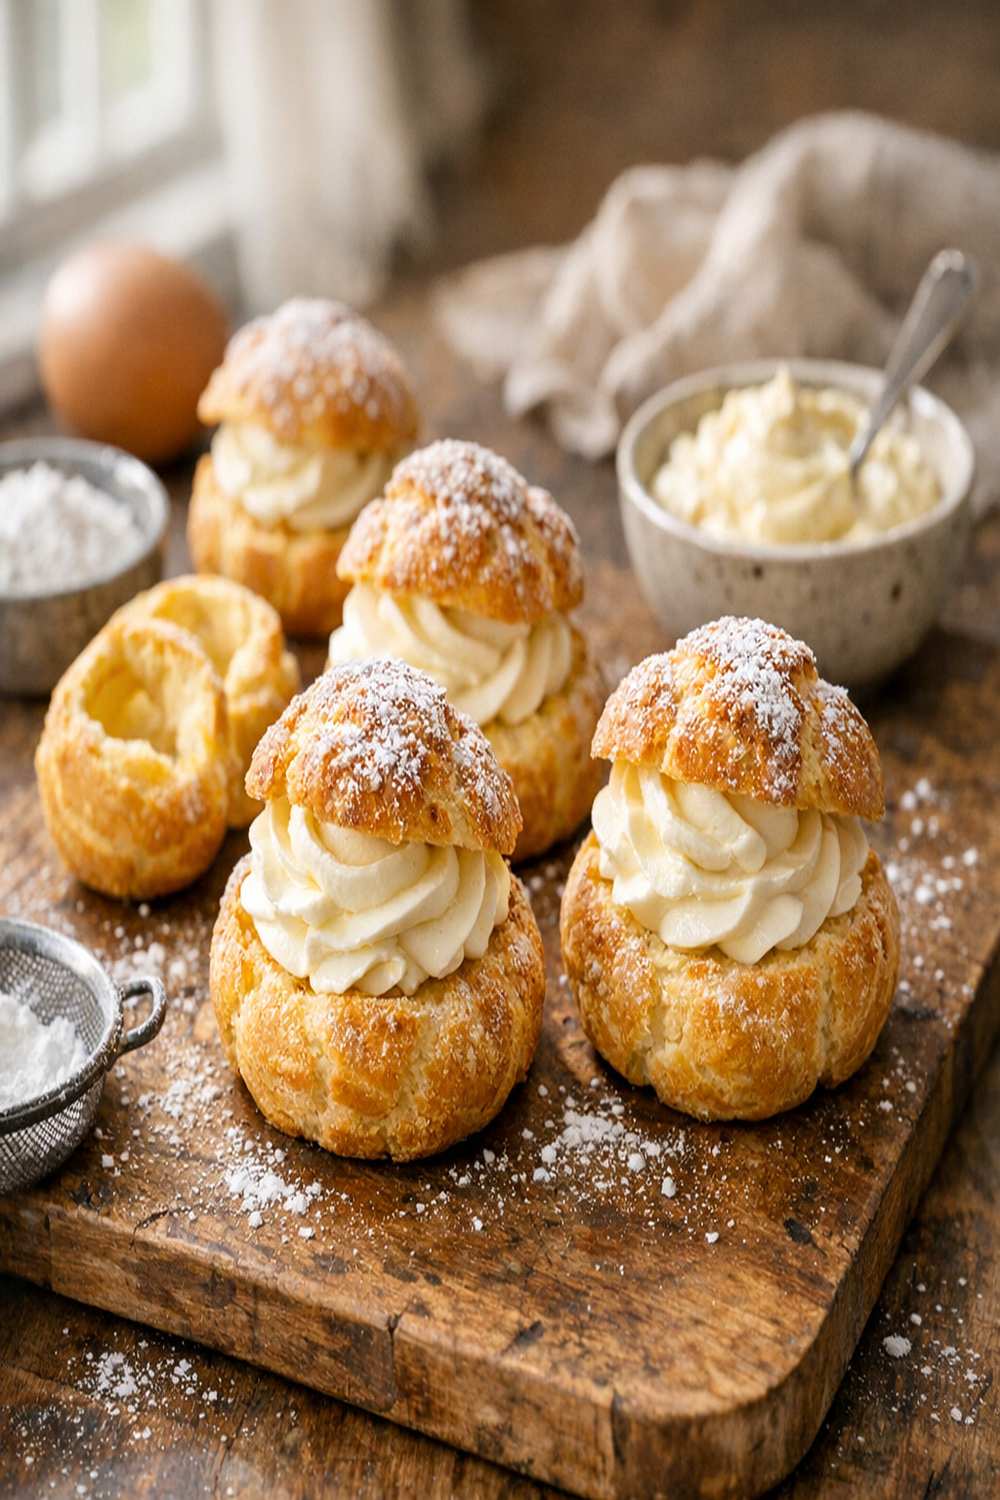
For profiteroles, I fill the shells with pastry cream or whipped cream, then drizzle them with chocolate sauce. For cream puffs, I love a combination of pastry cream and fresh whipped cream topped with a dusting of powdered sugar or fresh berries.
Make-Ahead Guide: Timing and Storage Strategy
One of my favorite things about choux pastry is its flexibility for advance preparation. Here’s my professional make-ahead strategy:
Day 1 – Make the Dough: Prepare your choux pastry dough in the morning, transfer it directly to a piping bag, and refrigerate. The dough keeps for up to 3 days, so you have a wide window for baking.
Day 2 or 3 – Bake the Shells: Remove the piping bag from the refrigerator about 30 minutes before baking to let it warm slightly (if the dough is too stiff to pipe, warm it a bit more—it should be creamy, not brick-hard). Pipe and bake. Unfilled pastry shells keep at room temperature for 1 day, in the refrigerator for 5 days, or frozen for up to 3 months. This flexibility is invaluable for entertaining or making multiple batches at once.
Filling Strategy: If you’re making these for an event, I recommend baking the shells the day before and storing them in an airtight container in the refrigerator. Make your filling fresh on the day of serving, then fill the shells just 1-2 hours before serving. Filled pastries keep refrigerated for up to 3 days, but they’re truly best served the day they’re filled.
The Most Common Mistakes (And How to Avoid Them)
- Adding eggs while the dough is still hot – This scrambles the eggs and creates a grainy, broken dough. Prevent it by cooling your dough for 3-5 minutes after removing it from heat. If you do make this mistake mid-batch, you can occasionally save it by cooling the dough completely, then adding another room-temperature egg slowly while mixing on low. It’s not guaranteed, but it’s worth attempting.
- Adding eggs too quickly without proper mixing time – This breaks the emulsion before it forms. Prevention is simple: add eggs in 3-4 separate additions with at least 30 seconds of mixing between each. The patience here pays dividends in texture and success.
- Skipping or rushing the dough-mashing step – This step gelatinizes the flour and creates structure. Rushing it results in dense, flat pastries that don’t puff. Commit the full minute to mashing, pressing firmly against the pan’s sides and bottom. You’re literally building the architecture of your pastries here.
- Opening the oven door during baking – This releases steam and causes your pastries to deflate. Prevent this by trusting your timer. If you really need to check, open the door just slightly for a quick peek in the final 5 minutes when puffing is mostly complete, but ideally, don’t open it at all.
How Do I Know When It’s Done?
Timing alone isn’t enough—you need to know what to look for visually and texturally. Your choux pastry shells are perfectly baked when they meet all three of these criteria:
Color: They should be a deep, even golden-brown all over. If they’re pale or blonde, they need more time. If they’re dark brown but still soft-looking, they might need just a few more minutes at the lower temperature. The color indicates both caramelization and doneness of the interior.
Firmness: When you carefully remove a pastry from the oven and let it cool for 30 seconds, tap the side gently. It should feel sturdy and firm to the touch, not soft or squishy. A properly baked choux pastry shell has a crispy exterior and a hollow interior—that hollowness is what allows it to hold fillings.
Visual appearance: The pastries should look puffed and expanded, with no visible wet, shiny spots that indicate unbaked dough. The surface should appear dry, not glossy or damp, though they’ll have a subtle sheen from the egg wash.
Troubleshooting: When Things Go Wrong
- Pastries came out flat and dense instead of puffed – This usually indicates one of three issues: either your dough wasn’t cooked long enough in the pan initially (the mashing step is critical), your eggs were added too quickly and broke the emulsion, or you opened the oven door during baking. Review each step and try again. If eggs were the issue, you’ll notice a grainy, separated dough during mixing. If the problem is in-bake, your next batch will succeed with the oven-door patience.
- Pastries puffed beautifully but collapsed after cooling – This indicates steam escaped during cooling, which is usually caused by a crack in the shell or insufficient initial baking time. Try increasing the lower-temperature baking time by 2-3 minutes. Also ensure your pastries cool completely on a rack—enclosed or covered spaces trap steam, which condenses and makes them soggy.
- Bottoms are dark brown or burnt while tops are still pale – Your oven’s heat is distributing unevenly, likely concentrating heat on the bottom rack. Try baking on the middle rack position instead. If both racks have this issue, your oven might run hot; consider reducing the initial bake temperature by 10-15°F.
- Dough was difficult to pipe and came out lumpy – Your dough was either too stiff (likely from being cold) or had grainy texture (likely from eggs added too quickly or at wrong temperature). Stiff dough warms up as you hold the piping bag or work with it; lumpy dough can’t be fixed mid-pipe. For next time, ensure eggs are room temperature and add them gradually.
Can I Store Choux Pastry?
Absolutely—this is one of the reasons I love choux pastry for entertaining. Here’s your complete storage guide:
Unbaked Dough: Transfer to an airtight container or piping bag and refrigerate for up to 3 days. You can actually pipe the dough directly into a piping bag, refrigerate the bag, and bake straight from the refrigerator without bringing to room temperature first. This actually improves results because the cold dough spreads less during baking.
Unfilled Pastry Shells: Store in an airtight container at room temperature for 1 day, in the refrigerator for 5 days, or in the freezer for up to 3 months. To thaw frozen shells, place them in the refrigerator overnight or on the counter for 1-2 hours. You can re-crisp room-temperature or refrigerated shells in a 300°F oven for 5 minutes before filling if they’ve softened slightly.
Filled Pastries: Store in an airtight container in the refrigerator for up to 3 days. They’re best served the day they’re filled, but they keep reasonably well. Note that cream-filled pastries will soften slightly over time as moisture from the filling migrates to the shell.
Nutrition Information
Per unfilled pastry shell (approximately 42g): 110 calories, 7g fat, 8g carbohydrates, 3g protein, minimal fiber, and 170mg sodium. The USDA notes that eggs are one of the only naturally occurring foods containing choline, a nutrient critical for cognitive function and cell structure. The combination of eggs and butter in choux pastry provides fat-soluble vitamins A, D, and E, which require dietary fat for absorption.
Here’s what matters nutritionally: choux pastry is nutrient-dense despite its richness. One filled cream puff provides complete protein, B vitamins from eggs, and fat-soluble vitamins from butter. This isn’t empty indulgence—it’s luxurious nourishment. This is precisely why I believe in mindful indulgence: when you use quality ingredients and eat with awareness, you’re choosing foods that satisfy both your palate and your body’s actual nutritional needs.
What Can I Serve With Choux Pastry?
The beauty of choux pastry is its versatility. Here are my favorite serving approaches:
- With chocolate sauce (profiteroles) – Fill with pastry cream or whipped cream, then drizzle generously with warm chocolate sauce. This is elegant, simple, and absolutely craveable. Serve slightly warm for maximum luxury.
- With fresh pastry cream and berries (cream puffs) – Make or purchase quality pastry cream, fill your cooled shells, and top with fresh strawberries, raspberries, or blueberries. A dusting of powdered sugar completes the picture.
- With lemon curd and whipped cream – A bright, luxurious combination that feels special but comes together easily. Fill half with tangy lemon curd and half with whipped cream for visual interest.
- Savory applications – Choux pastry isn’t limited to sweet. Fill with creamed chicken, béchamel with herbs, or salad mixtures for an elegant appetizer option.
- As part of a dessert board – Arrange unfilled shells alongside small bowls of sorbet, whipped cream, fresh berries, and your favorite jam, allowing guests to customize their own creations. This is interactive and fun for entertaining.

Choux Pastry Recipe
Ingredients
Equipment
Method
- Place your medium saucepan on the stovetop over medium heat. Add your cut butter pieces, along with the filtered water, whole milk, salt, and granulated sugar. Watch this mixture carefully—you're not in a rush. As the butter melts, stir occasionally with a wooden spoon or heat-safe spatula, ensuring everything combines evenly. This isn't a vigorous stir; it's a gentle, consistent movement that distributes the salt and sugar while the butter melts. The mixture will transition from separate, oily components into a unified liquid. Once you see it beginning to simmer—tiny bubbles actively breaking the surface all over—you've reached the critical moment. Don't let it boil aggressively; a gentle simmer is perfect. This temperature is about 200-210°F, and it's precisely hot enough to cook your flour without scorching it.
- Here's where patience becomes your greatest asset. Reduce the heat to low. Measure your flour carefully—spooned and leveled—and add all of it at once to your simmering liquid. Immediately begin stirring with vigor, breaking up any lumps that form. You're looking to fully incorporate the flour within about 30 seconds, creating a thick, unified dough that forms a shaggy ball. Now comes the crucial step that most recipes barely mention: mash this dough against the bottom and sides of the pan for a full minute. Use the back of your spoon or spatula, pressing firmly. What you're doing is gelatinizing the starches in the flour through heat and friction. This cooking process creates the structure that allows your pastry to puff. You'll notice the dough becoming smoother, slightly glossier, and more cohesive. This step is non-negotiable—don't skip it or rush it.
- Remove the saucepan from heat. Transfer your dough immediately to the bowl of your stand mixer fitted with the paddle attachment. If you're using a handheld mixer, transfer it to a large mixing bowl. Let it cool for 3-5 minutes. This cooling period is critical because you're about to add room-temperature eggs. If your dough is still piping-hot, those eggs will scramble before they can emulsify properly. Set a timer and resist the urge to rush—this short rest makes all the difference. While your dough cools, beat your eggs in a separate bowl until fully combined. You want a uniform, pale yellow mixture. Set this aside near your mixer.
- This is the step that separates success from disappointing, lumpy dough. Turn your mixer to low speed. With the paddle running, begin adding your beaten eggs in 3-4 separate additions, allowing 30 seconds of mixing between each addition. This gradual approach allows each portion of egg to fully incorporate and create an emulsion with the dough before the next addition arrives. Your first addition will look jarring—the dough will appear curdled and separated, almost broken. This is completely normal. Keep the mixer running. By the second addition, you'll see it beginning to come together. By the third addition, you're watching a transformation: the dough becomes glossy, smooth, and cohesive. For your final addition, add your eggs very slowly, almost pouring a thin stream while watching the dough's texture carefully. Your goal is a shiny, thick, smooth choux pastry with a pipeable consistency—it should look like soft cookie dough or thick pudding. Stop adding beaten egg once you achieve this texture. You'll likely have a few teaspoons of beaten egg remaining, which is perfect—save this for your egg wash in the next steps. Expert's Nutritional Tip: As a dietitian, I appreciate that choux pastry derives its structure from eggs, which provide complete protein containing all nine essential amino acids. This makes choux pastry more substantive nutritionally than many other pastries, despite its delicate appearance. The protein also contributes to satiety, so you're likely to feel satisfied with a single cream puff rather than consuming multiple servings.
- Your choux pastry dough is now complete and ready to use. If you're baking immediately, transfer it to your piping bag fitted with the Wilton 1A tip. If you prefer to work ahead—and I often do—cover your dough bowl tightly and refrigerate for up to 3 days. You can even transfer the dough directly into a piping bag and refrigerate the bag itself; you'll pipe and bake from cold, which actually prevents the dough from spreading too much during baking. When you're ready to pipe, preheat your oven to 400°F (204°C). Line two baking sheets with parchment paper. Here's a small technique: lightly brush the parchment with water. This creates a humid microclimate that prevents your pastry shells from drying out or burning on the bottoms. Fill your piping bag and pipe 2-inch mounds of dough onto the prepared baking sheets, spacing them about 3 inches apart. They'll expand during baking, so this spacing prevents them from touching. After piping, use a finger moistened with water to gently smooth down any peaks on top of each mound. This creates a more even surface and prevents browning too quickly on the peaks. Brush each pastry lightly with your reserved egg wash.
- Place your baking sheets in the preheated 400°F oven. Set a timer for 20 minutes. Do not open the oven door during this time. I know the temptation is real—you want to peek and see what's happening. But opening that door releases the steam that's literally creating the puff. Have faith in the process. After 20 minutes, your pastries should be beginning to puff and turn golden-brown. Keeping the pastries in the oven, carefully reduce the temperature to 350°F (177°C) and continue baking for 10-15 minutes more until they achieve a deep, even golden-brown color. The shells should look sturdy, not pale or soft-looking. Remove the baking sheets from the oven and transfer each pastry to a cooling rack. Allow them to cool completely before filling—this takes about 30 minutes at room temperature. As they cool, the interiors set and the shells become crispy. This cooling step is just as important as the baking.
- Once completely cooled, you have two filling options. You can split the pastry shells horizontally and fill the interiors with your choice of fillings—whipped cream, pastry cream, lemon curd, fresh berries, or any combination that speaks to you. Alternatively, you can poke a small hole in the bottom or side of each shell and use your piping bag to fill them from the inside, which creates a more elegant presentation. For profiteroles, I fill the shells with pastry cream or whipped cream, then drizzle them with chocolate sauce. For cream puffs, I love a combination of pastry cream and fresh whipped cream topped with a dusting of powdered sugar or fresh berries.
Notes
FAQs
Why did my choux pastry dough look separated and curdled when I started adding eggs?
This is completely normal and not a failure! Choux pastry dough looks broken and curdled during the first egg addition because the emulsion hasn’t formed yet. As you continue mixing, the fat from the butter gradually combines with the eggs, and you’ll see the dough transform into something smooth and cohesive. This is why mixing for 30 seconds between additions is crucial—you’re giving the emulsion time to form. By the second or third egg addition, your dough will look perfect. If after all eggs are added your dough still looks grainy or separated, your dough was likely too hot when you added the eggs, which caused them to scramble. Next time, ensure your dough cools for 3-5 minutes after removing it from heat.
Can I make choux pastry without a stand mixer?
Yes, though it’s more physically demanding. Transfer your hot dough to a large mixing bowl and let it cool for 3-5 minutes. Using a sturdy wooden spoon or hand mixer, add your eggs in the same staged approach: 3-4 additions with 30 seconds of mixing between each. A handheld electric mixer makes this much easier than hand-whisking. Be persistent—the emulsion will form, though it requires more elbow grease than a stand mixer provides. Plan for 5-7 minutes of active mixing time total.
My oven tends to bake unevenly. How do I adjust?
Oven variation is genuinely common, and it’s not a reflection on your baking skill. If you notice one rack bakes hotter than another, use the middle or upper rack for choux pastry. If heat concentrates on one side of your oven, rotate your baking sheets 180 degrees halfway through the second baking phase (the 350°F phase). Some home bakers also place a second empty baking sheet on the rack below to deflect excess bottom heat. If you suspect your oven runs hot overall, reduce the initial 400°F temperature by 10-15°F. Do a test batch with the adjusted temperature and take notes—most ovens have personality quirks, and knowing yours helps you succeed consistently.
Can I use a different type of flour?
I recommend staying with all-purpose flour for reliable results. Cake flour has less gluten, which affects structure; bread flour has too much and creates toughness. If you only have cake flour available, you can substitute, but expect slightly less dramatic puffing and slightly more delicate shells. Avoid whole wheat, almond, or other specialty flours—they change the water absorption and structure in ways that require formula adjustment.
Why is my pastry cream leaking out of my finished cream puffs?
This usually means your shells weren’t baked long enough—they’re not quite set enough to hold filling. The solution is simple: increase your second baking time (at 350°F) by 2-3 minutes, until the shells are deeper golden-brown and feel very firm to the touch. Also, ensure you’re using a thick pastry cream, not a thin custard. If your cream is very liquid, it will seep through even properly baked shells. Let filled pastries sit for 10-15 minutes before serving to allow fillings to set slightly.
Seasonal Variations and Adaptations
Choux pastry is a canvas, and the seasons invite different creations:
Spring: Fill with lemon curd and fresh whipped cream, or use pastry cream with fresh strawberries. The brightness matches spring’s renewal energy.
Summer: Fill with fresh berries mixed into whipped cream, or pair with homemade sorbet. Summer’s abundance is perfect here.
Fall: Fill with cinnamon pastry cream, top with candied pecans, or pair with a salted caramel drizzle. You could also create a pumpkin spice variation by adding 1 teaspoon pumpkin pie spice to your pastry cream.
Winter: Fill with peppermint-infused whipped cream and drizzle with chocolate, or use vanilla pastry cream with chocolate Nutella for richness.
More Recipes You’ll Love
- Best Profiterole Recipe – Transform your choux shells into elegant chocolate-covered profiteroles
- Best Cream Patisserie Recipe – Master the pastry cream that makes your choux pastry shine
- Blender Sorbet Recipe – A refreshing filling option that pairs beautifully with choux shells
- these homemade cookies – Another showstopping pastry for your repertoire
You now have everything you need to create choux pastry that your family will remember. This isn’t complicated, intimidating baking—it’s entirely within your reach. The technique is learnable, the failures are fixable, and the successes are genuinely luxurious. I’ve watched skeptics become confident bakers through this recipe, and I know you will too. Start with confidence, trust the science, resist opening that oven door, and allow yourself to savor this small act of creation. You’ve got this, and I genuinely can’t wait for you to experience that moment when you pull perfectly puffed, golden-brown shells from the oven. That joy, that accomplishment, that tangible evidence of what your hands can create—that’s worth every minute of attention this recipe asks for. Savor the joy of cooking!